CSL style spoiler mounting question

daddywad

Well-Known Member
Messages
369
Reaction score
189
Location
Heathrow, UK
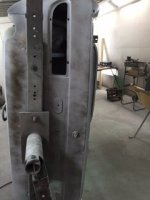
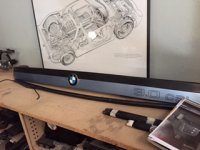
I'll get some pictures sorted from the paint shop. although we have made them based on an original Motorsport spoiler, we have left out the strip steel bracing bars inside.

this so we can see if it is better to fit the spoiler without them. if they are needed then its easy to bond them in.

there are a series of holes on the leading edge of the original to attach to the bonnet. we will be attaching the rear by bonding. these holes can be omitted

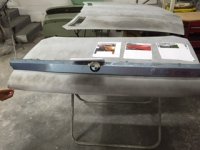
the spoiler is very light but the rubber part is the heaviest piece, I have removed all the torsion springs on my bootlid and use a prop like the bonnet.

I will get pics asap

thanks

mark
 

JFENG

Well-Known Member
Site Donor
Messages
3,182
Reaction score
1,398
Location
Bahston (Boston)
Sounds well thought out

Sounds well thought out. Is the underside completely hollow like the pics at the start of this thread or will the underside follow the contour of the boot lid so it can be easily bonded on?
 

Atavistic

Well-Known Member
Site Donor $
Messages
166
Reaction score
47
Location
Sydney, Australia
Original CSL Rear Spolier Fitting

See pictures - we have sourced an original spolier and are about to fit to a newly restored body

For a very light weight spoiler, it has a lot of mouting points!
- the light steel support brackets inside which have mounting holes which presumably can be matched carefully to new holes in the bonnet
- the last owner drilled 8 holes in the top fibre glass lid which could also be matched with newly drilled holes into the aluminium

As we dont want to start drilling the aluminium bonnet needlessly, we are considering:
- using the latest two sided tape for the top edge
- using a minimal number of holes to connect to the inner supporting brackets (maybe 4) and sikaflexing over the existing holes rather than filling or alumniumum welding
- one bright spark thought we could try and rely on just the pre-existing holes for the roundel and CSL badge (now both under the new spolier)

It sems this thread might be suggesting two pack foam and a lot of glue - has this approach (maybe combined with two sided tape) proven robust?
 
Last edited:

Atavistic

Well-Known Member
Site Donor $
Messages
166
Reaction score
47
Location
Sydney, Australia
With attachments - apologies!

This time with attachments - apologies no pciture of the innards of the spoiler - can post need week in need.
 

Attachments

  • IMG_1645.JPG
    IMG_1645.JPG
    35.5 KB · Views: 191
  • IMG_1712.JPG
    IMG_1712.JPG
    32.2 KB · Views: 204

Peter Coomaraswamy

Well-Known Member
Site Donor $$
Messages
3,787
Reaction score
896
Location
Austin, TX
Does look really nice, if possible it would be great to have a picture of the stock trunk (just a stock pic of the rear of the car) and then the same shot with the spoiler. Just sayin' it would be "nice" :)
 

daddywad

Well-Known Member
Messages
369
Reaction score
189
Location
Heathrow, UK
The original motorsport spoiler has several brackets moulded into the inside of the spoiler to enable studs to protrude through the bootlid. The front edge of the original has several recessed holes for rivets or screws. The part over the wings on the original is not blanked off.

I have copies of the original rubber edge Motorsport spoilers and the one fitted to my car has the over wing parts blanked off and the front and rear edges bonded to the bootlid
 

Atavistic

Well-Known Member
Site Donor $
Messages
166
Reaction score
47
Location
Sydney, Australia
Thanks all

Peter I will provide th epictures you request next week.

Daddywad - your description of the original is consistent - ie interior brackets for pins through the boot and rivet holes at the back so that is good news thanks. Two questions:

1. You say yours is bonded to the bootlid on the front and back (do you only bond - ie no rivets or screws of any kind?) and did you use foam to increase the bonding area?
2. Can you help with the comment "blanked-off over the wings". Mine extends over the wing by an inch or so and has a thicker countersunk stainless steel screw at each end that holds the edge of the rubber to the top of the spoiler. Can you explain blanked off a little more for me please?
 

daddywad

Well-Known Member
Messages
369
Reaction score
189
Location
Heathrow, UK
Hi we bonded both front and rear edges, no fixings. the bonded area was about a 2" strip at the leading edge and about 1/2" at the rear edge.

there is a part at both ends of the spoiler that will extend from the boot side edges over the rear wing slightly. the bit that covers the wing will allow water into the inside of the spoiler if not blanked off. the original has no blanking but some people prefer it blanked. we filled the ends with foam then laid fibre glass over to give a solid blanking
 

Peter Coomaraswamy

Well-Known Member
Site Donor $$
Messages
3,787
Reaction score
896
Location
Austin, TX
That does look great-and question

Even though my blue one is fairly non-stock, I think I still probably have too much weight on her so I would pass on putting the rear foil on. Also, there is nothing "racy" about my car. Red is a great color and I'm sure it looks quite appropriate on that. I am contemplating a front air foil and have a question; I put a small chin spoiler on my '86 911 and noticed the difference as soon as I hit 50 MPH, it really pushed the nose down and felt much more stable at highway speeds. Do the chin spoilers on e9's have a similar effect and is there any consensus on which one works best since there are multiple styles out there?

Seems like this thread is a good place to ask that question :)
 

Atavistic

Well-Known Member
Site Donor $
Messages
166
Reaction score
47
Location
Sydney, Australia
Photos as requested

Apologies car still on rotisserie, so separate pictures of rear end and boot/trunk.
 

Attachments

  • IMG_1783.JPG
    IMG_1783.JPG
    14.3 KB · Views: 146
  • IMG_1784.JPG
    IMG_1784.JPG
    17.4 KB · Views: 152
  • IMG_1785.JPG
    IMG_1785.JPG
    33.8 KB · Views: 149
  • IMG_1786.JPG
    IMG_1786.JPG
    43 KB · Views: 145
Top