You are using an out of date browser. It may not display this or other websites correctly.
You should upgrade or use an alternative browser.
You should upgrade or use an alternative browser.
cylinder head and cam ID
- Thread starter Kizilsakal
- Start date
3 different intake port shapes over the years
Match the stub manifold to what ever head you use
Match the stub manifold to what ever head you use
restart
Well-Known Member
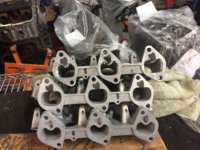
View attachment 38591 Pic for you.
Thanks, Don
Didn’t want to make you repeat yourself...
I guess it’s an optical illusion. The middle intake mani looks like the
heart shaped area above the rectanglular port looks filled with some black material.
restart
Well-Known Member
So many slight variations
I needed the green one on the right weirdly enough I have seven of those
I don't like buying new parts when I know that I have the correct ones here and I somewhere. Sometimes it just takes a major cleanup
View attachment 39086 OK thanks for your patience I found some in the bottom of the box
So many slight variations
I needed the green one on the right weirdly enough I have seven of those
I don't like buying new parts when I know that I have the correct ones here and I somewhere. Sometimes it just takes a major cleanup
Sorry for the delay- I do a lot of community service these days.
Today was breakfast for 140
View attachment 39086 OK thanks for your patience I found some in the bottom of the box
So many slight variations
I needed the green one on the right weirdly enough I have seven of those
I don't like buying new parts when I know that I have the correct ones here and I somewhere. Sometimes it just takes a major cleanup
I’m just starting to dig into this myself. I’m doing bench work on my fuel and linkage setup for my carbs. The Korman intake manifold is a lot like gasket number 2 in the image above. I have a little bit of a mismatch on the bottom and a big unnecessary bump up top. That is on my ‘81 head. The head on my project car is newer.
You'll want to make sure the bottoms of that intake doesnt have that mismatch, mark it with a marks-a-lot and grind it flush with a dremel. Your idle qulity and low end accel will thank you.
I’m happy to do it but I presume that I need to have the head off. If not I’m a go. I can jam a rag in front of the intake valves but it seems kind of risky.
This is on my bench with a different head.
I did mine head on with an oily rag stuffed in front of the valves. Cleaned and vacuumed after to make sure no nasties got in there.
Actually you need the middle one. The green one is B35.View attachment 39086 OK thanks for your patience I found some in the bottom of the box
So many slight variations
I needed the green one on the right weirdly enough I have seven of those
restart
Well-Known Member
I think the message is to match the intake manifold to the head: aluminum to aluminum. Which is to say, you may need different manifolds that match your head geometry. Once the metal aligns, use the matching gaskets accordingly. This is the baseline. Grinding a head slightly to eliminate any small edges will improve this (as discussed my Markos and Stevehose above) - but it will generally not be enough to adapt one manifold/head style to another. That is my takeaway from this thread (and also experiential knowledge from other builds).
If the manifold and head you want to use together are two different shapes, then you have more work to do than trying to match a gasket to either of them.The middle one fits the manifold well.
The green one fits the head well.
You are saying I should use the one that matches the manifold?
View attachment 39144
Your first job is to either get a manifold that is meant to work with the head port you are using, or modifying one of the two ports to match the other(port matching).
If you are looking at it from a performance standpoint, you can use a <=B34 manifold on a B35 head (smaller flowing into bigger) before using a B35 manifold on a <=B34 head (larger flowing into smaller). Ultimately just plan to choose the setup you want, then port match the two. If you want to keep the L-Jet style manifolds and match them to a B35 head, you can open up the manifold ports to meet it, but the sides of the L-jet manifold mating surface will be pretty thin, even worse if you do any porting on the b35 side.
My suggestion/recipe:
JB Weld the negative areas of the L-jet manifold mating surface. Center a B35 gasket on each port of the manifold and scribe/paint/sharpie the material that needs to be removed to match the opening of the gasket. Using a die grinder or whatever method you have available, do the work. Then use the green gaskets.
restart
Well-Known Member
Thanks again all for helping me out here while I totally derail this thread.
This started with....
“it’s so much easier to remove the intake to get to starter” job.
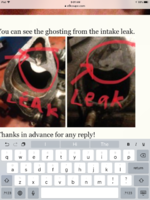
When I removed the rear intake I noticed the engine had the wrong gaskets causing a minuscule intake leak.

I only had five of the six new gaskets in stock. So I started looking around for in-house solution.
That was when I noticed Don’s picture of the stacked intakes...
At first glance to me,
Sfdons photo of the stacked intake showed a process from stock to filled to ported....

So @BuzzBomb, your mention of jbweld encouraged me to respond again...
My ‘logic’ was Filling that relief would allow me to use gaskets I had in stock to eliminate the ‘Factory’ leak.
Keep in mind this car a warranty bmw crate engine running great and installed in around 1984.
Running fine, great in fact, efficient, strong quiet, starts great, responsiveness to carb adjustments...And driven around 30k miles in the circa 14 years I have owned it.
So in this case I am taking the not broken too much and don’t fix it that much path...
Put the new starter in,
new hoses,
use intake gaskets that don’t create an new turbulence,
delete egr, and
adjust accelerator cable,
tune and drive for 10 more years.
Completely agree on best practice to ‘port and polish’....
And thought that was what was happening in dons pic....edited below...
ok, thanks for all, and apologies for not starting my own thread on this.
Whew!
Best wishes to all in the NEW Year!
Al
This started with....
“it’s so much easier to remove the intake to get to starter” job.
When I removed the rear intake I noticed the engine had the wrong gaskets causing a minuscule intake leak.
I only had five of the six new gaskets in stock. So I started looking around for in-house solution.
That was when I noticed Don’s picture of the stacked intakes...
At first glance to me,
Sfdons photo of the stacked intake showed a process from stock to filled to ported....
So @BuzzBomb, your mention of jbweld encouraged me to respond again...
My ‘logic’ was Filling that relief would allow me to use gaskets I had in stock to eliminate the ‘Factory’ leak.
Keep in mind this car a warranty bmw crate engine running great and installed in around 1984.
Running fine, great in fact, efficient, strong quiet, starts great, responsiveness to carb adjustments...And driven around 30k miles in the circa 14 years I have owned it.
So in this case I am taking the not broken too much and don’t fix it that much path...
Put the new starter in,
new hoses,
use intake gaskets that don’t create an new turbulence,
delete egr, and
adjust accelerator cable,
tune and drive for 10 more years.
Completely agree on best practice to ‘port and polish’....
And thought that was what was happening in dons pic....edited below...
ok, thanks for all, and apologies for not starting my own thread on this.
Whew!
Best wishes to all in the NEW Year!
Al
restart
Well-Known Member
Don,Sorry for the delay- I do a lot of community service these days.
Today was breakfast for 140
Believe me, I am amazed you take the time to do so much. I know myself, getting involved in even a single conversation can eat up hours of shop time.
So, absolutely no need for apologies on my part and always grateful for your posts.
Even when you are sometimes as succinct as bluemax2!


