For those who have ordered a decal-set, thanks again and I hope to have the sets in the mail by Monday.
Please feel free to add your pictures and installation tips to this thread. I have made a brief illustrated instruction-set to get things started....my apologies for the grainy photos, but I believe you should still be able to follow along.
Important: You only have one-shot to install the decals, so please get a good nights sleep and be ready to concentrate.
Step 1.
Get all of your materials ready. (you may use whatever you wish--this list is what I used)
1)Rubbing Alcohol ( to prep surface)
2)Ronan Aquethane ( As a Clear coat) (use acrylic or other)
3)Exacto blade (any cutting tool works)
3)Copic Marker (as a brush, you may use any brush to substitute)
4)Lead pencil (to apply decals--take caution when applying pressure)
5)Scotch Tape (remove and apply decal using tape)

Preface:
The center of each button may be detached to install or erase decals. To do so, place a long, thin blunt rod through the back-side and gently pop-up the metal center. It simply snaps back into place.

Note:
You may attach decals with buttons on or off the car. For reference, It is difficult to obtain perfect vertical orientation if button is removed and has to be re-installed. ( I hope that makes sense)
Step 2.
Clean and prep your surface using any solvent and a dry cloth.

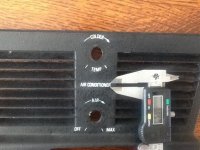
Step 3.
Cut and remove decal with scotch tape. Make sure to mark 12&6 on the button first. Align marks and secure decal to button surface. (do not install yet)

Step 4.
Make sure you are happy with the location & alignment of the decal. Now you are ready to apply. Using the tip of lead pencil, apply even pressure and work from top-down, left-right. Now go in the reverse direction, the backing paper is ready to be removed.

Note: Do not apply pressure to the alignment marks, they will appear on your button if you do so.
Step 5.
The decal has been attached firmly to your button. To ensure proper adhesion, place a small piece of paper on top of the decal and re-apply pressure as in Step 4.

Step 6. (optional)
It is recommended to protect your decal by applying a thin layer of clear-coat. Any type or brand will work, but choose a product that will not dissolve the decal ink. It is also advised to apply with a brush, but choose any method you are comfortable with.

Step 7.
Reinstall button if removed from car.
(no picture)
Note: If you would like to remove the decals, try using a solvent or for better results find a decal eraser wheel.
Congratulations! You have successfully added beautiful button graphics to your BMW! Its time to take the first drive and marvel at your accomplishment....
MF
Please feel free to add your pictures and installation tips to this thread. I have made a brief illustrated instruction-set to get things started....my apologies for the grainy photos, but I believe you should still be able to follow along.
Important: You only have one-shot to install the decals, so please get a good nights sleep and be ready to concentrate.
Step 1.
Get all of your materials ready. (you may use whatever you wish--this list is what I used)
1)Rubbing Alcohol ( to prep surface)
2)Ronan Aquethane ( As a Clear coat) (use acrylic or other)
3)Exacto blade (any cutting tool works)
3)Copic Marker (as a brush, you may use any brush to substitute)
4)Lead pencil (to apply decals--take caution when applying pressure)
5)Scotch Tape (remove and apply decal using tape)
Preface:
The center of each button may be detached to install or erase decals. To do so, place a long, thin blunt rod through the back-side and gently pop-up the metal center. It simply snaps back into place.
Note:
You may attach decals with buttons on or off the car. For reference, It is difficult to obtain perfect vertical orientation if button is removed and has to be re-installed. ( I hope that makes sense)
Step 2.
Clean and prep your surface using any solvent and a dry cloth.
Step 3.
Cut and remove decal with scotch tape. Make sure to mark 12&6 on the button first. Align marks and secure decal to button surface. (do not install yet)
Step 4.
Make sure you are happy with the location & alignment of the decal. Now you are ready to apply. Using the tip of lead pencil, apply even pressure and work from top-down, left-right. Now go in the reverse direction, the backing paper is ready to be removed.
Note: Do not apply pressure to the alignment marks, they will appear on your button if you do so.
Step 5.
The decal has been attached firmly to your button. To ensure proper adhesion, place a small piece of paper on top of the decal and re-apply pressure as in Step 4.
Step 6. (optional)
It is recommended to protect your decal by applying a thin layer of clear-coat. Any type or brand will work, but choose a product that will not dissolve the decal ink. It is also advised to apply with a brush, but choose any method you are comfortable with.
Step 7.
Reinstall button if removed from car.
(no picture)
Note: If you would like to remove the decals, try using a solvent or for better results find a decal eraser wheel.
Congratulations! You have successfully added beautiful button graphics to your BMW! Its time to take the first drive and marvel at your accomplishment....
MF
Last edited:
")