Hi guys , I took the dashboard out of my car yesterday , I took some photos of it tonight to help anyone else planning on doing the same.
Remove the glove box and the leather under dash panel below the steering wheel and the center console and the heater control panel and then lower the steering column ( it is held on with 4 bolts ) firstly to allow access to the rear of the dashboard from below.
 remove the padded gauge pod cover , it is held on with 2 M6 nuts which have to be accessed from behind the dashboard.


 Next you need to remove the black padded panel nearest to the windscreen ( I had my windscreen out of the car ! )
Be very very careful with your de-mister vent ducts - they are very brittle !!!
The dash pad is held down by 4 spring clips. They “let go “ when you pull upwards on the dash pad.


 Next you need to remove the gauge cluster complete.
It is held in by 2 M6 nuts they go through both the timber dashboard and the metal car bodywork support behind it.
Remove the 2 nuts and lift the guage pod upwards a little and out towards you , just enough to get your hand in behind it to disconnect the speedo cable and the trip meter rest cable , there are 2 multiplug wiring connectors which need to be disconnected, the cluster is now free .


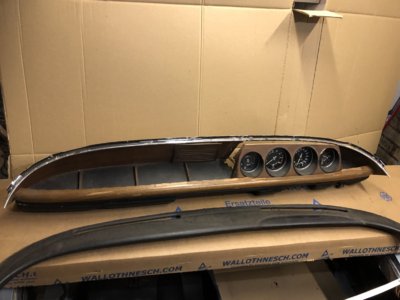
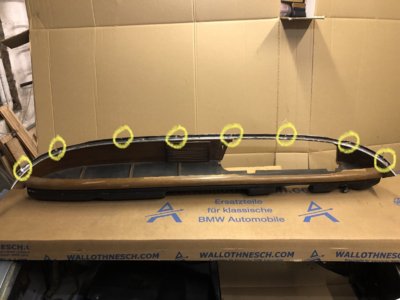
 Then the next thing to remove is the chrome strip along the top of the wood . It has screws going into both the car bodywork and the timber dashboard below it. Remove all of the screws.

 the next part to remove is the aluminium and rubber strip at the front of the dashboard. I pryed mine out from the dashboard carefully trying not to bend it too much ( it is aluminium and it bends easily) I thought it was attached with clips , it turned out they were wood screws ( they pulled out of the wood anyway )
Once that piece is removed, you will then see more screws behind it holding the Lower black piece of the dashboard to the wood , remove all screws.
The speaker cover just pulls out carefully as it is held on with 4 spring dowels
Be careful, it can be brittle.


Remove the glove box and the leather under dash panel below the steering wheel and the center console and the heater control panel and then lower the steering column ( it is held on with 4 bolts ) firstly to allow access to the rear of the dashboard from below.
Be very very careful with your de-mister vent ducts - they are very brittle !!!
The dash pad is held down by 4 spring clips. They “let go “ when you pull upwards on the dash pad.
It is held in by 2 M6 nuts they go through both the timber dashboard and the metal car bodywork support behind it.
Remove the 2 nuts and lift the guage pod upwards a little and out towards you , just enough to get your hand in behind it to disconnect the speedo cable and the trip meter rest cable , there are 2 multiplug wiring connectors which need to be disconnected, the cluster is now free .
Once that piece is removed, you will then see more screws behind it holding the Lower black piece of the dashboard to the wood , remove all screws.
The speaker cover just pulls out carefully as it is held on with 4 spring dowels
Be careful, it can be brittle.
Attachments
Last edited: