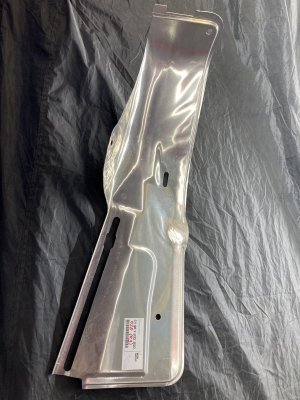
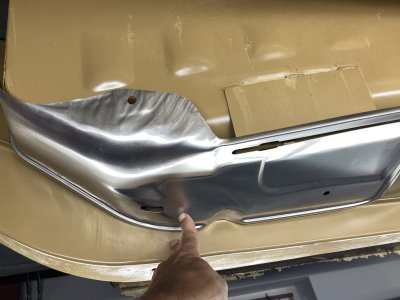
DIY - Heat resistance plate - Exhaust pipe front

Hello e9 Freunden,

I would like to make a DIY for the heat insulation of the exhaust:

The heat resistance plate of the BMW e28 / e24 / e12 serie are also useful for our e9.

It will keep the heat radiation away from your passenger.

The part number is 51 48 1 832 850
Still available by BMW.

See attached pictures. Not yet finished, but very useful piece of heat resistance aluminium.
 

Attachments

  • IMG_0506.jpeg
    IMG_0506.jpeg
    312.7 KB · Views: 62
  • IMG_0507.jpeg
    IMG_0507.jpeg
    219 KB · Views: 68

Additional information
 
I installed mine using the transmission bracket, and then cut some unused bushings and wedged them in the front and back to keep the ends of the heat shield from flapping and hitting the underside of the car.


20150708_164757.jpg
20150708_164747.jpg


20150708_164810.jpg
 
i recomend you do proper engineering and use correct fixing points, the plate has the holes for it, you can use welded studs or rivets, better if you make it 10mm away from body so air can pass in between and help cooling, my 0,5€

you can find the deatils in this thread...


and here the pics:


rear as stated, using the gearbox frame:

1689426247814.png


mediaum and front using welded studs; plus a 10mm distancer between the plate and the body; this leaves an air layer for cooling the plate and limiting the radiation

1689426289767.png


good engineering in this one
 
Last edited:
  • Like
Reactions: LEO
i do have some pics indeed...

I installed it with an additional mouting point located 137x70 mm from the sides. I believe i also snipped a bit off & reshaped (see the hammer marks) the edge where it turns up into the engine compartment to clear the frame rails, though i see others managed to do without:
20161021_104524.jpg
20161021_104544.jpg


Then I installed 2 weld nuts, to be able to fix the part with at least 3 points:
first weldnut installed and the 2nd weldnut drawn out with pencil marks. 3rd point is the already existing transmission support bolt.
20161103_213326.jpg
20161103_223136.jpg


20161103_220250.jpg


But everyone's solution is interesting. Even the ones that are perhaps less 'engineery' ; the one from @Ohmess benefits from being quicker to install. My solutions take the longest time to build :) And I'm far away from driving as a result of my quest for engineering perfection!

Building on the heat containment theme:
I also added this part, stomped out of an E60/E61 heatshield; it has a fully contoured shape with an airgap ~10mm offset of the body + driveline
20170421_232831.jpg


trimmed and held in place with magnets.jpg


some suggestions if you want to build it yourself:
20200706_230250.jpg


I started out by making the main form with simple wooden jig:
wooden jig front end.jpg
 
i do have some pics indeed...

I installed it with an additional mouting point located 137x70 mm from the sides. I believe i also snipped a bit off & reshaped (see the hammer marks) the edge where it turns up into the engine compartment to clear the frame rails, though i see others managed to do without:
View attachment 189200 View attachment 189201

Then I installed 2 weld nuts, to be able to fix the part with at least 3 points:
first weldnut installed and the 2nd weldnut drawn out with pencil marks. 3rd point is the already existing transmission support bolt.
View attachment 189203View attachment 189207

View attachment 189206

But everyone's solution is interesting. Even the ones that are perhaps less 'engineery' ; the one from @Ohmess benefits from being quicker to install. My solutions take the longest time to build :) And I'm far away from driving as a result of my quest for engineering perfection!

Building on the heat containment theme:
I also added this part, stomped out of an E60/E61 heatshield; it has a fully contoured shape with an airgap ~10mm offset of the body + driveline
View attachment 189195

View attachment 189209

some suggestions if you want to build it yourself:
View attachment 189196

I started out by making the main form with simple wooden jig:
View attachment 189210

love it,
 
love the idea. i remember somebody posting this idea 2 or 3 years ago but don't remember seeing the result. i bought the e28 (double metal) piece, wondering if i could get it to fit into the coupe tunnel.
 
Back
Top