DIY: Open up & clean the inside of your gauges

Gransin

Well-Known Member
Site Donor
Messages
1,529
Reaction score
1,273
Location
Vasa, Finland
I don't know if this is already documented somewhere on this forum, couldn't find anything so I thought I could share some pictures of the process. I was a bit afraid when I started but it turned out to be quite easy and not extremely time consuming, approx an hour/gauge if you already have them out of the car and cluster.

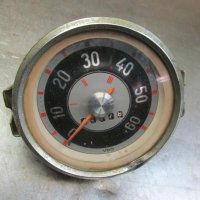
It started with my fuel/temp-gauge looking really bad. There was a lot of spots on the inside of the glass:

1.jpg


I then found out that Benz-guys who have similar gauges simply took a screwdriver to the back of the chrome-bezel and started turning the screwdriver clockwise or counter-clockwise to slowly open up the chrome bezel and allow it to go over the edge of the gauge.

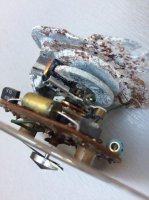
This is what the back of the chrome bezel look like:

2.jpg


So I started turning a small screwdriver everywhere around the gauge, slowly applying more and more pressure against the bezel.

3.jpg


4.jpg


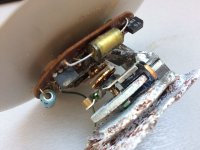
In a while it will look something like this all the way around:

5.jpg


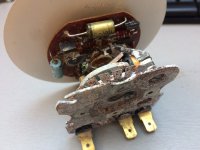
Then I took a slightly bigger screwdriver and continued, the bezel really wants to spring back, so use the force needed, but carefully. Now you can start to see the edge of the gauge:

6.jpg


Continue until it's possible to remove the chrome bezel "straight" out from the gauge, do not try to remove it if it still catches on to the edge of the gauge somewhere, because that will destroy/warp/twist the bezel.

After that you will have the glass, chrome bezel and the black ring separated from your gauge:

7.jpg


8.jpg

9.jpg


Then I took a nipper and carefully straightened out the edge of the chrome bezel:

10.jpg


Then I separated the glass, bezel and the black ring from each other:

11.jpg


And then I cleaned everything really good and started putting it back together. I used the same screwdriver to slowly press the edge of the bezel back over the edge of the gauge, takes a while but needs to be done properly to not allow new dust/crap into the gauge.
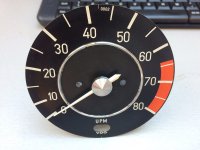
12.jpg


And the result:

13.jpg

14.jpg


The only downside about cleaning this gauge was that my speedometer and rpm gauge (that looked good before in comparison to this one) looked all dull and dusty now compared side to side.
So I went ahead and had them cleaned too :) I have not done anything to the clock yet, as it does not work (surprise), but will clean it as soon as I get it working.

The result of all the cleaning, they look so much better than I ever could have imagined before:

15.jpg

16.jpg


Cheers,
 
Last edited:

Gazz

Well-Known Member
Site Donor
Messages
945
Reaction score
620
Location
Gold Coast Australia
Well done, I admire your perseverance. I took the back off mine ( fuel gauge ), removed the internals, made up an angled wire to reach the outer edges of the glass, wrapped the wire end in cloth, sprayed a little window magic on it, worked it all the way around then wiped the glass with clean dry cloth. Came up really well. The fuel gauge was the only one I needed to do fortunately.

Got a real 70s thing happening with the furniture, very cool.
 

Ohmess

I wanna DRIVE!
Site Donor $
Messages
4,890
Reaction score
2,714
Location
Aiken, SC
That is very cool.

Anyone know of a source for a replacement speedo ring? Someone has been chewing on mine.
 

rsporsche

Moderator
Site Donor $$
Messages
10,685
Reaction score
3,714
Location
Atlanta, GA
great explanation Robert, THANKS !! and this made your gauges look perfect

question / thought ... i realize that the thought is to not have to go back in unless its absolutely necessary, but being that these gauges are now 40 to 45 years old, the likelihood increases as we go along. the question is, should you only lock the bezel down at the quarter points, and use a sealant to keep dust out of the rest? then it would be much easier to go in later ... i figure there are only so many times that you can reopen / close these gauges before the bezel breaks.
 

Gransin

Well-Known Member
Site Donor
Messages
1,529
Reaction score
1,273
Location
Vasa, Finland
Question / thought ... i realize that the thought is to not have to go back in unless its absolutely necessary, but being that these gauges are now 40 to 45 years old, the likelihood increases as we go along. the question is, should you only lock the bezel down at the quarter points, and use a sealant to keep dust out of the rest? then it would be much easier to go in later ... i figure there are only so many times that you can reopen / close these gauges before the bezel breaks.

That is actually not a bad idea, would definitely be alot easier to go back in a second time that way, and probably be better sealed off. But by the feel I got from it (could of course be wrong) it felt like the bezel would stand
reopening/closing again several times before it would begin to crack/break.

The next time, hopefully in a very distant future, I'll use sealant instead.

Oh, great, now I know what I'm doing this weekend :)

Glad to inspire someone! :)
 

m5bb

Well-Known Member
Site Donor $
Messages
2,082
Reaction score
911
Location
Peachtree Corners, GA
Thanks Robert for taking the time to show how this is done.

I did this exact process last year to my gauges when i had them out.

Didn't use sealant but an excellent idea.

Gary
 

lloyd

Well-Known Member
Messages
444
Reaction score
94
great explanation Robert, THANKS !! and this made your gauges look perfect

question / thought ... i realize that the thought is to not have to go back in unless its absolutely necessary, but being that these gauges are now 40 to 45 years old, the likelihood increases as we go along. the question is, should you only lock the bezel down at the quarter points, and use a sealant to keep dust out of the rest? then it would be much easier to go in later ... i figure there are only so many times that you can reopen / close these gauges before the bezel breaks.

I once removed a gauge and found the bezel came off easily because of preexisting kerf cuts, a couple of which were easy to bend like a "tang." At the time, the cuts almost seemed original. Although I thought about repairing them with solder, they seemed to bend tightly enough not to worry about it. As to use of a sealant, I have a little trepidation without knowing the nature of the sealant. RTV and various silicone elastomers, for example, have a tendency to "outgas" and this might lead to an unwanted film on the inside of the gauge glass.

Something I wonder after reviewing the accompanying photos, could some of the bottle cap metal pinching have been avoided with the careful use of a heat gun? How does NH Speedometer remove similar bezels? With a de-crimping device or is the bezel simply replaced with another reformed/crimped piece of metal?
 

Gransin

Well-Known Member
Site Donor
Messages
1,529
Reaction score
1,273
Location
Vasa, Finland
RTV and various silicone elastomers, for example, have a tendency to "outgas" and this might lead to an unwanted film on the inside of the gauge glass.

Yep, using just any sealant could be a potential failure. There are "low-outgassing" sealants available but more research would be needed before actually using any sealant.

Something I wonder after reviewing the accompanying photos, could some of the bottle cap metal pinching have been avoided with the careful use of a heat gun?

I don't think so, the bezel was pretty tough/hard and I can't see that the small amout of heat you would dare to use upon it would be of any help.
But, I could be wrong as I didn't try that.
 

m5bb

Well-Known Member
Site Donor $
Messages
2,082
Reaction score
911
Location
Peachtree Corners, GA
Yep, using just any sealant could be a potential failure. There are "low-outgassing" sealants available but more research would be needed before actually using any sealant.


I don't think so, the bezel was pretty tough/hard and I can't see that the small amout of heat you would dare to use upon it would be of any help.
But, I could be wrong as I didn't try that.


Yes, metal is pretty strong and requires some force to move/open to remove bezel.
Heat would not help and may damage the gauge.

Gary
 

mulberryworks

Mr. Fixity
Site Donor
Messages
1,245
Reaction score
614
Location
Jacksonville FL
You're holding it wrong

Something I wonder after reviewing the accompanying photos, could some of the bottle cap metal pinching have been avoided with the careful use of a heat gun? How does NH Speedometer remove similar bezels? With a de-crimping device or is the bezel simply replaced with another reformed/crimped piece of metal?

I think the answer here is to not twist the screwdriver when prying outwards.
I'll have to do my fuel gauge as it's quite cloudy so I'll get to confirm my theory. I suspect that a rounded pry tool, with a raised foot on the backside would allow bending of the bezel with no sharp points.

I'll make one up and give it a try on an unknown VDO speedo I bought just for grins off ebay that has a dented chrome ring.

Ian

1970 2800CS 'Ottokar'
 

Attachments

  • s-l1600 (3).jpg
    s-l1600 (3).jpg
    89.6 KB · Views: 155
  • s-l1600.jpg
    s-l1600.jpg
    84.9 KB · Views: 149

rsporsche

Moderator
Site Donor $$
Messages
10,685
Reaction score
3,714
Location
Atlanta, GA
I think the answer here is to not twist the screwdriver when prying outwards.
I'll have to do my fuel gauge as it's quite cloudy so I'll get to confirm my theory. I suspect that a rounded pry tool, with a raised foot on the backside would allow bending of the bezel with no sharp points.

I'll make one up and give it a try on an unknown VDO speedo I bought just for grins off ebay that has a dented chrome ring.

Ian

1970 2800CS 'Ottokar'
you almost need a small version of a paint can opener - a little lip on the tip of the blade to use it as a lever
 

Gazz

Well-Known Member
Site Donor
Messages
945
Reaction score
620
Location
Gold Coast Australia
I'll have to do my fuel gauge as it's quite cloudy so I'll get to confirm my theory. I suspect that a rounded pry tool, with a raised foot on the backside would allow bending of the bezel with no sharp points.

I'll make one up and give it a try on an unknown VDO speedo I bought just for grins off ebay that has a dented chrome ring.

Ian

1970 2800CS 'Ottokar'

You really don't need to remove the bezel and glass from the front for the fuel gauge as you can get in from the back. See my earlier comment
 

radosc

Active Member
Messages
61
Reaction score
0
Location
Warsaw/Poland
Taking off bezel is harder than it looks. It's a piece of metal with a good "springy" action and it takes a long time to take off. I will definitely look into attaching it with sealant and will not bend it back in as it has micro crack there (my manual skills are not the best). But as a warning to you guys take a look at what's lurking at the back of my rev counter...
 

Attachments

  • tacho4.jpg
    tacho4.jpg
    59.8 KB · Views: 169
  • tacho3.jpg
    tacho3.jpg
    87.5 KB · Views: 204
  • tacho2.jpg
    tacho2.jpg
    82.6 KB · Views: 178
  • tacho1.jpg
    tacho1.jpg
    77.7 KB · Views: 168
Top