DIYers: Need to build a bench mounted motor driven steering wheel sanding jig

Bmachine

Well-Known Member
Site Donor $
Site Donor $$
Messages
3,681
Reaction score
1,978
Location
Northern California coast
Background: I want to build a wood rimmed steering wheel. But I want to build it using the stock csi sport wheel frame and with the same wood I have on my dashboard (etimoe).
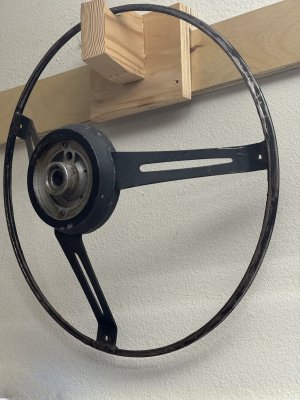
IMG_4897.jpeg

I want to do it so the wood grain follows the circle of the wheel like a proper Nardi would. I thought about steam bending but there are several issues with that, including how do you join the two ends cleanly in a way that the whole thing will not split open at some point.

So, instead of starting with solid wood, I would like to use bent lamination, ie wrapping a continuous strip of thin veneer of the same etimoe I used on my dashboard around the steel frame to build the outer thickness. Maybe 5mm or so thick.
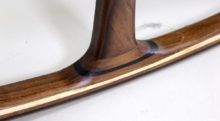

Once that is done, using the same technique, I will build inner layers. Then at the end I would sand it all down to the proper rim thickness and shape. If this works as planned (and I realize it's a big "if"), it should make a nice match between the steering wheel and the rest of the car woodwork.

The tool setup I need: I have a steering wheel column to which I can secure the wheel (on the left in this photo)
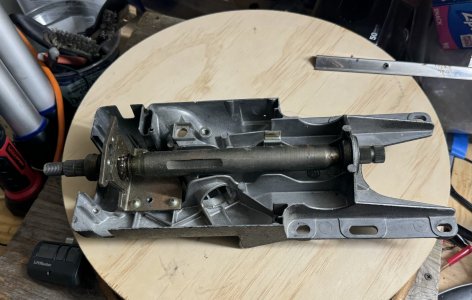
IMG_4896.jpeg

I would like to setup a small electric motor that will spin this column (by grabbing the spindle on the right in this photo) which will then spin the wheel so it can be sanded. Much like you would do in wood turning. I imagine attaching the whole contraption to a base, securing the motor next to the column and using a belt of some sort to grab the spindle on the right. This motor would need to have variable speed for ideal control.

There are plenty of motors available on eBay but they are generally too powerful and fairly expensive ($150+). And then there is the issue of finding a belt that can fit on that motor on one side and that can grab the grooved spindle on the other.

I know several here have built similarly crazy contraptions ... Any thoughts on how to bring this to reality?

Thank you very much
 
Last edited:
Some good ideas visible there. Looks like a record player turntable might be a good garage sale start (33,45,78 rpm choices)
Motor from roadside washing machine or dryer donor? A PWM controller works wonders for around $10; why not direct drive?
If you don't want to cut up your steering column I'll be happy to donate a splined stub of 2002 shaft you can attach.
Setscrew coupler for a marginal safety aura. Or use a suitably sized electric fan so you have a safety cage to work in - sort of.

Never would have thought they spun-dipped the rims in finish still.
 
i have seen curved wood done with thin strips laminated together and bent around a form. the final joint is usually done on an angle to help hide the joint.
 
i have seen curved wood done with thin strips laminated together and bent around a form. the final joint is usually done on an angle to help hide the joint.
My idea is to use one very long strip that is coiled over itself. This way there is no joint to worry about, except for the end of the long strip. Looking at the Nardi video, I wonder if that might be what they are also doing
 
Take care that you will may experience a wobble if you choose a setup where the wheel spins. A wheel isn't weight balanced like a fan; the bottom half is heaver vs the top part.
As the steering column has a double bearing about a foot apart, mounting the wheel on it, and screwing the cooumn to something sturdy will likely be strong enough, but still you may, depending on the RPM of the wheel, get a wobble or vibration at higher speeds.

I think i see why a setup with a spinning shaped sanding drum or shaped router is often used.
Good point! Will need to keep that in mind
 
Good idea, but don't think those steering bearings are intended for continuous running at any rpm you might want for sanding. Turntable and router for heavy removal sounds like a plan. Now if you had an old motor driven wheel balancer... ;)
Got rid of the e21 or you could borrow it, mount the wheel and drive around at 55mph with sanding gloves on - smooth in no time.
 
I made a hatch for my antique boat by bending thin 1/8" teak pieces around a form. I stemed the pieces and wrapped three of then one around the other. I thn un clamped them and sprung them into an external form (in this case the hatch bezel, and laminated themtogether to make what ened up loking like a rather large embridery hoop.
This process is recoded in my blog here: Hatch

The key with the Nardi wheel is that you will need ot first cut the blank in half long ways, and then cut a rabbet in the inside of the two halves to accept the wheel spoke frame. And that's just to get a square section wheel.

Rounding the hoop will be a trick.

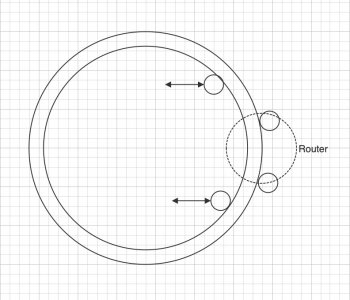
I think the best way to go about this is to laminate the pieces as I did for the hatch, and then make a router table arrangement that holds the hoops flat and allows you to rotate them manually around the router bit.

Basically get some small roller wheels and mount them flat on the router table. Two on one side of the router center and two on the other. Make them adjustable horizontally so you can tune the hoop rotation to the position of the router center (which will, obviously, be at the enndge of the hoop. You can use this setup with a small saw balde in the router to split the hoop as well (as shown in the video). As I recal the original Nardi wheel has the aluminum spoke hoop clear through the wood to the outside (mine does anyway). If you want the outside tobe wood, then you need to cut a rabbet in each side of the inside each half of the hoop. Do that onthe same router table setup, just using a flush cut bit. I'd also use a 45 degree bevel bit and lop off the outer corners of the hoop to get a head start on the rounding process.

As you can see in the hatch blog, you can also build up the hoop blank using laminated sections (I think this is how Nardi does it). Th do that you willneed to make a routersetup that mounts the router to a swing arm,and then cut the outside and inside of the lamination. After that, then the process is the same.

Rounding the hoop with the spokes is probably pretty difficult to do well. Clearly you will need a hub to spin the wheel, and some sharp tools and patience!!

Think outside the box. Here is how I made a mast for my boat using a router and a home built jig.
Mast
 

Attachments

  • WHeel.jpg
    WHeel.jpg
    132.2 KB · Views: 20
Some good ideas visible there. Looks like a record player turntable might be a good garage sale start (33,45,78 rpm choices)
Motor from roadside washing machine or dryer donor? A PWM controller works wonders for around $10; why not direct drive?
If you don't want to cut up your steering column I'll be happy to donate a splined stub of 2002 shaft you can attach.
Setscrew coupler for a marginal safety aura. Or use a suitably sized electric fan so you have a safety cage to work in - sort of.

Never would have thought they spun-dipped the rims in finish still.
Great and informative video. Not sure a record turntable has enough torque to spin the hoop for sanding or contouring.
 
I have re-read this post and wonder about encasing the CSI sport wheel rim. It doesn't look like it is made to be seen. So, that definitely means some rabbet work to create a channel that the rim sits in between the two halves of the wood. You will then need to hand cut reliefs for the spokes to exit the wood in the inside.

I think to do this well, and not have the result look amateurish, you will want to shape the wood round before attaching it to the rim and hub. That way the round cross-section will be uniform. and fine tuning can be done with a file and sandpaper. i think you could also flute the back side of the wheel after all that was done, probably using a sanding drum and a Dremel tool.

Another alternative to hand cutting spoke reliefs would be to leave a gap on the inside and then put in an inlay, or possibly do that on the inside and outside. Maybe some nice dark macassar or wenge... For that you would cut a shallow rabbet to locate the rim on the hoop, and then glue it together, clean out the gap, and then inlay it (West system is your friend!).

Using the DIY router table I sketched above it should be possible to mechanically round the hoop to about 90-95%. I'd start by rectifying the hoop to be sure it is round and uniform after the lamination. Do this by hand first, so the thing sits flat on the table, and turns smoothly in the rollers. Then fine tune it by shaving the high spots off with a flush-cut router bit. Get it to a square section about 1/16" larger than the finish diameter. Then cut the corners off using a 45 degree bit, again (I am sure you already know this) a bit at a time. Be sure not to cut too much off the corners.

For a rough diameter of D, you would cut into the edge at 45 degrees as follows.

The depth from the corner to the 45 degree flat is Z=1/2*(sqrt(2*D^2)-D), this translates to a lateral cut in from the edge (for example looking from the top of X=sqrt(2*X^2). If you run these relations using, say a 1 inch rough blank diameter, your get Z=.207,and X=.292.
Here is a diagram for you geometry nerds.
hoop.jpg


As you can see this gets you a LONG way toward a round section hoop. You can either use a file to cut the remaining points down, or use a 1" bullnose bit in the router. I did this on some long teak grab rails on my boat using just a table saw, and then hand finished them with a plane and sandpaper (long and straight is much easier than a hoop though. I do have an old Stanley 113 plane with an adjustable curved base you are welcome to try out, but sandpaper is probably safer...

Once you have the rounded hoop, then cut the hoop long ways using the table and a saw bit in the router, and then cut the above mentioned rabbets, and start assembly!

I'll be following this one closely. Great project!
 
Unrestored_07.JPG
Unrestored_04.JPG
Unrestored_06.JPG
Veneering_01.JPG
Veneering_02.JPG
Veneering_03.JPG
Finishing_02.jpg
Restored.jpg
I re-veneered a junky 420mm CS wood coupe wheel & modified it for my 1973 2002Tii.

After I removed the original flaking by scraping & sanding.

I made a painters tape templates 2 for the front 3 for the back. Peeled the templates off & laid as flat as possible on the Rockler Adhesive back Mahogany Veneer. Fist I moistened the veneer then I used fiberglass reinforced tape to wrap it around the wheel. Where the front pieces wrapped over the 3 back pieces I trimmed them with a a new razor knife blade. Only use only enough pressure to cut the excess veneer. I was able to maintain the rear finger detents of the original.

I sanded with 220 only enough to smooth out the raised grain, the veneer is at most 1/16th or 2mm thick.
I did 5 thin coats of Minwax Gloss Oil Polyurethane & 3 coats of Satin, lightly sanding between each coat, then using 0000 Bronze Wool & Bowling Alley Paste Wax as the final step.

The stock 2002 'Bus' steering wheel is 400mm & fit inside the 420mm stock 'Bus' Coupe steering wheel.
 
Not the same but maybe there's something you can get from it. I made a "lathe" for polishing my Style 5 wheels. If you can figure out a coupler for the splined shaft that would make things easier.

 
I went out and took some pics of my Nardi wheel . This is on my 635, but it is the same as woudl go on an E9..

It appars that this wheel was made by cutting a 1/4 secton out of the wood hoop, and then inserting the rim and spokes in that cutout, and then replacing the cut out portion. They used a black inlay to mask the cut line in the front of the wheel. There are no joining lines anywhere else onthe wheel. On this one the rim shows on the inside, so the piece that replaced the removed section (probably the same piece that was cut out) lies flat against the rim. Seems like the way to do this would be as described above, but cut the section out using a saw kerf that is the thickness of the rim and spokes, so when it goes back together the crosssection is unchanged. That way all the shaping is not for naught. Again, for you, the rim probaby doesn't show, so you would use the smallest kerf you could find, and cut reliefs for the spokes. I'd bet that they used a router to cut the front part creating a groove that would later be filled with the black inlay, and then used a saw for the horizontal cut to release the quarter section. Were I doing this, I'd then put the rim in, and attach the black inlay with a thickness that fills the gap. And then attach the removed 1/4 section piece. Then simply use the router to trim off the slightly proud inlay, and sand.


Nardi1.jpg
Nardi2.jpg
Nardi3.jpg
 
There are no joining lines anywhere else onthe wheel.
That really is the ultimate goal, isn't it. You see so many bad shortcuts being taken when making these wheels on the net, it makes you really appreciate the art of Nardi and the like. And to think that you can buy one of those brand new for less than $500 is insane.

That is why I want to explore the idea of wrapping a (very long) strip of veneer of the same wood I used on the dash in the same way a roll of duct tape is. If the glue (I'm using a pre-catalyzed urea powdered glue) is thin enough, it might blend in enough to be near invisible. I suspect that Nardi might be using that same technique to make joining invisible.

From then on, there are several paths available for routing the channel inside which the steel rim will nest. Building a jig with roller bearings for the routing table as you mentioned earlier will definitely be part of the deal. Both for outer contour (although we might not want a perfectly round type of arc) but also for the inner channel.

PS: Beautiful work on that boat hatch!
Look at 00:43 inthe Nardi video above. Their balnk is made from super thin wood, almost veneer, wrapped dozens of times to get the blank. They must use some sort of spiral tensioner to get the lams that tight. Quite a trick! At 1:33 you can see the end of the lams. Unfortunately they skip the part where the hoop gets rounded off into a torus.

Can you get large sheets of etimoe veneer? If it was 1/32 thick, that would be roughly 30 wraps, which for 15 inch wheel would be 700 inches long!, if it isnt pieced. SO it MUST be pieced. For a 1 1/4 dia blank 1/32 veneer would require 40 wraps. For a 15 inch wheel that would be 940 inches of wood. You get 4 wraps per 96 inches, so ten 1 1/4 inch strips 96 inches long would do the trick.

Macbeath, in Berkeley has a room with huge sheets of veneer in drawers. You might check that out.
 
Look at 00:43 inthe Nardi video above. Their balnk is made from super thin wood, almost veneer, wrapped dozens of times to get the blank.

Yes. I had noticed that also. It sort of validated my original thinking about wrapping veneer
Macbeath, in Berkeley has a room with huge sheets of veneer in drawers. You might check that out.
I have indeed checked MacBeath‘s veneer room before. Unfortunately their selection is quite limited. I have bought a lot of my veneer from GL Veneer in Los Angeles which has a HUGE selection.
Www.glveneer.com
But these days it doesn't really matter anymore since you can get pretty much anything online
 
Last edited:
I am wondering if I might try redoing my interior wood in Wenge. I have a roll of it. I also have a roll of Bubinga that I bought years ago for this. Just not sure if I want anyting that flashy... . I'll decide when I get closer I guess!
 
Back
Top