First strip it...then bathe it...

afeustel

Well-Known Member
Site Donor $
Messages
566
Reaction score
180
Location
Houston
And myself at the same time.

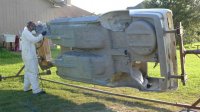
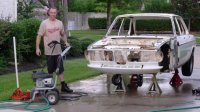
The Bav is now officially in a million pieces all over the garage. Broke down the rear sub-frame today. Lots of parts off to be plated and powder coated.

It is all a bit overwhelming but hey, it needed a new head gasket...
 

Attachments

  • BavTearDown6 007.jpg
    BavTearDown6 007.jpg
    97.3 KB · Views: 307
I see great fun ahead for you... What's the plan for it?

Are you replacing the front fenders?
 
Well Luis, as you can probably tell from my posts and questions to you I am pretty much going through everything at this point. Not planning to replace the front fenders, though they do have a spot of rust down low on the rocker at the seam.

You could say it is getting the "Luis" treatment to a somewhat lesser degree. Interior going from Blue to Red with perforated leather inserts where the pattern now lives on seats and door panels. Engine will be fitted with MS. The rest is getting painted/plated/powder coated.

Which, buy the way Luis, leads me to the question: where did you find the replacement parts for the power steering pump (seals and such)?

As for fun...I call this Type2 fun: things that are fun AFTER you do them.
 
Sounds like a great project; keep us updated.

The PS parts --all I needed was a couple of O-rings, were available from BMW.
 
Looks oddly familiar...


104_5406.JPG


I promise I'll start my own thread soon. afeustel, looks like you're off to a good start, and I love your reasoning (needed a head gasket!) :razz:
 
Amazing...they are twins.

I had the disadvantage of having the complete undercarriage and wheel wells sprayed with rubber undercoating. Spent the last two nights on my back with a scraper and propane torch getting that junk off. Yours looks a little cleaner to begin with.

Good luck.

Drew
 
I had the disadvantage of having the complete undercarriage and wheel wells sprayed with rubber undercoating. Spent the last two nights on my back with a scraper and propane torch getting that junk off. Yours looks a little cleaner to begin with.
Oof, that's dedication, especially where you are this time of year.

I got very lucky with mine.
 
looks like fun! I am curious about how you are moving the chassis around without the front wheels? I see some big caster wheels on the front but could you elaborate and possibly show more pics of the setup?
 
In the front right now it is just a 2x10 bolted to the chassis where the subframe bolts up and two 10" caster wheels bolted on.

I am building a dolly with four 10" casters mounted on two 5' long 2x10 planks (2 wheels each), that are connected to each other with 6' long 2x4 boards. Will send a pic when it is done but basically a simple dolly with 4 wheels to set the body onto.

awesome, thanks for the info!
 
Then you sandblast and epoxy primer it...

On a Rotisserie.

12 hour day today. Started at 8 a.m., finished priming it by 8 p.m., just as the sun was setting.
 

Attachments

  • BavReFinish2 011.jpg
    BavReFinish2 011.jpg
    95.3 KB · Views: 228
Back
Top