Gauges out, Speedo repaired

Willem Tell

Well-Known Member
Site Donor $
Messages
340
Reaction score
315
Location
Zug, Switzerland
Hi All,

My speedo stopped working during a highway-speed jaunt a few weeks ago (stuck @ 80 KMH). Thanks to mthomson's write-up on dash removal, I summoned up the courage to take this on. Michael confirmed that he actually got his speedo out without pulling the whole dash, so I gave it a go.

I will include as many pictures as possible for those folks who pull a panel or gauge and miss a detail and need verification on connection pin-outs.
Pulling the panels left and right of the steering column. (right panel circuit breakers

65972

65971


The knurled round nuts holding the gauges in place conveniently have a 7mm end facing out, so with much contorting to lay face-up, it is possible to get them started with a socket and take pressure off of the most accessible knobs on the lower side. It's only necessary to loosen the lower knurled nut. You can then rotate the gauge CCW to free it up from the wood panel.

Getting the fuel gauge out is easiest. There's plenty of room for that gauge to drop down and hang out of the way if it's the speedo you're looking to remove. If you disconnect the fuel/temp gauge, their are a number of connections. I disconnected one gauge at a time, and wrapped a rubber band around the connections to be able to distinguish them later.

65973

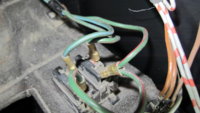
Connections for the Fuel/Temp gauge:
65974


This image from mthompson was critical; if not for this, I would not have known to lift the hood and pull the wooden cluster face outward slightly:
65977


I went after the speedo, and my speedo cable mounting nut was on pretty solid, but miraculously, I could sneak a medium channelock on there and break it loose. After loosening the lower knurled nut I could dismount the speedo. The failure mode was obvious before I even removed it; the shaft/weight in the speedo had become dislocated and caused the needle to hang up. There should only be 0.5mm of play there, max.

65976

Having the speedo in hand, the shaft play was obvious:
65978


The gauges on an E9 are different from those on a 2002, as they have rings formed around the body of the gauge, so they have to be coaxed off by deforming the ring. I used a hooked pick the start the process, but I mainly relied on my trusty bamboo chopstick.

65979
65980


This takes patience, working 'round and 'round to slowly deform the ring enough to slip it off to access the speedo:
65981

I used a plastic cap to protect the needle when I removed the speedo from the body:
65982


Sorry, but I forgot to take a photo of the the aluminum cup delicately attached to the needle with a light spring in between. The iron weight spins within the aluminum cup and creates magnetic eddy currents that cause the needle to deflect as the weight rotates. The faster the weight rotates, the more the cup/needle deflects against the spring.
This image is from PaulTWinterton on the BMW 2002 FAQ: https://www.bmw2002faq.com/forums/t...can-it-be-fixed/?tab=comments#comment-1340176

65983


I followed this video from FunkyLaneO on the FAQ that shows how to repair the speedo:
65985
65986
65987
65988
65989
65990
 

Attachments

  • IMG_3207.JPG
    IMG_3207.JPG
    202.7 KB · Views: 279

Willem Tell

Well-Known Member
Site Donor $
Messages
340
Reaction score
315
Location
Zug, Switzerland
Important note: Pay attention to how the speedo odometer cable is routed so that you can route it the same way upon re-installation. This, and having the odometer cable pop out a few times caused the re-installation to be pretty trying.
65997

And make sure that the cable is seated correctly and the plastic mount fully seated when re-installing:
65998


Reforming the chrome ring:
66006


65999

66000

My Fuel/Temp gauge glass was so cloudy that I could hardly read the gauges:
65991

This chrome ring is actually a bit more challenging than the speedo, but with patience, it yielded.
It cleaned up pretty well:
65994
65993


I was encouraged by the results of these two gauges, so I decided to remove the tacho and clock as well.

65995
65996


66001

66002


I didn't disassemble the clock, as it seems that somebody might have cleaned it in years past.
66005

Interesting that my clock is different from Michael's. His is similar to a 2002 clock, mine has a metal body. It seems that they actually designed it so that the solder fuse could be repaired without disassembling the clock.
66003


I noticed that this wire had been cut or broken, so I traced it out. It is the brown/grey wire from the brake fluid reservoir. It comes from the white connector behind the speedo. The brown cable with white connector is the e-brake line that appears to have been re-wired. It should also come through the same connector. They should join at the connector rear of the speedo, so I jumpered them together at this connector.
66004

Unfortunately, the wire that was cut seems to be grounded somewhere on its path, so when I got everything back together, I found that it gave a brake fluid fault.
The brake fluid sensor itself is working correctly. By then I had all of the gauges installed and access to the connectors was blocked, so I ended up cutting the connection, but leaving enough wire to come back to it later.

Needless to say, I brushed and vacuumed all of these hard-to-reach areas while I had the gauges out, so all of that 45-year-old dust is gone!

All in all, a successful operation, so I buttoned everything up and treated myself to a nice drive in the mountains!

Post driving note. The speedo needle was a bit jittery but accurate as I started driving. It smoothed out considerably as I drove. It wobbles slightly, but it's acceptable.
 
Last edited:

Honolulu

Well-Known Member
Messages
1,918
Reaction score
226
Location
Honolulu Hawaii
add another very patient DIY-er who has fully gone down the rabbit hole, and re-emerged. I put off fixing my odometer for almost 20 years, then got some sack and went in there, cleaned it up, and put in 4w bulbs.
 

Willem Tell

Well-Known Member
Site Donor $
Messages
340
Reaction score
315
Location
Zug, Switzerland
Man, I wish I had thought about the 4 watters before I went in there!:rolleyes:

I was in a rush yesterday to treat myself to a drive before the rain moved in, so I forgot to take a few "after" pictures:

66052
66053
66054


BTW, for anybody that is cleaning their instrument glass with paper towels, DON'T DO IT!
My clock glass tells the tale in this flash photo. Always use a soft microfiber towel to glean the glass!
66055
 

Bmachine

Well-Known Member
Site Donor $
Site Donor $$
Messages
3,525
Reaction score
1,779
Location
Northern California coast
Most excellent post! And very timely too as my odometer is also dead and i really want to get it fixed very soon.
Thank you for taking the time to do that.
PS: I'm sure you saw that earlier but equally excellent post from Robert Gransin about cleaning the insides of the gauges.
 

Keshav

Well-Known Member
Site Donor $$
Messages
2,761
Reaction score
2,773
Location
Germany
My clock glass tells the tale in this flash photo

The clock ‘glass’ is infact plexiglass and prone to scratch, more so due to regular time adjustment..... which is why it looks comparatively dull. The other 3 instruments are glass.
 

Willem Tell

Well-Known Member
Site Donor $
Messages
340
Reaction score
315
Location
Zug, Switzerland
Right again, Keshav, I thought about that as I read my post (I know that from my '02 clock, but didn't edit). It almost has to be plexiglass, as you push the knob against it every time you adjust the time. Good chance glass could crack.
 

Keshav

Well-Known Member
Site Donor $$
Messages
2,761
Reaction score
2,773
Location
Germany
Some special plexiglass polish would make a big difference.... but in pics it possibly looks more scratched than in real.
 

Willem Tell

Well-Known Member
Site Donor $
Messages
340
Reaction score
315
Location
Zug, Switzerland
PS: I'm sure you saw that earlier but equally excellent post from Robert Gransin about cleaning the insides of the gauges.
I hadn't seen it before, but it's a great write-up! I searched on speedo, speedometer, so I didn't come across this one. Great work, Gransin!
 

Willem Tell

Well-Known Member
Site Donor $
Messages
340
Reaction score
315
Location
Zug, Switzerland
Meh.

Went out for long, loping ride yesterday and realized that while the speedo is reading accurately, I apparently didn't get the odometer engaged properly again.
It must be one of these gears that is not meshing properly.

66494


Back into the breach I go...
 

Honolulu

Well-Known Member
Messages
1,918
Reaction score
226
Location
Honolulu Hawaii
As you can see, there's a screw at center right of the photo that holds the near-vertical shaft onto the body of the instrument. If the shaft is too far right, the gears don't engage. This looks to be the problem with the brass gear at the bottom of your photo.

The work will go much more quickly this time as you now have all the experience needed.

Although it's illegal in most jurisdictions to reset the speedo for purposes of deceiving a buyer, the law I've looked at does not state that it's illegal to do it for your own purposes. Since my odometer was not functioning for the first fifteen years I've owned my coupe, and wasn't working when I got it, there's no way of knowing the actual mileage. So I reset it, as i did several other 2002 units I've had apart, to zero miles. It doesn't make it drive better, it's just a little inside joke. No one has ever noticed I have a "low miles" coupe. I'll simply check the box on the registration that states the indicated mileage is not accurate, and reveal why to the buyer.... if if ever sell. More likely my wife will dispose of the car after I'm gone. Watch this space!
 

Willem Tell

Well-Known Member
Site Donor $
Messages
340
Reaction score
315
Location
Zug, Switzerland
Thanks, I'm sure you're right. I made the mistake of assuming that because I could reset the trip odometer, that I had everything lined up properly. I realize from revisiting the photos that there are two wheels being driven on opposite sides of the mechanism.

Who can say what the original mileage is after 45 years, but my odometer had been working right up until I took it apart.
I think I'll take this opportunity to order the 4W bulbs and swap them out while I'm in there.

Now that I've done it once, I'm pretty sure I can do most everything by feel without spending a couple of hours on my back on the floor board (after getting the panels out again!). I will try to rig up a drill to spin it until I see the wheels turning.

I want to do some driving/oldtimer meets in the next weeks, so I'll wait until I'm at a good point to shut down to pull it. That way if I need to order a gear from Odometer Gears, I won't miss too much driving.
 
Last edited:

Honolulu

Well-Known Member
Messages
1,918
Reaction score
226
Location
Honolulu Hawaii
I don't remember what the exact bulb specification was, I think I took a sample to the parts store and asked if they had them in that spec.

Some have commented that 4W in some positions is a little bright, but you can still dim them. There is the alternative to wire some of them separately from the dimmer switch, so some are always bright, others dim-able.
 

Willem Tell

Well-Known Member
Site Donor $
Messages
340
Reaction score
315
Location
Zug, Switzerland
Thanks. I found Philips bulbs on Amazon. I have found them to be "brighter" than Osram, even though the wattage is the same. Must be a different light spectrum. I prefer them on my Tii.
I definitely would use them on the speedo and tacho, and maybe the Hi Beam indicator, as it's difficult to see during the daytime.
 

pmansson

Well-Known Member
Messages
873
Reaction score
31
Location
switzerland and sweden
I posted many years ago that 4W was the way to go, esp for the blue headlamp telltale.

Tpday I would say: 4W on all but the green blinker which I think is disturbingly bright at night with 4W. 3 is enough.
 
Top