How to refresh your propellor shaft ?

eriknetherlands

Moderator
Site Donor
Messages
2,963
Reaction score
2,191
Location
Netherlands, Eindhoven area
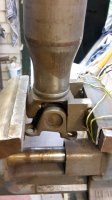
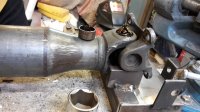
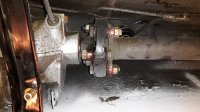
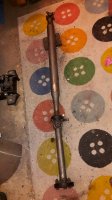
In the proces to clean up the underside of my e9 I have taken out my propellor shaft.
It came out easy enough, it had a few tough nuts but lengthening my spanner with a 1 meter (3 foot) tube did the job.
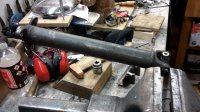
I have a small lift and the shaft isn't that heavy, about 15 kg or so.

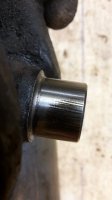
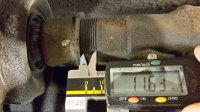
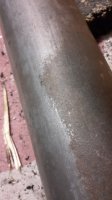
The rubber disc, the center bearing and the cross joint are all in good shape; they look good and feel smooth. But after cleaning the the whole thing, I noticed it's a bit rusty underneath the layers of wax and under body coat. I'd like to get it nice and fresh again.

My questions
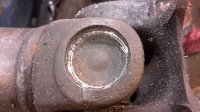
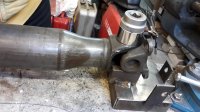
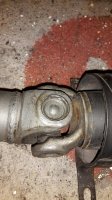
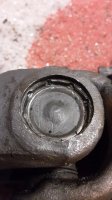
1. How can the cross joints be seprated into individual parts? I know that they are supposed to be removable by removing the caps, pushing them to one side, releasing the other side. However to remove the cap, it looks like I have to grind out the 8 little folded tabs (see picture). How ever will i be able to reinstall the caps then later? (I see W&N supplies springs with, but there does not seem to be an groove to locate them)
2. Will it be a problem if I dismantle & get all parts zinc plated? Would perhaps the seating surfaces of the cross bearings be compromized by the plating process?
 

Attachments

  • 20161116_082150.jpg
    20161116_082150.jpg
    764.5 KB · Views: 144
  • 20161116_082531.jpg
    20161116_082531.jpg
    506.3 KB · Views: 138
  • 20161116_082126.jpg
    20161116_082126.jpg
    716.5 KB · Views: 135
  • 20161116_082440.jpg
    20161116_082440.jpg
    583 KB · Views: 135
Last edited:
those are press fit
the only way to do it is to hydraulic press them out
your best bet is to just get another
no problem w/ zinc -wast of money
but why bother just paint em
you would have to retap the edges again to anchor no clips
 
Hi Erik,

I wanted to replace both of the cross joints on my propshaft "just because", as everything else is new or serviced in the driveline of my car. I set out to replace them myself, but after finding out there wasn't any way to separate them without grinding out the tabs and find a new way to lock them again, I contacted a local machine shop that do service on propshafts. It was way cheaper than I expected to have them replace them so I just let them handle it without even asking for any advice on how to eventually do it myself.

When I got it back I saw that they had locked the new cross joints simply by putting a fitting washer at both ends and put a couple of spotwelds to keep it together.

I don't have any good pictures of it, and my car is currently at the painter so I can't go out and take a better right now, but hopefully you can see something on this picture:

 
OK, thanks. I'll try that route, see what shop locally are available and how they do it.
Perhaps i'll have them do the part of the disassembly / assembly, and i'll zinc coat the parts myself in between.

( i just can't stand crumbly brown stuff I notice......)
 
Aearch, thanks for the input. I think I'm going for the TIY; ''try it myself' method here....

The current U joints of the prop shaft are kept in place by 8 notches, depressions made in the eye of the fork (yoke).
Aearch mentioned that if I were to install new cross joints (universal joints) i will have to retap them. Indeed i have noticed that my prop shaft doesn't have a groove with a circlip (snapring), as i think other BMW have them (at least a quick Google images search for BMW produced nothing but universal joints located with circlips).

To replace the u-joints i have to grind the notches out. Would it then not be very difficult to achieve a correct depth of the u-joints? I think that if i set the U-joint a bit to deep in one end, it will put the virtual axle of rotation in offset to the center of the tube.

I am not that keen into having a propshaft of roughly 15 kg or 30 pounds at a few hundred RPM being 0,1 mm ofcenter....

Is there a trick to get the u-joint aligned? As the forks are rough, cast iron, they are a bit irregular, making measurements difficult.
 
yea ive done tons of them
when you set the joint it automatically sets itself
with the depth-- so you can align the extra ends with anything
like a piece of wire as a measure --both sides till
equal. USE IT LIKE A DEPTH GUAGE
then renotch with a punch
file the top to get a smooth surface
 
Thanks for the tips and trick guys. I have choosen to go dismantle and reassemble myself. Once its finished I will put more pics & description in my "'fixing that little rust spot" thread.
pics: (sorry no chronologic order...)
- marking the parts for exact reassembly (needed to keep the balance in the shaft)
- grinding out the notches
Removing the bearings using different methods;
- welded up a tool to push the fork relative to the bearing.
- I then nocked them one way with a smaller socket fitting inside and a larger socket on the other side.
- One of the 2 crosses actually showed severe grooves. Glad I took them out.
- Marking shaft to transmission before removal
- measuring the length in adjustment part, in order to have a rought figure for reinstallation.
- last step of the removal of the bearing cups involved cracking them to bits in the in the vise. Most of the 8 caps were not yet fully out when using the sockets to push them through, as the cross prevents further travel.
- pic of using the welded tool, in combination with a 30 or 32 mm socket and a large hammer.


When I will build them up, I will post the rest of the work as well.
 

Attachments

  • 20161113_205607-01.jpg
    20161113_205607-01.jpg
    532 KB · Views: 148
  • 20161117_215651.jpg
    20161117_215651.jpg
    554.2 KB · Views: 134
  • 20161118_095020.jpg
    20161118_095020.jpg
    728.3 KB · Views: 125
  • 20161118_100743.jpg
    20161118_100743.jpg
    475.9 KB · Views: 125
  • 20161118_101127.jpg
    20161118_101127.jpg
    195.7 KB · Views: 125
  • 20161113_205346-01.jpg
    20161113_205346-01.jpg
    867.4 KB · Views: 153
  • 20161113_205745.jpg
    20161113_205745.jpg
    552.6 KB · Views: 129
  • 20161118_175656.jpg
    20161118_175656.jpg
    579.7 KB · Views: 122
  • 20161118_100801.jpg
    20161118_100801.jpg
    498.4 KB · Views: 133
Last edited:
You should have it rebalanced by a driveshaft shop when you're done.

There's a place here in the US (Driveshaft Specialist) that rebuilds these in the correct way. Cost about $400 and they look just like original. I've had 3 done on my own cars over the years. I really don't trust the shops that weld washers to them.
 
Back
Top