how to reset the carbs

Screw 1

I suggest all things in moderation;

Turn counterclock wise the one carb that is hissing the loudest, then clockwise on the least or quieter carb until you can get an idle below 950 or so.

Turn screws 2 and 3 by the same amount inward or clockwise by 1/4 turn also.

Once you can run at that speed, the adjustments are very small at a time while pausing to see the result.

Once that can be done, then a length of hose and listening to a fixed point of each carb and comparing is the method of balancing. If you have an air measuring device it is useful also.

The factory recommends two other methods- carefully count screw 2 and 3 turns inward to stop. The engine should be able to run at 6-700 rpm, then adjust screws 3 to obtain the same hiss or balance. Once that is done, the the screws 2 and 3 can be turned outward from the point that they were.

The other is to just use the screws 3 and idle at 850-950.

You're choice.

But again the idle needs to come down a little more than 1100 for balance.

Keep asking and I'll do my best to help.
 
moderation, and understanding

I will certainly follow your advise,

the good news is that now I am not scared of the carbs, with your help and with the manual you provided me with I am starting to look at it in a friendly way

I have discover THIS: (take advantage of the reality and mirror to discover all the information)

ir5puh.jpg


a detail reveals that the pivot that cames from the choke is loose from the flap attachment, so you can see that the flap is wide open (even if what is presented in the pic, is the engine in its cold state)

296i5hk.jpg


so, I put it in position and I fix it with the small "allen" screw (screw without head, don´t know the name, we call it "prisionero" (translation: prisioner) )
 
Prisonero

We call it a set screw or allen screw. It is common for the rod to become dislodged during reassembly. Rotating it helps. Sometimes you have to take the top section off or loosen to get the rod back in place.

An observation from your photos- the rod you found loose and reattached to a small arm.

1) It appears that the rod/ disc was set when cold and activated in choke mode. The length of rod above the "arm" and prisonero seems long compared to what I've observed.

2) By removing the three screws that hold the retaining ring on the water choke housing and where your rewired the connection is a hidden cam that the rod attaches. The cam is stepped from narrow to wider. Make sure that it is in the narrow position and the hidden screw is not touching the cam. ( Normal running or idle position.)

This would cause the idle to be above normal and the choke arm not to release.

The prisnero is set when the flap is nearly closed. Usually there is a small clip on the rod below the prisnero. It is an easy reference when assembling. You may wish to put one on.

If I haven't explained this well, please let me know.
 
awesome...
i had to give this thread a 5* rating.
having close up photo's of the carburetors helps tremendously
 
continuation

this afternoon a little more time for him,

I started positioning the rod for the butterfly with the set screw (prisionero), I have seen that the manual mentions also that circlip in the rod you comment, but none of those is in my carbs rods, no problem, done with reasonable success

then i did the following:

as all the air filter assembly was out from its place, I started the engine that way, I had problems at the beginning with my tiny hoses that went from carbs to air filter, as they were desconnected from air filter case I discover suction in them, so I plug them, ok, then the engine went ok warming up continuously

so, like a new shiva goddess, with your answers in one hand, the carbs manual in the other, a medium screwdriver in my right foot and a short screwdriver in my left foot, ;-), I started adjusting the screws

I had this loud hiss in carb2, and still high iddle but little by little things were getting better

step by step it improves, I recall finishing with around 980 rpms and quite an stable iddle, when I decided to stop the engine and reinstall the air filter case

then I restart the engine and that was a disaster, the engine simply can not maintain the iddle

I tried to fix the screws but some of them were not accessible, then I realised that was precisely the reason for adjusting the carbs without the air filter aseembly :evil:

so, again, how can I adjust them without having the awesome special tool that replaces the effect of the air filter case and so on

I have been taking a look to the picture in the manual and it seems to me like a closed hose, can someone explain me the way it works, so I can think about building a do-it-yourself one ?

regards
 
manometers

Here's a working version-http://www.youtube.com/watch?v=0nKaGEMLZjs


There are many other versions of the same. The factory uses caps on top of the carburators. You will have to find a plastic bowl that fits the top of the carbs as one other member did .The caps have a 3/4 hole in the middle and a tube/ bulkhead fitting on one side to attach the hose.

If you need more examples, just let me know.
 
i am afraid i explained myself badly

the tool I meant is this one circled in red in the picture, that is conected to the tube that comes out from the cylinder head cover, do you use anything like that ?

6ql0l4.jpg
 
regarding the other tool for syncronising it seems to be a very good idea, thank you very much for sharing,

but in that motorcycle engine there are two well disposed tubes for the syncro test, one in each carb, that is making things easier, on the contrary the zeniths are another thing, or.... not ?

take a look to the two tubes arrowed in green in the following picture,

4q3lh2.jpg


I have checked that in those tubes there is suction, so, in my opinion no matter if the top of the carbs is perfectly closed or not (or even completely open), the case is that if those two tubes perform an identical suction, the carbs should be then syncronised, ..... don´t you think so ?

regards
 
Crank case evacuation

No, none that I know of.

Here we cap or blank off those vacumn connections that come from the the manifolds or elsewhere except those that go to the distributer.

I suggest you do the same since possibly that's what is now causing rough idle and only keep the hose from the cover to the air cleaner. I would carefull go over all those hoses as they appear to be a source of air which is disturbing the idle.

What the instructions are saying is that the air filters will cause the idle to drop 50-100 rpm because of restriction. But it should not cause the car to run rough.
 
Sycronization

The tubes- no. These are located in only one barrel and will not work for what we are trying to accomplish as air is coming in slowly at the rear or larger opening too. That is the purpose of the cap that covers the whole top.

A vacumn guage here would tell you something but not everything. For instance, the throttle plates position are relative to this opening of the tubes. But if the engine, valves, pistons, rings, etc. are sometimes better or worse by cylinder and we must tune for best mixture to occur for the worst cylinder.

If you use only vacumn to decide mixture, it will tend to be lean. What we want to do is to go slightly rich ( a little more gas).

I like your thought but we must also measure the air by listening or by guage.
 
thank you, so, as a summary:

1- I will try to find two plastic bowls of the same or similar diameter to use the syncro homemade device with them

2- I will plug the two frontal suction tubes of both carburetors

3- I have no answer to the unexpected failure of the engine run when the air filter case was attached after adjusting an acceptable iddle, (as you correctly translated from the french manual: only a 100 rpm fall is expected when air filter is attached)

to be continued....
 
lean/ rich

Somehow... the mixture became unsettled. I suspect the hoses, the air cleaner thermo switch near the end, or something is moving.

You can use a length of hose to listen and get close. What will happen with the tubes closed is the mixture will get richer. You may have to adjust 2.3 and 3 inward a bit.

What elevation do you live near? I will help to get adjusted.
 
maintaining a misunderstanding

we will see what happens

please remember that I do not have screws number 2, the only screws I have operating are 1, and 3

number 2 is only present in carb1, but can not be adjusted (is only to close a similar tube to the one that in carb2 is going to distributor advance)

altitude: sea level

regards
 
Here's a working version-http://www.youtube.com/watch?v=0nKaGEMLZjs


There are many other versions of the same. The factory uses caps on top of the carburators. You will have to find a plastic bowl that fits the top of the carbs as one other member did .The caps have a 3/4 hole in the middle and a tube/ bulkhead fitting on one side to attach the hose.

If you need more examples, just let me know.

when i tried it... one of the two carbs kept sucking all the fluid through at once...
after some initial adjustments she runs better now and the fluid stayed in the tubes. but i'll make a rig like the one in your video.
...after i fixed the M/C
 
Last edited:
Carb tunes

Dequincey,

Yes, we have an understanding. 1 and 3only.

Altitude- a higher elevations ( above 5000') the mixture would get rich. Screw three would go inward slightly to compensate. ( I just remember the mountains and forget sometimes about the sea which is where I live too.)


Art/ everyone- Originally manometers and other instruments were filled with mercury which is very heavy and highly toxic. To compensate, the tube must be longer; as in around a yardstick/ meter. Any colored oil/ trans fluid/ will do. The heavier the better.
porsche:
that might have been my mistake , i had maybe 8 foot of hose all together.
i will build the design like in the video with about 30 ft of tubing.
thank you so much for your time and insight. :)
 
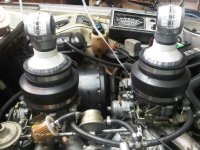
You may want to try a plumbing supply store - attached is a picture of my setup, The black piece is a rubber pipe reducing adapter, the white is a hard plastic pipe reducing adapter. The silver duct tape is wrapped around the white piece to make them fit, it is tightened by a clamp. The black rubber piece fits snugly over the tops of the carbs (remove the rubber rings that fit between the carbs and air cleaner) but can be moved from carb to carb (necessary for me now that a backfire from the front carb blew up one of my meters!). I use vacuum guages also as a double check. The Manometer should be hooked up to the ports you have circled in green but preferably after using meters or Jerry's listening technique to get the 2 carbs close, otherwise like Artcar said one will suck the fluid out quickly, this happened to me (and mine has 20' of tubing).

1- I will try to find two plastic bowls of the same or similar diameter to use the syncro homemade device with them
 

Attachments

  • IMG00214-20100903-1133.jpg
    IMG00214-20100903-1133.jpg
    91.9 KB · Views: 156
You may want to try a plumbing supply store - attached is a picture of my setup,).
:-D
hi,i like your device it seems to be very well done and just in one assembly for each carb,instead that official bmw tool withtwo hoses comming to an additional box

a couple of questions:

1- which is the meassuring ratio of the manometers that you are using ? (please give the figure in bar or p.s.i. )

2- inthe figure it seems that the manometer mouth is closing completely your device,but this is not possible because then air will not be entering in the carbs, so i suppose that a hole will be somewhere, is this right ? is so, which is the diameter of that hole ?

thank you for your answers

regards
 
Back
Top