hunting the carbs problem

first time is scary, yes, but once you learn how to do it, you can do blind eyed

and they are so good carbs
i gladly believe you deQuincey , but would never do it myself.
Weren't those over complex all to do with emissions demands of that period ?
 
i gladly believe you deQuincey , but would never do it myself.
Weren't those over complex all to do with emissions demands of that period ?

mine are free from the emission gadgets,
the essential zeniths also no air cold start valve, are complex already, but if you follow the steps there is nothing to woory about
 
Update (ref to this post: https://e9coupe.com/forum/threads/hunting-the-carbs-problem.8569/post-339585);
Following the picture in the tech instructions showing the sealing rings of the Idle shut off valve, I've been looking for them.

However:
- I noticed that on the site of Walloth & Neesch there are pictures of NOS parts idle shut off valve WITHOUT these rings.
-To confuse it even more, W&N show the Electric air valve WITH the metal+rubber rings.

.....So I'm not sure what is right in the end for the idle shut off valve; with our without sealing rings.

But for sure the locktite solution by @deQuincey will work and it's universally available.
Other option is to search for some generic parts, in the end they are *just* rings with a defined thickness with a simple sealing function. Benefit is that then the sensor can be removed an re-installed a bit easier.

1638440691632.png
 
Last edited:
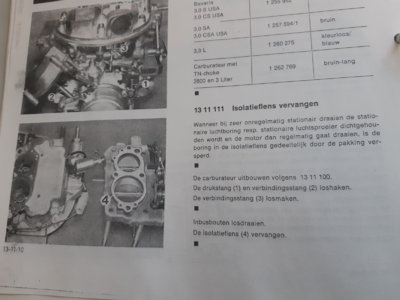
And now a question for the group; A bakelite heat isolator is located between the throtle body and the float chamber. See image of the tech manual below, Number 45. Note that no paper gaskets are shown in the exploded view. Also a picture inside the tech manual shows only the bakelite part, and the textual description next to it only talks about replacing the "ISOLATION Flange" (4). It does mention in the text that sometimes the small holes can be blocked by 'paper particles' and they need to be checked for blockage.
The parts books also do not show any paper gasket, but all other gaskets are shown.

However in most Gasket kits there are 2 paper gaskets for this location. What's the purpose of them? I see @deQuincey placed them on either side of the bakelite flange, but that seems not to be needed according the tech manual I have.

- is the paper needed?
- would it hurt to place them, even if not required /designed like this by BMW? (Note the clever improvement by DeQuincey of the hole size suggestion in post 5# to reduce chances of blocking again)

References:
picture from DeQuincey:
1638442582244.png


pictures from Tech manual:
20211202_115736.jpg
 

Attachments

  • 20211202_115657.jpg
    20211202_115657.jpg
    215.5 KB · Views: 118
Last edited:
And now a question for the group; A bakelite heat isolator is located between the throtle body and the float chamber. See image of the tech manual below, Number 45. Note that no paper gaskets are shown in the exploded view. Also a picture inside the tech manual shows only the bakelite part, and the textual description next to it only talks about replacing the "ISOLATION Flange" (4). It does mention in the text that sometimes the small holes can be blocked by 'paper particles' and they need to be checked for blockage.

However in most Gasket kits there are 2 paper gaskets for this location. What's the purpose of them? I see @deQuincey placed them on either side of the bakelite flange, but that seems not to be needed according the tech manual I have.

- is the paper needed?
- would it hurt to place them, even if not required /designed like this by BMW? (Note the clever improvement by DeQuincey of the hole size suggestion in post 5# to reduce chances of blocking again)

References:
picture from DeQuincey:
View attachment 131596

pictures from Tech manual:View attachment 131597


as to the best of my knowledge
the original system used 2 paper gaskets as shown, i used them and they worked well, it is more complex to install as everything has to be aligned
the bakelite element was changed for an improved deisgn that used no paper gaskets and placed an o-ring in one of the holes, this is the preferred way

unfortunately the bakelite with o-ring element is a very scarce item
so if you do not have them i would use paper gaskets as shown

there was also a very bad, more sponge kind of plastic instead of bakelite sealing element, i found it in some of the carbs that i overhauled during these years
 
Update (ref to this post: https://e9coupe.com/forum/threads/hunting-the-carbs-problem.8569/post-339585);
Following the picture in the tech instructions showing the sealing rings of the Idle shut off valve, I've been looking for them.

However:
- I noticed that on the site of Walloth & Neesch there are pictures of NOS parts idle shut off valve WITHOUT these rings.
-To confuse it even more, W&N show the Electric air valve WITH the metal+rubber rings.

.....So I'm not sure what is right in the end for the idle shut off valve; with our without sealing rings.

But for sure the locktite solution by @deQuincey will work and it's universally available.
Other option is to search for some generic parts, in the end they are *just* rings with a defined thickness with a simple sealing function. Benefit is that then the sensor can be removed an re-installed a bit easier.

View attachment 131595

i found once a set of carbs with the metallic cup and rubber seal destroyed, i found that a set of three o-ring rubbers set in line can do the trick
i have no solution if you do not have the metal cup
 
addition on usual flodding issue:


sometimes your favourite setup of two carbs happens to be ruined by an unexpected flodding of one of the carbs

here is what i experienced:

suddenly the perfect iddle does not come steady anymore the engine stumbles and it dies

it is usually one of the carbs, not the two of them, you open the air filter box and you see one carb completely full of fuel

the culprit ? the floater gets stuck by the protruding paper gasket


this is the explanation:

the cardboard gasket that isolates the lower body from the intermediate tends to move and protrude a little, enough so that on some occasions the float is blocked by it, in this way the valve does not cut off the flow, and the gasoline overflows the tank and flood the carburetor


the proof:

when flodding happens, try hitting** the carburetor with a rubber mallet (in the area near the fuel reservoir of the carb), the vibration will cause the float to come loose and hence block the flow of fuel by means of the shutting valve, and the flooding will stop.

If when hitting with the hammer, the flood does not stop, the problem is elsewhere

**carburetor body is sort of aluminium/pot metal mix, i said a rubber mallet and i say hitting, but be careful, we do not want to break the carb body, i will hit only in the corners/edges of the body, lower section close to the place in which the floater si located

the solution:

If this is the problem, the solution is not too complex, but you must disassemble the carburetor again until you reach the float, place the gasket very carefully and cut any edge of it so that nothing protrudes from the inner wall of the tank.

and ensure that the float moves freely in place
 
Last edited:
Back
Top