Is there an a/c compressor from a later BMW that works with the original a/c hoses?

thehackmechanic

Well-Known Member
Messages
426
Reaction score
98
Location
West Newton, MA
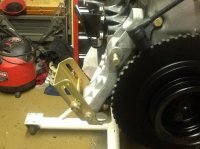
I'm looking at getting the non-functional a/c in the Bavaria working. I shot it full of nitrogen and could hear it leaking out the compressor shaft seal, so to no great surprise, the York is a boat anchor.

I well understand the process of a/c retrofit and rejuvenation (I retrofitted a/c into my E9, rejuvenated it in my 2002tii, and the single longest chapter in my book is on air conditioning), so my following question is very specific.

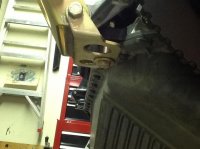
The York compressor has two #12 male flare fittings, so both hoses are #12 female flare. I'm making a test hose with two #12 male fittings and with a charging fitting spliced into it, allowing me to hook it up to the two existing hoses, bypass the York, and pump the rest of the system full of nitrogen to see what else is leaking (clever, huh?). If nothing else is leaking (yes, I know, chances are slim to none), I'd like to replace the compressor and leave as much of the rest of the system intact as possible. If, on the other hand, it shows that there are multiple leaks in other places, I'll just bite the bullet, do exactly what Stevehose did, and replace absolutely everything except the evaporator assembly, and if I'm going to do that, I'll do what Steve did and what CoupeKing sells, getting rid of every flare fitting except the ones on the evaporator assembly. But I have too many cars, too many expenses, and would prefer to try doing this one on a budget if possible.

So... the question is: Has anyone used a compressor from a later-model BMW that worked with the existing hoses? The compressor needs to:
a) have its fitting locations be reachable by the existing hoses
b) either have the same fittings as the existing hoses (the hoses are both #12 flare), or be adaptable to the existing hoses while still reaching


I looked at the "wing cell" compressor on, for example, a 533i, and it looks like it has #12 and #10 o-ring fittings, not flares.

I went through this same issue when I updated the compressor in my 911SC. Like on old BMWs, the original York had two #12 flare fittings, but the new Sanden compressor had a #12 and a #10 flare. I found that, by using a #12 to #10 flare adapter, I could leave every hose intact.

--Rob
 
Last edited:
Last edited:
I bought his compressor and adapter bracket and it was a bolt-up job to my M30. I didn't even have to slot the holes like Steve.

HTH
James
 
I need the bottom slotted adjusting brackets. I am using a Seltec compressor which is physically the same as a Sanden mounting wise

Based on your post I called John Toysil, a really nice guy, who told me he didn't have the adjusting brackets.

I have found them but only in a complete mounting kitt, which I do not need, at over $100

Any one have any ideas? I am frustrated enough to make them myself, but I prefer machine cut brackets
 
I hope this bracket is the one you refer to as being good for a Sanden unit?
 

Attachments

  • image.jpg
    image.jpg
    84.2 KB · Views: 169
Thank you Chris, but that bracket will not work. i have 3 of them and tried in every possible position but none worked.

The ends that go to the compressor have to have ears on them. The problem is, that the bracket you show mounts on the top for adjustment, the replacement compressor swivels at the top and adjusts on the bottom. What is needed are 2 slotted brackets. One for each side I have seen them on Amazon, but only as part of a $125 installation kit.

Worse comes to worse, I can cut some some from plate steel with an angle grinder. Problem with that was/is when I started to do it 2 weeks ago, I put the angle grinder three stitches worth into my finger. So now I am getting over being gun shy!!
 
Last edited:
long bracket-related post a-comin'

Bert and I have swapped e-mails. I've just ordered a Sanden for the Bavaria, and am honor-bound to resolve this bracket issue for the good of the E9 community. When I come up for air, I'll photograph it all and post it. But Bert is probably two steps ahead of me.
 
Well, maybe 1 step anyway.the problem I have is overthinking something and turning it into nightmare instead of a piece of steel with a slot milled in it.
 
I hope this bracket is the one you refer to as being good for a Sanden unit?

I also have been trying to figure out bracket/compressor compatibility for a year.

Chris: I have that exact bracket, kindly donated to me by someone in the forum, but I can' determine with certainty which compressor would fit it. Which one are you using? Thanks.
 
Chris, one more thing. I am missing the smaller bracket that mounts underneath, part #4 and its mounting hardware in the diagram below.

What function does it serve?

18.png
 
Yes Steve, I agree; if my car had a York that would have been the most straightforward route but my car came w no AC from the factory.
 
Sanden on a Wing-Cell Bracket

Luis, I just sent you a PM.

In your original post a year ago, Sven shows a close-up of this bracket and the "wing-cell" compressor.

http://www.e9coupe.com/forum/showthread.php?t=13163&highlight=luis+bracket

If you look closely, you can see that:

--the two ears on the wing-cell compressor go on either side of the top part of the bracket (the piece that you have)

--the solid piece of the wing-cell compressor goes inside the gold piece, the bottom part of the bracket (the piece that you say you don't have).

I have confirmed that, on a Sanden or Seltech compressor, the inside ear-to-ear spacing is 3 1/4" (sometimes shown on a drawing as 3.28"), whereas the inside ear-to-ear spacing on the wing-cell compressor is 2 1/16". In other words, a Sanden won't fit on the wing-cell bracket you have in the same way as the original wing-cell compressor.

Ben Thongsai confirms this, saying "It's the lower mounting point [on the wing-cell compressor] that is this [3.25"] width, though -- the upper one in a bit narrower at right around 2". Looking at a Sanden M30 bracket [like the NLA one in your original post], it mounts off of the top ears and tensions off of the lower ones. I think you would have to reverse that with the BMW bracket. But it looks like it should work with minimal fabrication."

When Ben says "I think you need to reverse that," what he means is that, when using the wing-cell bracket with a Sanden, the fixed pivot point should be at the bottom (using the bottom ears of the Sanden and the bottom through-hole of the bracket), and the top should rotate. So the ears on the bottom of the Sanden should slide around the bottom of your bracket, and a set of strip brackets should be fabricated that attach the top ears of the Sanden to the top through-hole on your bracket. Again, my interpretation; I haven't done it. There are posts on BigCoupe.com that say exactly this, but I can't find a pic of it anywhere.

If my interpretation is correct, the gold piece that bolts onto the bottom of the bracket won't do anything in this configuration. Of course I could be wrong.

I believe this is what Bert is trying to do. I may try to do it as well, as I want to know the answer.

You'll notice that on CoupeGuy's site, he shows the picture of the full wing-cell bracket, with all pieces, but he also shows photos of an actual wing-cell compressor, not a Sanden.

--Rob
 
I also woul like to mention I am replacing a Sanden and it was mounted with the swivel on the top. The adjustment brackets used were slotted, but hand made, and nasty looking. However they did work. Oh, and only one was used.A sketch of 2 brackets I mocked up from balsa wood Both work, the curved one looks a little better. These go from the engine bracket to the lower ears of the pump as on mine, it swivels from the top

I am going to find someone with a plasma cutter and get them made. If not, I will do it by hand. UGGH!! After reading the various responses here, I think we are all having the same problems when changing pumps.I do not agree that mounting, swiveling, from the bottom will work. The reason being is the large lower lug on the engine mounting bracket is a: too wide, and b: the pulleys will not line up

I am guessing that since more than a few are having the same problem, if I can find a guy with a plasma cutter, I will get a dozen sets made up.

No idea what it will cost, but I will post it when I know.
 

Attachments

  • Bracket sketch_0001.jpg
    Bracket sketch_0001.jpg
    80.3 KB · Views: 140
Last edited:
Luis,

I haven't bought a unit yet. The bottom bracket is needed as it braces bottom of main bracket to the block.

Chris
 

Attachments

  • image.jpg
    image.jpg
    76.3 KB · Views: 119
I agree... with that bracket being used with a factory pump. However, try as I might, I can't figure out how to use it.
If you can show me how to make it work on a replacement pump I would be a happy camper
 
Back
Top