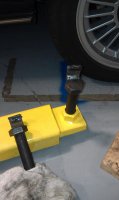
Though I simply can't compete with DeQ, I offer this up for safe lifting procedure. I realize that not everyone has a lift but this idea could probably be adapted to a floor jack as well. Especially helpful when removing the rear sub-frame, which I am unfortunately doing for the second time!
You are using an out of date browser. It may not display this or other websites correctly.
You should upgrade or use an alternative browser.
You should upgrade or use an alternative browser.
Keeping up with the Jonses
- Thread starter Peter Coomaraswamy
- Start date
I have to support mine when I remove my subframe too. I only have 1 floor jack. Was thinking about Channeling a 4X4 to fit the seam along the rocker and putting jackstands underneath or maybe making something out of steel. Curious why you have to remove the subframe again?
I did mine with only one floor jack, I made some wood pieces that fit into the contours of the jack stands and to fit snugly at the jack point, I also took off the rocker panels to avoid damaging them (took the opportunity to clean all the sediment behind them too). No other spot to safely support the rear of the car when removing the frame. Have the front jack stand in place before fitting the rear one. Was glad to get it off the stands for sure.
I have to support mine when I remove my subframe too. I only have 1 floor jack. Was thinking about Channeling a 4X4 to fit the seam along the rocker and putting jackstands underneath or maybe making something out of steel. Curious why you have to remove the subframe again?
I might have to weld something up for floor jack purposes so if that time comes up I will take pictures. I don't always have the lift available since my wife's car occupies it sometimes.
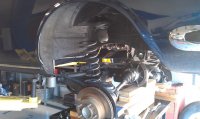
I had to remove the rear so I could weld on the adjusting (camber/toe-in) plates from IE. I probably could have done it in the car but since I had the room and time. Dis-assembly took 1 hour, then about half an hour to pull everything apart and probably the same-maybe an extra hour to re assemble and lift her in. This is my first time around with these cars so if I knew then what I know now I would have put the plates in a long time ago. Found some rear brake issues as well. Just for the record, these cars can stop pretty straight with just the fronts working :-(
I had to remove the rear so I could weld on the adjusting (camber/toe-in) plates from IE. I probably could have done it in the car but since I had the room and time. Dis-assembly took 1 hour, then about half an hour to pull everything apart and probably the same-maybe an extra hour to re assemble and lift her in. This is my first time around with these cars so if I knew then what I know now I would have put the plates in a long time ago. Found some rear brake issues as well. Just for the record, these cars can stop pretty straight with just the fronts working :-(
Hi Bob,
I just welded on my first plate today. Andrew at IE asked that I send him step-by-step pictures for the e9 which I will and also post them here. Most of their pictures feature 2002's and a variety of adjusters so this set should be pretty definitive. I also have the before specs from the alignment and I will post the after specs as well. Though not a professional driver by a long shot, I will do my best to translate the results into some real-world diatribe that I hope will be helpful to some.
BTW, the posts regarding brakes and suspension located throughout the site are an incredible resource, so if I am lucky enough to get the results I desire I think I can put together a pretty good spec sheet as literally every part under the car will have been replaced/upgraded or somehow tweaked.
Thanks all!
Peter, how did you do the slotting for the camber plates on the trailing arms? Is there a better way than a laborious hand process with drill bit, burr and rat tail file?
I had a concern about a misalignment of the trailing arm links leading to binding because the camber plate adjustment will pivot one side of a rigid structure. However I think there is enough play in the bolt holes on the outer end to allow the camber plate side to rise without causing binding. It seems that the outer side needs to be loose while making the camber adjustment, the camber plate is tightened first then tighten the outer linkage bolts in their new pivoted position.
Is this the case with yours or do I just have a sloppy rear end?
Hi Gazz,
The hole enlarging was pretty easy; first, position the plate exactly where you want it. The original hole should not be in the exact center of the plate opening but leave room on both sides of the plate hole so you can adjust in both directions. I used a scribe to mark the exact oblong hole to be cut. Also, mark the exact center (vertically) of the original hole-this will help you to get both sides even before welding. I used a dremmel with a carbide bit and it cut through very easily. I found that doing it on high speed -but slowly gave me the perfect grind and yes, it took a few minutes, but not bad. I did not try the original bolts back in the slotted opening but I checked the new bolt from IE and there was no slop. I think the adjustments will not come anywhere near binding because there are the bushing edges and very small changes in the cam bolt position will have a pretty big effect on the alignment.
I hope that makes sense- I'm doing both toe-in and camber plates but thats because I don't want to pull this out a third time")
The hole enlarging was pretty easy; first, position the plate exactly where you want it. The original hole should not be in the exact center of the plate opening but leave room on both sides of the plate hole so you can adjust in both directions. I used a scribe to mark the exact oblong hole to be cut. Also, mark the exact center (vertically) of the original hole-this will help you to get both sides even before welding. I used a dremmel with a carbide bit and it cut through very easily. I found that doing it on high speed -but slowly gave me the perfect grind and yes, it took a few minutes, but not bad. I did not try the original bolts back in the slotted opening but I checked the new bolt from IE and there was no slop. I think the adjustments will not come anywhere near binding because there are the bushing edges and very small changes in the cam bolt position will have a pretty big effect on the alignment.
I hope that makes sense- I'm doing both toe-in and camber plates but thats because I don't want to pull this out a third time
Attachments

Thanks Peter. Tried my Dremel but the bits wear to nothing well before the slot is finished. Maybe the wrong bit.
For the toe plates yes I will position them over the centre of the original hole with the slot running either side per IE's recommendation. I note that the small outwardly bent tangs at the end of the outer link bracket foul the toe plate so these will have to be flattened or some grinding needs to be done on the plates to get them to fit flush.
However for the camber plate I will position it at the bottom of the original hole for maximum upwards adjustment. I didn't get a chance to measure the original camber as the car was obtained disassembled but I am assuming that there certainly wasn't positive camber and lowering will only increase negative camber therefore any needed adjustment will be only towards positive.