Modern type battery moved under rear seat?

Bmachine

Well-Known Member
Site Donor $
Site Donor $$
Messages
3,769
Reaction score
2,116
Location
Northern California coast
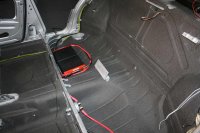
I need to change my battery. While doing that, I am considering moving either in the trunk or preferably under the rear seat.

I did a search on the site and one discussion had this interesting post:

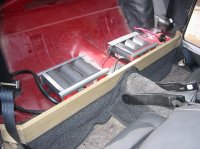
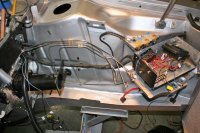
I am considering copying Doug's design for my coupe. Doug has a single Oddessy PC 680 - http://www.odysseybattery.com/extreme_battery_specs.aspx

It is held in place using polyurethane mold created using Por a Cast http://www.sunbeltmaterials.com/syna...duct_lines.htm to hold it in place.

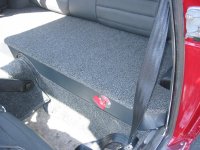
Given that folks tell me the rear strut brace doesn't do much for coupe handling, and requires drilling holds into the rear shock towers, this seems like it may be a better alternative for those of us who want to get the battery out of the front of the car.

I was wondering if either Ohmess or Decoupe or anyone else who has done something similar might comment on how well (or not) this mod has worked.

Thank you very much.

Bo
 
Last edited:
I did that on my '66 Alfa Sprint GT, using two, 6v Optima batteries in series. Worked quite well. Obviously a 12v Odyssey would be another solution.

Haven't tried doing this to my coupe - is there enough volume below the rear seats?
 

Attachments

  • Back Seat Upholstery 002.jpg
    Back Seat Upholstery 002.jpg
    95.3 KB · Views: 439
  • Back Seat Upholstery 008.jpg
    Back Seat Upholstery 008.jpg
    97.7 KB · Views: 367
Last edited:
I am on my 2nd Optima dry cell battery (this time a yellow top after 5+ years of a red top), lighter than lead acid, no liquid or fumes, no hassle for rewiring. Just a thought.
 
Trunk space is too valuable IMO.

I have two Odyssey PC680's in parallel under the right rear seat. Built a metal tray and welded it to the floor. A strap holds the batteries in place (not shown in pics). I had to cut one small corner(±8 mm) of the floor at rear right corner to fit the tray so that the rear seat cleared the top of the batteries without modifying the fiberglass seat base. Also, for some reason, the shape of the floor is not the same on the left and right. There is more clearance on the right side.
 

Attachments

  • BatteryTray.jpg
    BatteryTray.jpg
    91.9 KB · Views: 379
  • DoubleBats.jpg
    DoubleBats.jpg
    94.9 KB · Views: 395
Perhaps there is more clearance on the right to fit the fuel injection brain. Easier to manufacture injected and carbed shells the same. A thought.
Steve
 
Battery box

Part Status Description Quantity Price
61217585707 Battery bracket 1 $16.34
61218361676 HEAT RESISTANT BATTERY BOX COVER 1 $11.22
61218361677 HEAT INSULATING BATTERY BOX 1 $15.24
 
Trunk space is too valuable IMO.

I have two Odyssey PC680's in parallel under the right rear seat. Built a metal tray and welded it to the floor. A strap holds the batteries in place (not shown in pics). I had to cut one small corner(±8 mm) of the floor at rear right corner to fit the tray so that the rear seat cleared the top of the batteries without modifying the fiberglass seat base. Also, for some reason, the shape of the floor is not the same on the left and right. There is more clearance on the right side.

That is very tidy. Nice work!

Why did you decide to run 2 of them, out of curiosity...?
 
I have found another thread which deals with this question and provides a lot of good info as well:

http://www.e9coupe.com/forum/showthread.php?t=17133&highlight=battery

For those who have done it, where did you decide to pass the cable through the firewall to the engine bay? Any existing hole that can be reused by any chance?

The above thread mentioned using the cable from an e30. Sound like a great idea to me.
 
Last edited:
Why did you decide to run 2 of them, out of curiosity...?

It has been awhile since I did the math, but I thought I needed two so that the CCA output would be closer to that of a full size battery.

I ran my heavy gauge wires through the frame rails. Dropped into an existing hole just forward of the front seat (under the carpet) and popped up under the battery tray (enlarged the existing slots into a round holes and used rubber grommets).
 

Attachments

  • BatCables.jpg
    BatCables.jpg
    96.6 KB · Views: 347
I ran my heavy gauge wires through the frame rails. Dropped into an existing hole just forward of the front seat (under the carpet) and popped up under the battery tray (enlarged the existing slots into a round holes and used rubber grommets).

Very slick work there Sven. I didn't realize there were holes in the frame rail. That is awesome.
 
Hi Bo -- I actually completed the battery move to the trunk, but was having a major electrical system problem at the time. I had run the cable through the frame rails, as noted, and did a ground under the rear seat that I used for other circuits I added to my car (fuel pump controller, fuel pump, and seat belt tensioners).

In the process of tracking down my electrical problem, I removed all this and returned to the battery in the nose of my car.

It turns out that there was an electrical connection in the reference line that runs from the dash light to the alternator that was deteriorating over time. This increased the resistance in the line, falsely telling the alternator to increase its output voltage. Ultimately, this fried two voltage regulators and two batteries, including the new little trunk battery, before I got it resolved. It was quite a nightmare.

I may go back to this setup, but it has dropped pretty far down the priority list.

Yikes! Expensive experience there.

Thank you for the tip, Ohmess. I will def keep an eye on that.

When you say "line that runs from the dash light to the alternator", I don't have the schematic with me but which dash light are you referring to?

Bo
 
I am referring to the idiot light on the dash. There are two wires to this light: one from the battery and one to the alternator. When alternator is not operating, the line to the alternator acts as a ground, voltage from the battery flows through the light and the light illuminates. This should happen each time you start the car. Once the car is started and the alternator runs, voltage from the alternator offsets the voltage from the battery and the light goes out.

The car runs off the battery, and the voltage regulator in (or near depending on which version you have) the alternator uses the voltage from this line to determine how much voltage to deploy to charge the battery (within a specified range). If the alternator charge voltage drops below a certain level (as when the alternator is failing), the light begins to illuminate. If the alternator charge voltage is eliminated (as when the alternator fails or the belt breaks), the light is fully illuminated.

Resistance in that line tells the alternator to put out more voltage than the car actually needs. Fortunately, there are almost no integrated circuits in our cars, but this excessive voltage destroys batteries in a relatively short time.

Excellent info. Thank you Ohmess.
 
I ran my heavy gauge wires through the frame rails. Dropped into an existing hole just forward of the front seat (under the carpet) and popped up under the battery tray (enlarged the existing slots into a round holes and used rubber grommets).

Would anyone have a pic that shows where the hole in the frame rail "just forward of the front seat" is? I have soundproofing there and I'd rather not remove the whole thing searching for where that hole is.

Thank you.
 
Back
Top