Needed! Pictures of your bonnet stay / bonnet hinge and torsion spring assemblies!!

dj_efk

Well-Known Member
Messages
541
Reaction score
75
Location
South-West UK
Hi all,

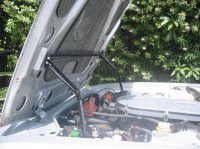
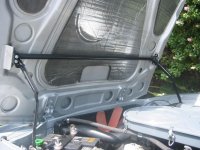
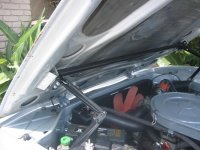
As in the title, my restoration shop is having issues working out how to assembly and install the above correctly - Can anyone help by posting some pics of how the three assemblies should look?

Thanks,
David.
 

jmackro

Well-Known Member
Messages
2,452
Reaction score
721
Location
San Juan Capistrano, Ca.
I can guess what your problem is:

When the torsion bar - arm assembly is delivered, the springs are not pre-loaded. Each side needs to be twisted, and held in place with that "L" shaped part secured by two 6mm bolts.

I bolted each side of my torsion bar - arm assembly to a piece of angle iron, and clamped the angle iron in a vise to secure it. Then I could rotate the arm with one hand, and insert the bolts with the other (having a helper would have helped a LOT!). The torsion bars exert a lot of force - I had to use two "L" shaped brackets on each side. When I tried using just one, the force of the spring just bent it, and the thing went off like a rat trap. Wear goggles, and work safely!
 
Last edited:

dj_efk

Well-Known Member
Messages
541
Reaction score
75
Location
South-West UK
Thanks for the info but the restoration shop requested the pictures - If anyone can help them (and therefore me!) out I'd really appreciate it.
 

BonitaCS

Well-Known Member
Messages
169
Reaction score
1
Location
Bonita CA
Isn't that the boot and not the bonnet? I had the same problem puttig mine back together and another member on this forum posted or emailed me photos; can't remember. I'll post some tonight when I get home from work if no one has posted any.
 

jmackro

Well-Known Member
Messages
2,452
Reaction score
721
Location
San Juan Capistrano, Ca.
OK, here are a few shots of mine. The tube and arms are supposed to be body color, but I realized that I would mess up the paint wrestling with pre-loading the torsion bars.

Hope this helps your restorer. I am guessing that he is puzzled because the arms seem to point 180 degrees from their logical direction before the torsion bars are pre-loaded.

My fourth photo shows how I doubled up the "L" shaped brackets (added the two from my old, worn-out assembly to the new ones), since one bracket wasn't stiff enough to resolve the force from the pre-loaded torsion springs. This close-up picture shows where the paint got scraped off the arm as it forced its way past the bent bracket.
 

Attachments

  • CS hood prop 001.jpg
    CS hood prop 001.jpg
    95.7 KB · Views: 1,704
  • CS hood prop 002.jpg
    CS hood prop 002.jpg
    92.9 KB · Views: 835
  • CS hood prop 003.jpg
    CS hood prop 003.jpg
    89.8 KB · Views: 840
  • CS hood prop 004.jpg
    CS hood prop 004.jpg
    82 KB · Views: 883
Last edited:

HB Chris

Well-Known Member
Site Donor $$
Messages
19,418
Reaction score
8,757
Location
Huntington Beach, CA
Jay,

I didn't have to double up my L brackets even though it was very tight. I pivoted the L bracket out of the way and once the arm was loaded I slipped the L back into place and added the second bolt. This may help others.
 

61porsche

Well-Known Member
Messages
1,732
Reaction score
28
Location
Dallas
Hood prop assembly and installation

Since the factory manual doesn't document the reassembly or removal ( for replacement of rods) can we please?

From a bare shell:

1) Insert the rods and install the assembly L bracket down and toward the front of the vehicle. ( Are they supposed to cross? Like the trunk?- Mine were bent like that..curved.)

a) Loosen ( remove one bolt form each side bracket) and swing "L" bracket down or up?

b)Position unloaded? Down or up to tension and insert in the arm bracket? ( Jay's photos show marks from both directions...)

c) Play between brackets/ hood braces? ( since some of us are handy with fabrication rather than handsome....) Clearance necessary to swing the tension rod past the side bracket and the cutouts of the tube?

d) Reposition the L bracket and reinsert bolt.

Repeat for the oppposite side.

Also- what is the correct hardware finish? My L brackets weren't painted and the bolts were silver cad. Can't definatively tell from the manual pictures.

The bolt on the fender- shouldered? Perhaps a small sleeve/ bushing is better than everything flopping about? Is that what the "S" stands for on the part detail?

I had to rebuild mine- it was an inch too long to fit. Yes, It was nice and shiney, but now it's on the short list of things to get done.

Any final help would be greatly appreciated.
 

dj_efk

Well-Known Member
Messages
541
Reaction score
75
Location
South-West UK
Hi guys,

My restoration shop is still having problems installing my bonnet / hood hinge assembly so that it doesn't foul the inner wings when you close the bonnet / hood. Can anyone provide some really close up photos of this area so they can see in detail how it's supposed to look when assembled?

Much appreciated!
 

pamp

Well-Known Member
Messages
1,017
Reaction score
3
Location
Comox, B.C. CANADA
Bonnet Stay

In my case,
The left side arm broke at the tube. I had to pre-load and clamp the assembly on the floor in order to weld the arm back on. Not easy. I would post photos but cannot see how they would be better than what is already posted. Not sure where one might get confused as to the assembly of all bits back to the bonnet, pretty straight forward. Where is the interference?
 

HB Chris

Well-Known Member
Site Donor $$
Messages
19,418
Reaction score
8,757
Location
Huntington Beach, CA
If you hold the torsion bar up to the hood and the two arms are pointing towards your headlights then you HAVEN'T pre-loaded the arms to move them behind the L bracket that is held by two bolts each. Jay provided excellent pictures of these arms and L brackets. The arms should be pre-loaded off of the car, I don't think it can even be done on the car, you don't have the leverage and it might not even bolt in due to the arms being in the wrong orientation.
 

61porsche

Well-Known Member
Messages
1,732
Reaction score
28
Location
Dallas
Fouling and scratching up the paint

Perhaps he's asking if there's any final adjustment that can be made so that the center pivot/ arms don't ding up the inner fender when closing?

I suppose you could elongate the rod notch/cutouts in the tubes and rotate slightly if something's really bad.

Thoughts?
 

61porsche

Well-Known Member
Messages
1,732
Reaction score
28
Location
Dallas
Hood Prop

Currently mine is on my workbench. When I shortened it, it would hang up as partially open keeping the hood up on the left side a 1/2" with and without tension rods. Slight pressure on the hood didn't bring it down. Oh well, back to the lab again.

I've seen owners who complain that the hood doesn't stay up or it's unstable. I just chaulked it up to needing new rods due to broken or twisted. Or if manhandled carelessly, the tube deforms and doesn't rotate easily and the arm doesn't assume a full closed position or it's hitting the lower portion of the shock tower. ( Kinda like a refridgerator light bulb- can't see it when closed.) I did have to bend the arm brackets inward and away from the inner fender drip rail.

The engineer in me says the rods are keyed into the hood end bracket bushing which has a slot completely through the bracket, which means the short bend can be pushed outward allowing the long end at the arm bracket to be tensioned with a tool similar to what's used on the trunk and slid into the slot. ( Without all the scratching of finishes) Sounds good, but the hood bracket has to be held opposite to the arm bracket or the brackets have to be secured to the hood. Maybe the factory had a jig or vise..... has anyone done it this way?
 

dj_efk

Well-Known Member
Messages
541
Reaction score
75
Location
South-West UK
Thanks guys, my restoration shop didn't know you had to preload the springs - Apparently that's going to be a right bummer of a job so if anyone has any tips on how to do it safely without scratching paint then I / they are all ears!
 

JhwShark

Well-Known Member
Messages
377
Reaction score
1
Location
Pacific Northwest
Why the silence?

This thread is interesting in that a lot of coupes have been restored (by competent e9 shops) with major front end and l&r body work...it also seems there are a lot of frustrated e9'rs that do a lot of there own auto work.

If this is so, then the e9 restoration shops that are mentioned on this board know how to do it! Shops usually need to remove the bonnet so they must replace it, right?

Therefore...why will none of them contribute to this thread??? I'm sure it's not because it was not asked in the Resto section.

Just asking an obvious question.
Jon
 

HB Chris

Well-Known Member
Site Donor $$
Messages
19,418
Reaction score
8,757
Location
Huntington Beach, CA
Put a blanket on the floor, place torsion rod on blanket, attach an 18" long strap of steel bar to the mounting points on one end of rod and use the two bolts to hold it in place, with steel strap on floor, pull arm towards strap until the L bracket can slip behind the arm and keep it tensioned, repeat on other side. It is pretty easy to do once you have the leverage.
 

ajf

Member
Messages
39
Reaction score
8
The key is to install the bar/arm assembly first, without the "L" brackets on it in place (these have 2 bolts each). Then, by attaching (by wire in my case) a piece of wood (or whatever; about 12" long) to each arm you can tension the spring by pulling the arms upward toward the hood. At this point you can install the L brackets with the bar under tension, which serve as a stop for the tension in the springs. After both L brackets are installed the arms are bolted to their mounting points in the engine bay. Hope this helps someone.
 
Top