Open Source restoration..

eriknetherlands

Moderator
Site Donor
Messages
2,773
Reaction score
2,007
Location
Netherlands, Eindhoven area
Being new to car restauration i'd thought it would be good to learn from the collective knowledge of the forum. That, and the fact that my love for the car superseeded reasonable thinking makes it essential. I'm technical, but haven't restored anything with wheels yet...
So to prevent that this car will be the barnfind of 2048, let me invite you to support me to hack my way through the brittle brown stuff.

Let me open this thread to show you what i've done, and what i plan to do.
I am first of all looking for comments how i could improve my work. And, please, do not hold back.
Being Dutch, were known for being direct. You can be direct with me and i'll be thankfull for the clarity of your comment.

So the history;
I wanted a classic since i was 12 or so; I collected every book there was on 1920-1980 cars that i could find. In 1996 I started with a old german '69 moped, and later i saved up some money but never really made the move to buy something.
So, when my Wife and I discovered in 2009 that soon there would be more then just the 2 of us, my friends advised me to spend the saved pennies before it was confiscated "for baby essentials"...:???:
So after fantasizing for >ten years where i would spend my (little) money on, i had to decide in a few weeks how the black bac account numbers had to materialise...
- I loved enlish cars, but dreaded their build quality
- being a technician, i loved the robust german engineering of my 1969 moped
- and being very precise, complex technical mechanisms such as the Zeniths carbs are considered kitchen table heaven by me...
What did i know about bodywork? .....not much other then that e9's were rust prone.
So i choose this car; a 1973 3.0 CS, Swiss delivered, fjord blue, tan leather. It was already torn apart once and seems (i'm not sure) to have at least the front fenders replaced, and the interior was complete, although a tear here and there was present. 99% of the parts were present.
I hoped that this would prove a a good start.

It was; 2,5 years of driving; about 10.000 km's (~7500 miles) and using it as a daily driver. (but not in winter; I took my bicycle through the snow to work instead of her; i learned that much already by reading the forum). The biggest problem's I've had were dead batteries and loose screws.
I love it, and so do the wife and 2 kids (by now)

Into the project;
Rebuilt the alternator and distributor (thanks to DeQuincey) in the meantime, and did some general tiding up. Fiddeled with the carbs (only a bit, they still have me puzzled on their inner workings). And i've been driving it... A lot.

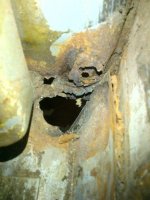
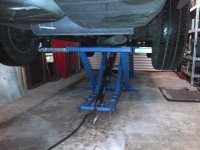
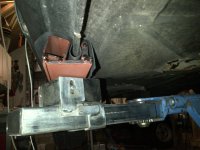
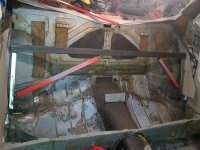
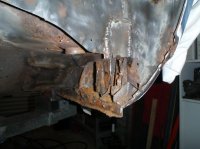
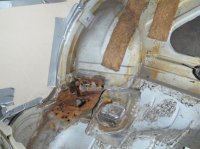
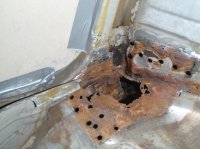
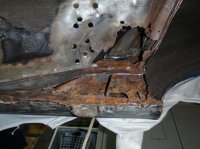
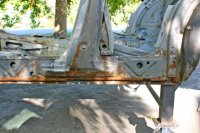
This winter (2011) i decided to solve the rust issue in the rear floor sections around the rear axle attachement points under the rear seat.
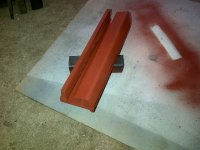
I needed to learn to weld, buy all the stuff required, tools, lifting device, sandblasting cabinet, sheet metal working bits etc. So it has taken some time to get going.

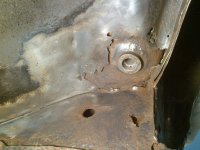
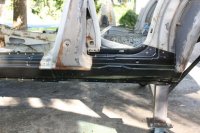
I'll limit myself firstly to parts of the car that are not in the line of sight, trying to keep the metallic blue on the car where i can, as i believe it requires more skills then i currently have to cut & weld and get a e9 worthy paint job, all by doing it yourself. (This may not proove to be a wise thing?)
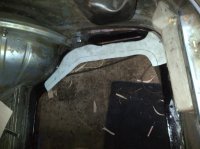
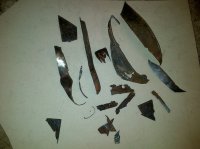
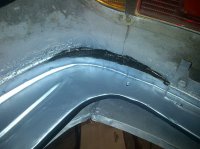
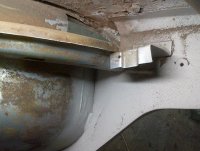
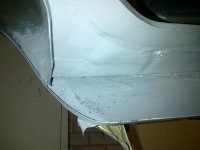
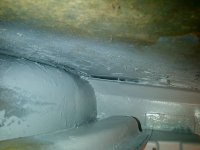
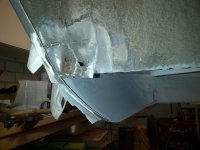
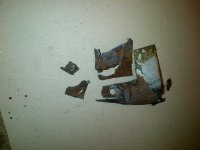
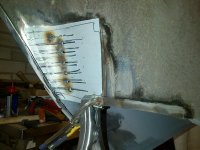
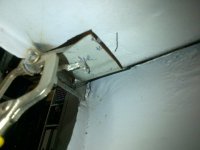
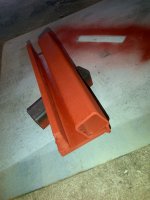
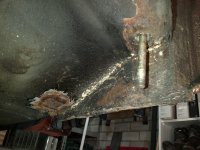
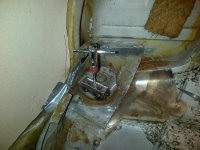
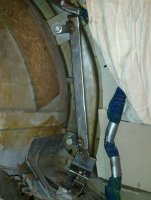
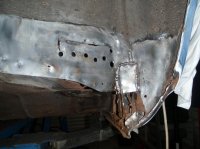
I started with the area around the fuel tank, the previous owner repaired it quite bad.
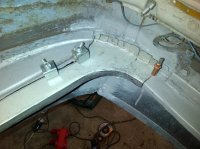
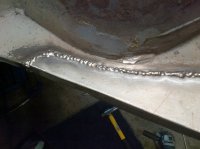
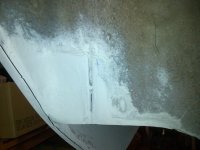
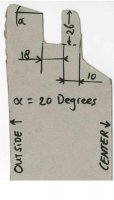
I made replacement sections for the area that i considered to be bad enough to replace. The weld is not completely flat after grinding it down, but i accepted it.
And it is is not spotwelded to the rear valence (isn't that what the panel is called that holds the rear lights and licence plate?), but it's sealed.

Attached some pictures showing the steps.
Tell me all you think; I'm eager to learn.
 

Attachments

  • IMG-20120324-00191.jpg
    IMG-20120324-00191.jpg
    74 KB · Views: 271
  • IMG-20120406-00277.jpg
    IMG-20120406-00277.jpg
    63.3 KB · Views: 252
  • IMG-20120423-00312.jpg
    IMG-20120423-00312.jpg
    72.5 KB · Views: 269
  • IMG-20120408-00284.jpg
    IMG-20120408-00284.jpg
    71.7 KB · Views: 243
  • IMG-20120509-00352.jpg
    IMG-20120509-00352.jpg
    87.6 KB · Views: 252

eriknetherlands

Moderator
Site Donor
Messages
2,773
Reaction score
2,007
Location
Netherlands, Eindhoven area
second project, a bit more complex

So, second thing i tackled is the lower rear corner of the rear right wheel well. It is a joint of the boot floor to the wheel well and the outer skin.

There used to be some kind of waterdrain hole located in this corner of the trunk floor, but 40 years later it looks more like a crater of about 6 cm (2 inch).

Attached some pictures.
Now that i see the pictures that i supply, i notice it would be good to also take some pics before tack welding it in place and paint to better estimate the panel fit. I will think about that next time.
But once i get going, i want to finish it and forget about the documentation process.

I created 2 pieces first, the floor and the wheel well. Temporarily fixed them in place to get correct alignment, joined them together with a couple of small welds. Next I took them out of the vehicle to weld them through. Ground down the welds, and placed the assembly in the gaping hole in the body. Welded the circumference and grinded the welds. I noticed that not all welds on the horizontal seam of the wheel well are completely welded through, so i should weld next time with a bit more amp's i guess.

I managed to keep the outer skin paintwork intact, although i do hope that it did not become to hot and that the paint falls off tomorrow.

Some pics attached.
Feedback welcomed.
 

Attachments

  • IMG-20120404-00270.jpg
    IMG-20120404-00270.jpg
    44.2 KB · Views: 240
  • IMG-20120423-00325.jpg
    IMG-20120423-00325.jpg
    75.1 KB · Views: 242
  • IMG-20120508-00340.jpg
    IMG-20120508-00340.jpg
    36.8 KB · Views: 226
  • IMG-20120508-00341.jpg
    IMG-20120508-00341.jpg
    26.4 KB · Views: 214
  • IMG-20120508-00344.jpg
    IMG-20120508-00344.jpg
    38.1 KB · Views: 235

eriknetherlands

Moderator
Site Donor
Messages
2,773
Reaction score
2,007
Location
Netherlands, Eindhoven area
some more pics

Hey,
Some more pics on the post before. I did make more pictures then I thought.
It shows the jont of the floor of the trunk area, and the right rear wheel well.

The pic of the steel "comb" is the fabrication trial process that did not make it. After 3 hours of welding grinding, grinding more, getting holes, welding them up again, grinding, new holes :x etc that design went into the recycle bin.

The second attempt with a hamer and a continuous sheet was much more succesfull. In ~2 hours i finished the 2 sections.

regards, Erik.
 

Attachments

  • IMG-20120423-00316.jpg
    IMG-20120423-00316.jpg
    57.3 KB · Views: 216
  • IMG-20120426-00333.jpg
    IMG-20120426-00333.jpg
    55.8 KB · Views: 215
  • IMG-20120426-00335.jpg
    IMG-20120426-00335.jpg
    71.4 KB · Views: 221
  • IMG-20120430-00338.jpg
    IMG-20120430-00338.jpg
    60 KB · Views: 214
  • IMG-20120430-00339.jpg
    IMG-20120430-00339.jpg
    37.9 KB · Views: 226

Nicad

Well-Known Member
Site Donor
Messages
3,519
Reaction score
544
Location
Toronto
Looks like you have some developing skills there Erik. With patience and the right attitude, you will obviously succeed. More photos please.
 

eriknetherlands

Moderator
Site Donor
Messages
2,773
Reaction score
2,007
Location
Netherlands, Eindhoven area
How not to lift your E9; and how to do another way.

Before doing the bodywork described in the 3 posts below, i first had to manage to lift the car with the lifting device I have.

I have found some links on the forum towards how to lift our coups, but most of them used the attachment points (long bolts) of the rear subframe trailing arms.
But exaclty that part of my floor needs replacing, so I had to create another solution. this was my first attempt: :?

To gain easy access to the body work required, i removed everyting tine the rear; the rear axle, decklid, fueltank, all seats, doorpanels, spare wheel and rear window, but did not realise that the engine is quite massive. I lifted the car by the frame rails under the car and the rear 30 CM of the sill. Proudly i showed it to my brother...who wisely commented, over a beer; "Why does the body not rest on the right rear lifting point?" I noticed that he was right, contemplated about the theory that 3 points are enough to define a surface, and then checked the other rear lifting point. It was also taking only a few kg/pounds of pressure! I had balanced the car almost perfectly on the framerails, at 30 cm (1 foot) to where they bend upwards into the engine compartment!
:shock:

I was very close to tipping the car forward, off the lift and writing it off completly by squashing it under the low garage roof.

So I moved the lifting points 30 cm (a foot) further towards the engine to have the centre of gravity at least between the lifting points. Now it's rock solid.


To be able to work on the floor near the rear axle attachement points, I fabricated the following "shoes" to lift the sill.

It's easy to make, and universal enough to use almost any section of the sill as a lifting point. What i found out is that the lower bit of the outer sill has a flat area, angled at 20 degrees upwards, on the underside. (remove the black steel non structural sill covers).
This means it spreads the load nicely when a section of square tubing is pushing it up.
You'll also have to remove the fuel line that is running (in my car at least) close to the left sill under the floor.
I used a slab of 1mm black EPDM rubber; any tough rubber would do the trick to prevent scratches.

Dimensions on the sketch are mm's and angle is in degrees.
The length is about 30 cm (1 foot), but can be longer or shorter; it's just to spread the load. If too short perhaps the sills will deform?
It may not work when your sills are corroded to much, you just push in the brown stuff into what remains of the sill.
Drawing and pictures attached.

Erik.
 

Attachments

  • IMG-20120308-00038.jpg
    IMG-20120308-00038.jpg
    64.9 KB · Views: 219
  • IMG-20120216-00037.jpg
    IMG-20120216-00037.jpg
    71.8 KB · Views: 225
  • IMG-20120308-00036.jpg
    IMG-20120308-00036.jpg
    62.3 KB · Views: 222
  • Copy of IMG-20120310-00052.jpg
    Copy of IMG-20120310-00052.jpg
    59.6 KB · Views: 223
  • template for sill lifting shoes.JPG
    template for sill lifting shoes.JPG
    31.7 KB · Views: 222

eriknetherlands

Moderator
Site Donor
Messages
2,773
Reaction score
2,007
Location
Netherlands, Eindhoven area
And the current challenge; Origami with sheet metal.

Still in the process to dismantle the brown stuff and figure out how the panels would have been shaped before turning into brown FeO3.

To guarantee the positioning of the long vertical bolts that secure the rear subframe, i have created a removable jig on the inside of the car.
The frame connects each of the 4 belt anchors (the threads) in the vehicle; 2 bolts on either side.
This frame then attaches with 2 M6 screws on either side to a small section of tube that i welded on the the reinforcement plate. Thus i can remove the frame, and keep the reinformcement plate in place.
Bu i can also drill out the spot welds to hold the reinforcement to the body, remove the rotted out steel, suspend the reinforcement plate again in mid air and restore the floor to fit perfectly to the reinforcement plate.

at least that's the plan...
Advise, comments?

Erik.
 

Attachments

  • IMG-20120316-00109.jpg
    IMG-20120316-00109.jpg
    72.9 KB · Views: 228
  • IMG-20120318-00130.jpg
    IMG-20120318-00130.jpg
    78.6 KB · Views: 221
  • IMG-20120319-00143.jpg
    IMG-20120319-00143.jpg
    62.1 KB · Views: 216
  • IMG-20120320-00156.jpg
    IMG-20120320-00156.jpg
    79.6 KB · Views: 219
  • IMG-20120320-00169.jpg
    IMG-20120320-00169.jpg
    65.7 KB · Views: 209

eriknetherlands

Moderator
Site Donor
Messages
2,773
Reaction score
2,007
Location
Netherlands, Eindhoven area
Some more pics of my inside sill; how bad is this?

The big question for me is; do i have to cut into the sill further?

I think i can fabricate the floor and wheel well 3D surfaces correctly, and the flat plate that makes the vertical plane of the sill.
But what about the condition of the internal sill?
And what about the lower end of the additional rigde that strengthens the wheel well radius (it follows the wheel to the rear) ?
And I wonder as well what i find behind the wheel arch leading edge, where the blue outside colour is just sanded off. I guess i have no choice but to cut that open as well?

I hope that the origami of E9 metal sheet does not get any more complex then this...:?:


I have the feeling it's best to cut and open the sill from the outside as well, at least at the underside to expose the inner sill and asses it's condition. It also has the advantage that I gain access to the vertical element (the reinforcement rigde of wheel well.) which is disintegrated in the lower 2 cm's (1 inch) as well.

-whishfull thinking-
Would it be an option to fix the floor and wheel well now; good & solid, and leave the sill with a patch to do for next year?

regards,
 

Attachments

  • P5080070.jpg
    P5080070.jpg
    55.1 KB · Views: 225
  • P5110075.jpg
    P5110075.jpg
    63.8 KB · Views: 229
  • P5110076.jpg
    P5110076.jpg
    60.8 KB · Views: 221
  • P5110077.jpg
    P5110077.jpg
    63.5 KB · Views: 223
  • P5110079.jpg
    P5110079.jpg
    58 KB · Views: 225

Sven

Well-Known Member
Site Donor $
Messages
1,145
Reaction score
110
Location
Seattle
Erik,

This is daring work to open up this area. Attached are two photos that should assist you in understanding how all the pieces come together. The side rockers are one of the main structural supports of the car, and if you are going to restore the car over time this should be address first - as you are doing. I would suggest you remove the outer rocker cover (the one screwed on) and most likely the outer structural rocker panel (shown in photo #2 - the new black piece). Once this is out then everything should be open for inspection. Unfortunately to remove this you will need to cut out the lower edge of the front and rear fenders (which probably need replacing anyhow given the other rust you have shown us).

Good luck. We look forward to more progress photos.
 

Attachments

  • RearRocker1.jpg
    RearRocker1.jpg
    71.3 KB · Views: 249
  • RearRocker2.jpg
    RearRocker2.jpg
    64.3 KB · Views: 250

Mike Goble

Well-Known Member
Messages
1,608
Reaction score
1,206
Location
Fairfield, CA
Restoration - the process of rebuilding your classic car.

Restauration - the process of rebuilding your classic car, meals included.
 

Krzysztof

Well-Known Member
Site Donor
Messages
1,659
Reaction score
793
Location
Poland
I know that there is a separate huge topic about your long journey. This thread is really old but it is easier for me to ask some questions. Maybe you will link me to specific pages to your restoration story but I'm planning to go over once (the best before I will start).

Based on Your experience and also from other's restorations you have monitored over the years ... what should be the right sequence of the panel removal of E9?
I mean for complete resto, not just a fixing some rust spots as I need to go into all places mostly.

For example:
1. Rear side (rear panel, rear fenders) - trunk floor, wheel's wells
2. Front fenders (to be able to go to the #3)
3. Sills (required reinforcements) - incl. bottom A-pillars, B-pillars and rear subframe mounts
4. Front fender structure (including engine compartment upper edges)
5. Floor panels
6. Roof

at which point the doors should be restored and fitted? #3 or #4?

Why you was not removing the rust by sand/soda blasting or chemistry but rather scraping and sanding? I know pro's and con's of aftermentioned but would like to know your motivation. What I can expect is you was willing to see where the rust is and how severe it is (and maybe save some time with towing the body to the shop). On the other side I can't even imagine how many sandpaper discs you've been used for each of the parts not mentioning dust and - even with mask on - dirt delivered to the lungs as it is almost impossible to collect all rust and paint residues from the garage just after each sanding.

I agree you have methodical approach to the job.
 

eriknetherlands

Moderator
Site Donor
Messages
2,773
Reaction score
2,007
Location
Netherlands, Eindhoven area
Hey, happy to help.

Let me answer your questions:

Why not sandblast it all?
Well, In 2012 I thought I would just fix that little hole and drive a year later. And one thing led to another. And I kinda like doing things thorougly.

If I'd do it again, then yes i'd take a different approach: I would strip the whole car from it's rear & front fenders and sills, and have it blasted.

My preferred way to build it up again: I'd roughly work bottom first, then rear, then doors, then front.

Start with instelling new sills & frame rails, then fix the 4 floor sections, then rear (trunk& sides). Weld all these parts in place with the doors and front fenders on temporarily for alignment/ fitment.

Then match the Doors to the fixed rear structure, with the front on with screws for reference. Reskin the door for perfect panel gaps and to get access to all the rust inside the doors.

Then tackle the front end.

Yes, I have consumed quite a lot of dust, and used about 30 or 40 wire wheels for drilling machines. The harder twisted wire discs for grinders I found too heavy to operate upside down, lying on my back. I've looked like a hedgehog more the once with these wires sticking in me in through gloves and sweaters.
And getting the underbody coating out off my hair was the most daunting task.

Learned a lot? Yep: 1. it doesn't make sense to first clean the underide completely, to decide later on to cut the whole floor out. I did spot the rust holes from the top as well, and that should have been enough. I could have thrown it in the bin with undercoating.

2. If I'd taken the go-in-full approach, stripped 4 fenders, sills, trunk and had it blasted, I'd saved myself 10% of the time spend.
 
Last edited:

autokunst

Well-Known Member
Site Donor $$
Messages
3,610
Reaction score
2,623
Location
Milwaukee, WI
Erik,
Your sequence matches what order I have been going as well (although I am still on the bottom right side, but making great progress).

I did invest in chemically stripping the whole car. It is a life changer and would highly recommend it if the goal is a full restoration. When I am finished fabricating/patching/welding/shaping I will have the car dipped again and then e-coated. This will be the basis of the subsequent body work.
Stephen
 

Krzysztof

Well-Known Member
Site Donor
Messages
1,659
Reaction score
793
Location
Poland
Thanks Erik and Steven,

I see some professionals are still trying to avoid sand/soda blasting which makes me struggle. They prefer to go chemical stripping which is fine in case each and every panel and cavity will be open and washed out or removed.

I'm still wondering about sandblasting due to the removal of the steel thickness from surfaces not being eaten.

Also I've learnt that sand or soda will be everywhere so it can be done only before finally closing any cavities.

@autokunst
Are you chemically stripping only outside body surfaces or each and every one? Which method/chemistry are you using?
 

autokunst

Well-Known Member
Site Donor $$
Messages
3,610
Reaction score
2,623
Location
Milwaukee, WI
I brought my entire chassis to a facility that dips the whole thing at once. It is a surprisingly elaborate process. First it is dipped into a solution that removes the paint. They pull it out after about a day and pressure wash the paint off. This step is usually repeated 2 or 3 times. Then they dip it in a different solution that removes the rust (some sort of mild acid based solution). After that, more pressure washing and a dip into a neutralizing solution. Finally, they dip it into a water based rust preventative solution.

Here is a video at a different facility than what I used, but it shows some of the steps of the process if you are interested.

The facility I am using will go through the whole process again when I am done with the metal work and end with electro deposition coating (e-coat) the whole car. It will be that satin black color - ready for body work.

Here is a much fancier video (of a much fancier facility) that shows the process I am using including the e-coating. This video was originally shared by @Keshav

Here is my car right after it was dipped.

20200925-roof in the sun.jpg20200925-under front.jpg20200925-back from dipping.jpg
 

autokunst

Well-Known Member
Site Donor $$
Messages
3,610
Reaction score
2,623
Location
Milwaukee, WI
Thanks for sharing the video. I did a little searching to find the firm that produced it, their price list is on facebook, and it appears the cost for the large tank dipping is $3k,

It has to give some peace of mind to know that you are starting from a clean base!
Since I am doing a 2-step process, the pricing I was given was similar, but slightly different. I think they charged me around $3k to clean it up the first time. But that includes them dipping/stripping it again the second time. However, I have to pay for the e-coat process at that second visit which I think was another $2k to $3k. I think it is well worth it. And YES, it is a treat to be working with a clean baseline.
 

eriknetherlands

Moderator
Site Donor
Messages
2,773
Reaction score
2,007
Location
Netherlands, Eindhoven area
Yeah, acid dip is indeed a good option, though not easily available.
Here in NL it's only on the other side of the country. 5K for an entire shell +doors & hood/trunk.

I do hear that it is important that all the acid is removed from the seams, as any acid remaining behind will play havoc if not neutralized. But you must simply have trust in them; its their job to donit right and it is not like you can test easily if all acid is neutralized.
But then again, sandblasting doesn't even get into the seams, where normally the most rust is hiding, and sandblasiting has a tendency to warp panels if done to rough.

So apart from taking the whole car apart into separate panels and fixing them (As Miklos in Hungary does), I'd also opt for the dip-> repair ->dip & KTL coat option.
Erik
 
Last edited:

Krzysztof

Well-Known Member
Site Donor
Messages
1,659
Reaction score
793
Location
Poland
Very informative materials. Thanks!

I was aware about KTL process.
There are some cons of that except the price but for sure it is worth trying.

Unfortunately most of E9 I have seen in EU need to be put into pieces. It is always a question what is recommended in which specific case.

Most of classic cars owners would like to have them treated that way. On the other side this technology is still not popular which is still making it worth implementing for the most precious cars. I know that we see our E9s as the most precious but taking into account all spending (workmanship, parts, materials) selecting acid+KTL might be just too much from business case perspective.

In the article I read about German KTL shop, the car used as an example (VW Polo MK1) was in poor condition. After peeling off the paint it was treated to have it protected but the car was still kind a sieve. That was the time to start repair the body. It was strange for me as the protection will be damaged in most of car surface due to welding, tinning, grinding etc. It is different on the film shared above which makes more sense to me.

I was told car before going into stripping bath should be clean from other metals like tin or aluminum or brass. It is to keep the solution clean.

There was one information I have received that there is a KTL option in Poland with the cost ballpark as indicated by @autokunst and @eriknetherlands . But I haven't reach them so far.

Looking on the move on Insta I was wondering how the paint (applied in the plant by dipping) will be washed out from the inner sill surface and bottom reinforcements?
Also they were dipping the car shell perpendicular to the solution surface which is a way to trap an air inside (even under the roof).
German KTL shop was using angular configuration (as in the plant) to keep the technological opening in the trunk and other cavities helping filling and releasing solution. I think this is important difference for this process.

From the other point of view...
If the car will be restored "manually" in a proper way it can survive longer than your grandchildren - one body shop worker told me. I had no point to disagree with him at that point.

Still a lot to consider ... as always.
 
Top