Please advise: Full rebuild of ‘72 CSI by Oldenzaal

MD4E9

Member
Site Donor
Messages
18
Reaction score
9
Location
Chicago, IL
So full disclosure, I was introduced to the E9 by a great friend and frankly I was immediately sold. Beautiful lines and stance, elegance and sporty. I’m grateful for this community as I’m constantly learning more. I was made aware of Oldenzaal Classics from their online presence and did have the chance to interview a couple of their clients who were happy with the product. Speaking with them I’ve been impressed thus far with their availability and transparency. So here we go... I knew I wanted a numbers matching car which they sourced and I apologize to the purists but I have decided to paint the car black from its original Polaris Silver, which I know is controversial at best. Ultimately, my goal is to create the best driving car with keeping the spirit of the E9 alive. This is a nut and bolt restoration and down to bare metal. On some level this opens up a can of worms with choices but I want some improvements for example with suspension while maintaining the rebuilt original engine and transmission. Am paying a premium for this total frame off rebuild and restoration? Yes, but I think worth it. I would love your input and potential pitfalls from mechanical to electrical to paint and bodywork. Any suggestions? Thanks!

I started this new thread to post as progress continues. Attached is the numbers on the block and originals manuals/servicing.
 

Attachments

  • 7C8A9F27-20D7-427E-8F58-6AF8F0639976.jpeg
    7C8A9F27-20D7-427E-8F58-6AF8F0639976.jpeg
    108.6 KB · Views: 156
  • 73B49201-7FD9-4813-8324-010177EB58B2.jpeg
    73B49201-7FD9-4813-8324-010177EB58B2.jpeg
    253.4 KB · Views: 140
  • E1B04513-0824-4F3C-9E3A-4F4367BA937B.jpeg
    E1B04513-0824-4F3C-9E3A-4F4367BA937B.jpeg
    382.8 KB · Views: 164
  • 1D235088-83C2-4CDC-9DDB-6D1327159328.jpeg
    1D235088-83C2-4CDC-9DDB-6D1327159328.jpeg
    239.7 KB · Views: 167
  • 8AB59441-CA36-4A54-BB4E-A3DA8198DC4D.jpeg
    8AB59441-CA36-4A54-BB4E-A3DA8198DC4D.jpeg
    140 KB · Views: 148

JamesE30

Well-Known Member
Messages
345
Reaction score
413
Location
Germany
Congratulations on the exciting project. The cars they put out always look spectacular! They must work very efficiently, they always have something new for sale.. did they give you an estimate how long the restoration will take?

Most of the cars they rebuild seem to be very original, how open are they to some level of modification and upgrades? Im
Only a couple of years in the e9 world but updated suspension and brakes can ad so much to any car, always a great place to start.

Also, I’m personally of the opinion that if you are doing a bare metal, nut and bolt rebuild, why shouldn’t you paint it a colour of your choice? If it’s an e9 colour that was available the year of your car then you are simply optioning your “new” car the you would have from the dealership back in the day..

I hate to think about going through all this work only to paint the car a colour somebody else chose 50 years ago, especially if you don’t even like that colour..

A complete bare metal respray in period correct colour really shouldn’t affect the value significantly.. But unfortunately people place a strange amount of importance on things like this haha

I only mention it because I’m in the same position at the moment, deciding on colour for my car!
 
Last edited:

MD4E9

Member
Site Donor
Messages
18
Reaction score
9
Location
Chicago, IL
Hey. Thanks for reaching out and congratulations as well! The restoration is supposed to take 9 months to a year. I totally agree... I felt as though why stick with stock components from a handling point of view. The engine and trans rebuild is stock and understandable. I think they have been very receptive to upgrading but I don’t know exactly what to ask for ... but I’ve taken advice from the forum so far. I haven’t discussed brakes yet but it will be another one of those talking points. I saw the black color online and I just had to go for it. Seems like it was an option for the CS in the U.S. but Europe not so much. Great connecting with you.
 

autokunst

Well-Known Member
Site Donor $$
Messages
3,605
Reaction score
2,618
Location
Milwaukee, WI
For what it's worth, my car's original color was Polaris Silver and I currently plan on painting it Schwarz (period correct black) after my bare metal restoration. I have wavered on that color choice a few times, and always seem to migrate back to black. I guess it is my jam. :D I personally don't care how it affects the value. What is important to me is the quality of the metal work and the promise of zero corrosion after the effort is put into the car. Best of luck with your restoration (which will be finished long before mine). I look forward to following along herein.
 

Gransin

Well-Known Member
Site Donor
Messages
1,528
Reaction score
1,271
Location
Vasa, Finland
I haven’t discussed brakes yet but it will be another one of those talking points.

First of all, Congrats! I'm really looking forward to follow the progress of this project.

I don't know if I should write good things about the stock brakes, since I had a stock front caliper piston bore crack on me last weekend, which I noticed by switching lanes involuntary when I applied the brakes... Well, they are 50 years old so anything can happen I guess, but before last weekend I would have written:
My take on the brakes is that stock 3.0CS/CSi brakes in new or good condition is well enough for a coupe with some suspension upgrades, if you aren't planning on doing track days or similar.
I've driven mine quite hard at times, and the least of my worries were brake fade or other brake related problems. I'd put the brake upgrade $$$$ on something else instead, but that's just my opinion. :)
 

CSteve

Well-Known Member
Site Donor $$
Messages
3,764
Reaction score
1,279
Location
Bucks County, PA
I have run stock CSi brakes on numerous tracks at Driver's Schools. Fine for those, only one instructor said they would like a little more brake. Real racing, I would want more.
 

MD4E9

Member
Site Donor
Messages
18
Reaction score
9
Location
Chicago, IL
I like that we are both banking on perfect metal!! A must for the black as I heard it is unforgiving but I think it looks stunning if done right.

For what it's worth, my car's original color was Polaris Silver and I currently plan on painting it Schwarz (period correct black) after my bare metal restoration. I have wavered on that color choice a few times, and always seem to migrate back to black. I guess it is my jam. :D I personally don't care how it affects the value. What is important to me is the quality of the metal work and the promise of zero corrosion after the effort is put into the car. Best of luck with your restoration (which will be finished long before mine). I look forward to following along herein.
 

MD4E9

Member
Site Donor
Messages
18
Reaction score
9
Location
Chicago, IL
First of all, Congrats! I'm really looking forward to follow the progress of this project.

I don't know if I should write good things about the stock brakes, since I had a stock front caliper piston bore crack on me last weekend, which I noticed by switching lanes involuntary when I applied the brakes... Well, they are 50 years old so anything can happen I guess, but before last weekend I would have written:
My take on the brakes is that stock 3.0CS/CSi brakes in new or good condition is well enough for a coupe with some suspension upgrades, if you aren't planning on doing track days or similar.
I've driven mine quite hard at times, and the least of my worries were brake fade or other brake related problems. I'd put the brake upgrade $$$$ on something else instead, but that's just my opinion. :)
Understood. I spoke with them today and they are basically making new brakes in the stock configuration so that sounded good to me!! Thanks for the input!
 

JamesE30

Well-Known Member
Messages
345
Reaction score
413
Location
Germany
Understood. I spoke with them today and they are basically making new brakes in the stock configuration so that sounded good to me!! Thanks for the input!

“Stock” system with Stainless lines, vented rotors, good pads and fluids seems to be the standard way to go for e9 brakes.

Incidentally, the original Alpina brakes on my e9 were exactly the same as the standard 3.0csi brakes just with thicker front rotors.
 

Willem Tell

Well-Known Member
Site Donor $
Messages
340
Reaction score
315
Location
Zug, Switzerland
Michael,
I almost forgot to say, so I edited to put it first: I would do the cavity waxing after the paint, but immediately after, when all of the cavities are easy to access. Even if Oldenzaal just buys one spray can and does only the rocker sections, that would be a plus, as everything else can easily be done after the assembly (but before Lokaris).
Since you have the opportunity now, you might want to ask for POR-15 epoxy primer underneath as an additional anti-corrosion layer. (Others with more experience with the product could chime in here.) Since they are starting from scratch, I would also want an etching primer layer under the standard primer, and I would specify Spies-Hecker, Glasurit, or minimum PPG paint for the color and clear coat. (I say this because my Turkis paint is beautiful, but very delicate. I sprayed my MBZ years ago myself with Spies-Hecker 2K acrylic color and clear coat, and it is tough as nails. PPG epoxy for the trunk and underside; again very tough paint.)

I used Bilt Hamber Dynax 50 in all of the cavities, and wherever I have folded metal coming together. https://www.bilthamber.com/dynax-s50
I bought both the aerosol cans and the 5-liter jerry can - that jerry can is a lot of cavity protection! I have done all three of my oldtimers and still have plenty left over. It's too bad they don't make a 1-liter version.
The aerosol cans are great for snaking the spray lance into cavities like the A-pillar, the front fenders, the trailing arms, etc. I bought extra lances so I could link them together to get as deep as needed anywhere on the car.
I used the liquid to paint into the bottoms of my doors so water will not collect in the folded seam at the bottom. Same in the space under the rear windows, the wheel well, around the gas tank, etc. You can run the lance down the length of the frame rails to make sure water doesn't collect there, as they are open-ended facing forward.
An advantage over the Mike Sanders wax treatment is that it does not need to be heated for application, has better creeping properties, and better chemical anti-corrosion properties.

Another corrosion proofing oil that I've recommended highly on the forum is Owatöl oil. (Like Penetrol in the US.)
https://www.owatrolusa.com/product/owatrol-oil/
https://owatrol-international.com/en/all-our-products/7936-owatrol-oil.html
It comes in aerosol cans and 1-liter cans.
This stuff is terrific for rust-proofing exposed metal parts, visible areas where you don't want to use Bilt Hamber (because it's black). It has great creeping properties, and it dries rock hard to a light honey color (on light surfaces, I doubt you would see it on black).
It's also really good to treat any aluminum engine parts that you are not powder-coating. You paint or spray it on, wait a few minutes, and wipe it off, and it really protects the aluminum from dulling oxidation.

Caution: I used the spray initially, and it's great as it really creeps. But like I said, it dries hard, so protect your body panel surfaces if you're spraying it to avoid any mist settling on your paintwork (ask me how I know :rolleyes:). The liquid is terrific. I painted the interior of my wheel wells before I mounted my Lokari inner fenders.

DSC00439.JPG
DSC00450.JPG


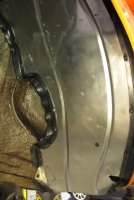
As you can see, there's a little honey color where I laid down several coats, but I can tell you that it's a bullet-proof water protection, and has lasted for several years now on my MBZ and Tii, as cars I've owned for longer.
It's great to paint around the inside of the folds at the edge of the engine hood and trunk lid. It creeps right into that fold to keep water from collecting or condensing there.

Something else I did, as I continually found that little cavity in front of the A-pillar collecting dirt and gravel. This is just from a few drives. Lots of agriculture in Switzerland, so tractors are always leaving dirt trails in the roads.

IMG_3253.JPG
IMG_3252.JPG


So before I installed the Lokaris, I used some thick closed-cell foam left over from my sound-deadening insulation jobs to make some pads to fill those holes so rocks and gravel just bounce off. I have those cavities painted with Owatröl, creases are filled with Dyanax 50, and the bottom is gooped up with melted Vaseline, so I think I can rest easy!

DSC00432.JPG


For the record, I also used this foam to close off those large rectangular access holes high up in the wheel well in front of the A-pillars.

And don't forget to ensure that you have those two simple little rubber gaskets in front of the A-pillar in the engine bay. They keep all of that stuff from getting sucked into the cavity behind your front fenders.

If you have any doubt about the advisability of waxing cavities or using Lokaris, read through Dan Mooney's thread, and consider he's a guy with a high-end car restoration shop, and even he didn't imagine what he would find after years of ownership!
 
Last edited:

Willem Tell

Well-Known Member
Site Donor $
Messages
340
Reaction score
315
Location
Zug, Switzerland
A couple of additional points:
Paint before cavity waxing: Any rust prevention wax or oil will creep into crevasses, and when you lay it down, you want to be generous, which means it will weep from crevasses and holes, especially as most cavities have holes in order to allow water to pass out. Paint would not adhere to these products, therefore you want to wax after painting in order to ensure all surfaces to be painted are wax-free (and especially silicone-free).

Paint - Etching primer above, POR-15 below to make sure your first paint layer on the metal is really bonded to the metal.

Chrome bumpers - since your bumpers are not mounted, this would be an ideal time to paint the insides of the bumpers with Owatröl. The insides cannot be reached and hence seldom get any attention after mounting unless they've been re-chromed, and hence they will rust. I recommend to paint the insides of the bumpers, their brackets, and hardware, and you'll keep them in good nick for many years to come.

Lokaris - Paint, or no paint? Opinions differ on this point. My experience: I installed Lokari on my Tii front and back:

IMG_1627.JPG
IMG_1628.JPG


I used black rubberized undercoat on the Lokari panels after I installed them on my Tii:

Lokari (4) - Copy.JPG
Lokari (2) - Copy.JPG


As you can see, the black undercoat tends to grab and hold grass and dirt a bit. In your case, with a black chassis, perhaps a smooth matte or semi-gloss black POR-15 or PPG epoxy paint would be a better solution.

Either way, except for the little "wing" that extends below the front lip of the nose, nobody can see that you have Lokaris unless the car is up on a lift. The wing serves to draw air into the gap between lip and Lokari and circulate drying air up between the inner fender and wheel well surface.

DSC00488.JPG


For The Unicorn, I installed only front panels. I chose to keep them in the raw aluminum, but I gave several coats of Owatröl on both sides of each panel. It makes a very non-stick surface, and I can easily rinse off anything on the panels.

DSC00445.JPG
DSC00446.JPG


Based on Adawil's advice, I pulled all of the brads out of the Lokaris on the E9 and replaced them with aluminum rivets to avoid the long-term galvanic reaction between steel staples and aluminum sheets. Makes perfect sense, but Man! I don't think there's enough money to pay somebody to do that job! It was one 6-hour wrist and finger-wrenching exercise for each panel to pull those brads (not staples)!
Lokari Fender Prep (1).JPG
Lokari Fender Prep (2).JPG

Next time around, I would douse the 50-odd brads liberally in Owatröl and call it a job well done!
Again, I've tried to find a shot with the wheel turned, and you cannot see the aluminum Lokaris unless it's on a lift or the wheel is removed.

IMG_4027.jpg
 

Attachments

  • IMG_1626.JPG
    IMG_1626.JPG
    224 KB · Views: 133
Last edited:

Gazz

Well-Known Member
Site Donor
Messages
945
Reaction score
620
Location
Gold Coast Australia
Wow, you really want those wells sealed William Tell! A lot of great advice there. However I would question the use of foam as a filler. Surely all that sealer plus well placed drainage holes would be sufficient. And a foam filler for the triangular hole high in the wheel well in front of the A pillar will surely get wet and retain moisture.
I made a template of those holes and cut some stiff clear plastic 20mm over-size to the shape. I then applied a thick bead of black Sikaflex 11 FC+ to the inside edge of the plastic and pressed it onto the outer perimeter of the hole. If you use clear plastic you can ensure that the black sealer has a completed bead around the inner edge of the plastic leaving no holes or gaps. The E9 wells are a masterpiece in engineering of open channels, hidden pockets, layered panels and mysterious cavities, all in bare or nearly bare metal.

If you would like to see what can be achieved tastefully check this out - https://www.carsales.com.au/cars/details/1971-bmw-3-0-cs-e9-manual/SSE-AD-6480230/?Cr=0

Note the price. For that money we are talking CSLs. Even though it is an amazing car I think you need to calculate as best you can what the final product will cost you and be wary of over capitalising. Then again, if money is no object then it won't matter. Hell if money was no object I would buy the listed car.
 
Last edited:

Willem Tell

Well-Known Member
Site Donor $
Messages
340
Reaction score
315
Location
Zug, Switzerland
Hey Gazz, I hear you, closed cell foam repels water, but for how long? Perhaps at the end of this summer I'll pop the Lokaris and see how they foam is holding up. I like your solution with the clear plastic. Definitely eliminates any risk of the foam holding water.
I don't save everything, but I often see things (like a sheet of strong plastic) and think: "I'll have a use for that some day." I'll keep my eye out!

Some kind of beautiful car! That must be an absolute blast to drive.
They only allow totally stock oldtimers here. I'm not even allowed to change up to a 15" wheel here because it wasn't in the original catalogue.
Otherwise, I would just write the check for $289K and ship von Trapp home! ;)

Congrats on that cherry 2002! Love the Fjorkal! (Swiss 2002Tii on the FAQ)
 
Top