So, I had a chance to tackle this today... Man!
I can only imagine that they designed a relatively simple door hinge mount
and then later thought: "Wait a second, we should install something to prevent fuel fumes from entering the trunk."
Clever as that might be, it does not translate into an easy-to-mount fuel door assembly!

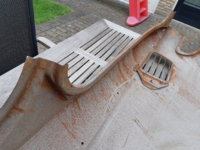
Having assessed the situation, I figured some masking of the area was in order. In retrospect, I would add masking to the edges of the door itself, and double up (thickness and width) all around.
The boot is quite flexible, so you can insert an 8mm socket and stretch it so that you can access the three nuts. I used a swivel head when I removed them, but later (when more despera... I mean experienced), I just used a straight extension and a straight hand socket drive, rather than a ratchet. It was better for feel, and applying force on the assembly.
I removed the rear nut first through the access hole, and then the two nuts closer to the opening. I thought I would get to them through the door opening, but it was actually more practical through the access holes.
At this point I rippe... I mean dismounted the rubber boot from the filler neck and from around the fuel door opening so that it was free. This enabled me to lift the hinge off of the studs..
Owing to the spring-loaded nature of the hinge assembly, and the very tight tolerance on the hinge holes relative to the studs, this thing does not exactly jump into your hands! The hinge tends to want to bind on the studs. It was necessary to use a plastic door panel tool to get under and lift them off. I would have used my wooden spatula, but it was on loan at the moment.
Here's what the fuel door assembly look like in hand:
The assembly is spring loaded, which makes it very difficult to manipulate in place, so I wondered what would happen if I unseated the springs at the hinge mount:
This freed up the assembly to swivel , and while I thought I would install it that way and re-seat the springs later, that's not the path I followed.
The main reason I didn't go down this path was because I wanted to verify that the boot would seat properly around the lip of the fuel door, as this was what was preventing my door from seating fully. I could have verified that with everything removed.
With the boot fully installed, having a free-moving hinge was difficult to manage, so I re-inserted the springs into the hinge and tried it "the hard way".
I first installed the new rubber boot and ensured that it seated all around the fuel opening and onto the filler neck.
I then reinserted the springs into the hinge assembly and proceeded to install it pretty much as I removed it.
That was not an easy process, as the spring loaded nature of the hinge and the spongy new boot made it very difficult to get the hinge to seat on the studs enough to get the nuts started.
I finally got the front nuts started by using the straight nut driver (with masking tape on a 7mm socket to protect the paint) to apply pressure to the rear of the hinge to push it onto that stud. I then slipped my hand into the fuel door (with difficulty and many attempts) to get a forward nut started.
Then, by pushing the fuel door closed, the hinge would pivot and the rear stud was exposed enough to get a nut started using the straight nut driver with a bit of masking tape to hold the nut in the driver through the lower access hole.
Three hours later, I was pretty much where where I started:
And with a little less paint:
Knowing what I know now, if I were to step back and do this all over again, to start the process:
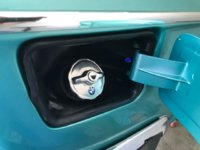
I would reach in here with a flat screwdriver or better, long needle nose pliers, and lift the two springs out of their hinge mounts. Move them to the
outside of the hinge (left from this perspective; see photo above), so that the door can swivel freely. They are strong and stiff, but reasonably accessible, and I think it's possible, and the best path. That would leave the door free, and the spring pressure off of the hinge.
I would then lift the boot off of the filler neck (the gas cap having been removed earlier). Don't ask me why I didn't do it, but you should tape over the gas filler neck do so that you don't accidentally drop one of the nuts into the tank.
Dismount the boot from the lip of the fuel door.
Now everything would be floating free around the hinge mount; it would be easy(ish) to access and remove the hinge nuts, and lift the whole assembly (boot and fuel door) off off the studs.
To re-install, I would keep the boot floating free and concentrate on getting the three hinge nuts started. If getting all three nuts mounted is not possible, focus on the rear stud; this is key to getting the assembly mounted. The door must be closed to access this stud.
Then, with everything loose, it might be best to re-seat the springs into the hinge at this point before seating the boot on the filler neck, and around the fuel door opening.
I will apply pressure to the fuel door when the car is parked, and I think with time it may deform the boot enough to seat fully.
Ironically, the fuel door and hinge assembly are probably some of the heaviest gauge metal on the car. I say "metal", because I think the door is steel, but the hinge seems to be a softer material like aluminum or pot metal, as it really binds to the mounting stud.
So I don't think we could "bend" it by accidentally bumping into it. Even though a person bumping into it would apply a significant force, I think it's more likely that the quarter panel would deform before the door itself would.
As a side note, it's interesting how cameras just don't know what to make of Turkis. No two exposures reflect the same color!