Rear window bolt sizes

Barry.b

Well-Known Member
Messages
752
Reaction score
555
Location
Ireland
Hi guys
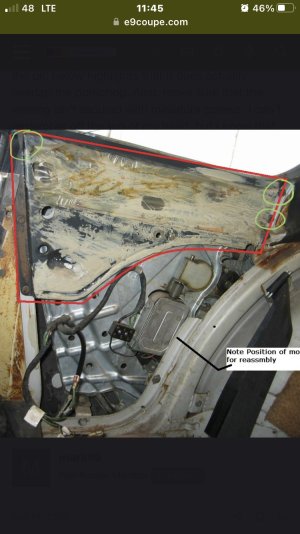
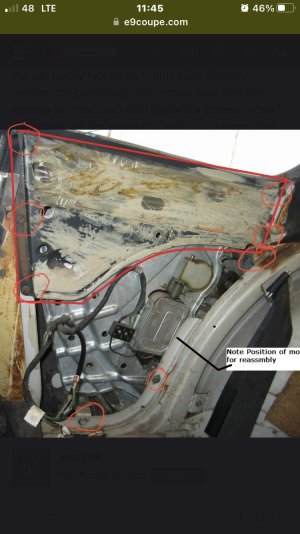
I am looking for some help please
I am putting back in my rear side windows
And I want to use new bolts
Do you guys know the sizes that are needed for that and maybe the order they go in ?
I am asking about the ones circled in red below
Thanks again
 

Attachments

  • IMG_9323.jpeg
    IMG_9323.jpeg
    191.7 KB · Views: 44
Last edited:
Realoem says M6 x 16, which is my recollection as well. When you say the order, not sure I understand. Install all of them loosely and then adjust the window guide position, tighten one or two to hold it, activate the window up/down, loosen and adjust further as needed, retighten, etc and repeat until the window is moving correctly and then final tighten. It’s a lot of annoying adjustment.
I did find this video very useful

Perfect
M6 x 16 it is so .
Thanks a mill!
 
Realoem is usually spot on whennit comes to the screws and bolt definitions, even down to head shapes.

These m6x16 bolts only secure the black panel, not any part of the window mechanism or alignement
 
Yes, I do recall that some were shorter than others, realoem only shows the 16mm. As you place them back in, just be careful that any of the longer ones are not protruding in a way that would prevent the window from going up/down. It should be obvious - if the bolt sticks way out the other side towards the window, make it a shorter one. I found this process very annoying, but since I was starting with a nonfunctional window it needed to be done. Are you upgrading motors and adding relays while you’re at this point? Please say yes
 
Hi guys
Thanks again
I have started putting in the m6 x16 and I do think that I will swap out 3 of them for m6 x 10 as they do seem close to the window as it moves . ( circled in green below )
I do have the newer motor version , not the sardine ones , so they should work better. ( I used a photo from someone else’s car )
I have disassembled everything on the bench and cleaned out all of the old grease and re greased everything , so thankfully they seem to be working well as they are now
I have not looked into the relay option
What would be the reason / advantages of adding relays ?
(I didn’t take photos this time as my hands were covered in grease :( )
 

Attachments

  • IMG_9323.jpeg
    IMG_9323.jpeg
    188.8 KB · Views: 27
  • IMG_9318.jpeg
    IMG_9318.jpeg
    779.5 KB · Views: 22
Last edited:
Relays serve a few purposes. The main idea is that they shorten the wire path from switch to battery to motor, meaning that the motor receives less of a voltage drop. They also simplify the wiring in some regards because you basically take one long circuitous route and break it up into two interconnected loops - think instead of a figure of eight you have two linked loops. The basic idea is that power runs from battery directly to window passing through a relay. The switch functions to allow that power through the relay or not. Most relays have four in/outs - power in, power out and then switch in and out (not quite it, but functionally that’s how it works).
Now, there’s on wrinkle. Does the motor you’re dealing with have two wires (like the E28 many of us upgrade to) or 3 wires? If three it’s a bit easier, if two it’s doable but just a wee bit more mind-bending. I’ll say that when I did this task I spent a week wrapping my head around what I was trying to do based on the instructions found in the forum but then it clicked and now I’ve relayed many items in the car that I’ve added - fog lights, low beam lights, etc in order to boost the power they receive and simplify the wire runs.
 
Hi Barry, you can easily remove the steel cover from your window motor, as it sits connected, and check the quality of the old grease in that gear box. Maybe you have done.
 
Barry - take a look at this thread, references some of the discussion around the relays. Also check for some posts by @ScottAndrews
 
Barry has the two wire 73 motors. I found the slotted bolt with locking nut up top was the trickiest to adjust. I removed it when I did mine and should’ve left it alone.
 
Barry has the two wire 73 motors. I found the slotted bolt with locking nut up top was the trickiest to adjust. I removed it when I did mine and should’ve left it
Hi Chris
Do those 2 slotted nuts go back in all the way ?
Or is there in and out adjustment on those ?
 
If I recall correctly those upper ones allow in and out movement to set the “angle” at which the window begins to rise up. Agree that they were rough and it doesn’t help that the movement of that window is so weird arcing back first to then swoop forward. I found it hard to get the window to follow that rearmost guide up and not fall out of the track there.
 
Back
Top