Rear window trim holder

tronch

Active Member
Messages
68
Reaction score
20
Location
Madrid
Hi Guys.
my car is missing the holder of the exterior chrome mounding on the rear windows, even I don’t know hot it works
anyone having this parts for sale or dimension and information to produce it by myself

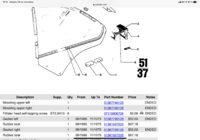
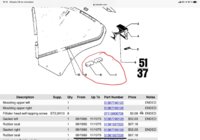
I think are numbers 7 and 8 on realoem


thanks!!!
 

Attachments

  • F93DD09E-A3BC-45B4-A2F7-E56C0E908772.png
    F93DD09E-A3BC-45B4-A2F7-E56C0E908772.png
    387.4 KB · Views: 260
Here it is.
however I’m not sure if is one of that ones
on my cars photo I marked where this rubber or nylon part is.
it hold the exterior chrome mouldind

thanks
 

Attachments

  • 1AE52E53-1ACC-42F9-B063-D2138242E4EF.jpeg
    1AE52E53-1ACC-42F9-B063-D2138242E4EF.jpeg
    153.2 KB · Views: 266
  • 2721ED7D-CF9B-4BB8-8F3F-5154E6311788.jpeg
    2721ED7D-CF9B-4BB8-8F3F-5154E6311788.jpeg
    299.6 KB · Views: 373
Thanks bavbob, very helpful. I’ll try to make something by myself and I’ll ask those guys if they have some

thanks again
 
Search here, someone actually made one. If demand was higher, 3D printing would be in order.
 
This is what they look like. They could be printed or cast pretty easily. I agree that someone may have drawn them up or scanned them. I’m not sure. You can stick some cellophane on your door, and on the trim, then use epoxy clay to mold some. Trim the length accordingly when done, although you don't need to. These are more complex looking than they need to be with all the baffling and what not.. The trim screws to the end of the block, and the block screws to the fender on the side, through the recessed hole.

8C6CC7F8-2894-461C-8B08-1779D1E859EC.jpeg
950EB2A1-40AA-4C1F-9EFE-D7F096C63304.jpeg
 
Last edited:
Elaborating on the epoxy putty approach. Honestly you probably don’t need the cellophane because you can pull the putty out before it sets.

Step 1: Mix your epoxy putty. The glitter infused putty is only available in Germany.
DE544DFE-6694-4166-AC0A-4ED07F44272B.jpeg


Step 2: Mash into cleaned trim. Make the edge flat against bottom of chrome.
B709C9E4-2A84-4014-A4AF-5777FFB7F164.jpeg


Step 3: Apply trim and putty to cleaned fender (it will be gross under there.
719C2376-49F5-40A5-8464-BD4BAF3E43A5.jpeg


Step 4. Remove Trim
82443079-B713-4E54-B461-3B01E87459E1.jpeg


Step 5: Extract Putty. Trim off ends as needed (see real block below:
9AE820D8-4831-43FB-816C-A3B6E7E995F2.jpeg

DC79F97B-DA27-4D6A-92AF-4CDB86FA073C.jpeg


Step 6: After curing, drill recess, and 3mm fender mount hole. Recess diameter should match your machine screw head size. 5/16 is a hair larger than original.
3277D6FB-F0B3-460F-8516-05C607DA8964.jpeg
7B1B12D8-E4D8-4CCA-B37F-9539F48733D1.jpeg


Step 7: Mount block. Apply trim. Mark hole for trim screw. Drill hole.
 
Back
Top