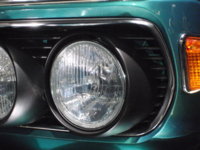
What is the best way to improve the looks of my headlamp grills? The black slats look old and faded and I wish for them to look like new! TIA
You are using an out of date browser. It may not display this or other websites correctly.
You should upgrade or use an alternative browser.
You should upgrade or use an alternative browser.
"Refreshing" headlamp grills
- Thread starter BP1
- Start date
What is the best way to improve the looks of my headlamp grills? The black slats look old and faded and I wish for them to look like new! TIA
I’d start by cleaning them. Then I would hit them lightly with a torch or a heat gun. A torch is faster.
For all of the non believers, I’ll try it on my unclean damaged grills first. Pictures to come.
Edit: See below
Last edited:
stphers
Well-Known Member
Try some " Plastic Resurfacer " from Eastwood. The stuff works great on faded black plastic
Bob, send them to Speedway and have them painted in black ceramic. Then have them polish the trim. You will need to put the trim back on after Speedway refinished it. Speedway is in Santa Ana.
If you want to do it yourself and the right way it will take some time . But it will come out just as new. I pained mine twice and now I am redoing the bright Work which I jobed out once.
Let me know what results you are looking for and how much time and money you want to spend? I painted one and didn’t like the look and re-paint another set second time and it now looks faboulous!
Let me know what results you are looking for and how much time and money you want to spend? I painted one and didn’t like the look and re-paint another set second time and it now looks faboulous!
Last edited:
I’d start by cleaning them. Then I would hit them lightly with a torch or a heat gun. A torch is faster.
For all of the non believers, I’ll try it on my unclean damaged grills first. Pictures to come.
Looks like I am going to have to admit defeat on this one. While I have had great success with this approach on softer ABS bumpers. I think the grill plastic is too hard and possibly just too old. The torch gives it a new, but crinkled finish. I continued on after this pic to see how consistent I could keep the crinkle, and I don’t advise using a torch. I’m sure plenty of folks already arrived at this conclusion but I have used the approach on interior plastic (jeep) and exterior plastic (volkswagen) in the past.
See pics below:
Dirty Grill:
Wiped Clean - no cleaner:
Torched:
Just so you know that I'm not crazy...
Exterior plastic:
Interior Plastic:
Last edited:
what about trying the heat gun?
what about trying the heat gun?
I would say no. As you can see from the truck mirror (and all the recommeded videos thereafter), you know almost isntantly when it is working. This plastic just doesn't seem to cloud up the way some others do.
The other thing that I have done on the same bumpers post torch is to use kiwi shoe dye. I also use that on my steering wheels.
")
The Kiwi dye does streak if you aren't careful. A single bottle goes a very long way also...
Wladek
Well-Known Member
Heat gun - maybe, but only if you had experience with such work. Because e9 frames are very old & tired - so any mistake might cost.
I personally didn't used such drastic methods - just good gel for plastics (2-3 layers day after day).
I personally didn't used such drastic methods - just good gel for plastics (2-3 layers day after day).
Bob, Follow Mike’s advice they will look amazing!
Speedway quote- Grills in black ceramic- $75. per side (including R & I trim). Polishing trim- $125. per side. I am sure it will look great!
Speedway quote- Grills in black ceramic- $75. per side (including R & I trim). Polishing trim- $125. per side. I am sure it will look great!
Not bad!!
Isn't ceramic coating just a protectant film?
Do the guys at Speedway paint it, then put ceramic coating on it?
What's the exact process?
Do the guys at Speedway paint it, then put ceramic coating on it?
What's the exact process?
The color is in the ceramic in this case.
I've had good success with a lot of plastics by applying '303 Aerospace Portectant '. Sometimes it takes several treatments, but they usually start to look like new - especially blacks.
Good luck,
Gary
Good luck,
Gary
Before using any heat you should clean the grill really good otherwise you take a chance at fusing the dirt and grime into the plastic to some level or another .Looks like I am going to have to admit defeat on this one. While I have had great success with this approach on softer ABS bumpers. I think the grill plastic is too hard and possibly just too old. The torch gives it a new, but crinkled finish. I continued on after this pic to see how consistent I could keep the crinkle, and I don’t advise using a torch. I’m sure plenty of folks already arrived at this conclusion but I have used the approach on interior plastic (jeep) and exterior plastic (volkswagen) in the past.
See pics below:
Dirty Grill:
View attachment 46572
Wiped Clean - no cleaner:
View attachment 46570
Torched:
View attachment 46571
Just so you know that I'm not crazy...
Exterior plastic:
Interior Plastic:
Before using any heat you should clean the grill really good otherwise you take a chance at fusing the dirt and grime into the plastic to some level or another .
Agreed. This was just a test on a broken grille. Regardless, the plastic doesn’t respond well to heat. Cleaners, dyes, and coatings are the way to go.
I am envisioning a best look when I am done . So far the grill Paint looks flawless when I did the following :
Mine was very dirty with years of grims , car sitting under a tree rusting out. I had already taken one side grill to the chrome shop and asked them if they can make the trim new again. This was a test so if the result was good I would send the other side .They said they can make it look much much better . Beside polishing and chroming the edge caustic solution took off grease and grime . But the result was not good. They couldn’t reach the section under the the lights so that part looked awful . Furthermore the tabs that go over the left and right of each grill edge alluminum piece is actually made of brass and the buffing has taken the silver off showing some of the brass color . So I decided to take the bright edge off and waiting to-send it it for Re-chroming.
1-With the other piece (the one that did not go to chrome Shop) I soaked it in a large tub with dish soap added . It sat there for days .
2 - I cleaned it all over with light scrub of worn out scotch bright pad. Rinsed it and looked at it when it was dry. It wasn’t clean enough. So I used a paint stick , the one you get for free at home depot or Lowes and wrapped the scotch bright around it and got all over the horizontal fins and all corners , rinse and repeat again. Let it dry and looked at it and was surprised how much detail work I had to do to get it clean as I wanted ... more on this later
3- next step was to straighten some of the sections that was deformed . I used two of the paint sticks and sandwiched the grill deformed edge in between. Used my heat gun and gently applied and watched how soft it was becomeing as I apply the heat. I was surprised that it didn’t take that much time (or heat) to get it to form properly. So I was very careful not to apply too much heat. It turned out excellent after few try’s on laying the piece on the car for proper fitment .
4 - next step was to fix the cracks where the Philips screw holes attach the grill to the car. Used some thin alluminum piece(soda can) and sanded it ruff for proper Adhesion . Sanded off the plastic piece so not only I get thinner section as I was adding thickness with the patch but also to ruff it out for better adhesion. Mixed some JB weld and cut and formed a piece large enough to cover the cracks and leave half an inch or so over lap the crack. Used a little plastic as liner so if the JB weld oozed out it will be easier to peel or sand off . Then used a spring clamp to hold it tight while it dries . You can sand the dried out JB weld some to shape the back . Once dried use a very thinly drill a hole as pilot and drill the hole where the screw goes on. Next I used a larger bit being careful not to rip the new patch with the drill bit ....
5- after investigating paint for car vinyl or plastic I picked up the SEM vinyle paint and SEM Vinyl paint Prep . Read the complete instruction and tested a corner of the plastic spraying the SEM prep paint . Used a clean micro fibber rag and cleaned the grill after spraying the SEM pre. You see that some black residue come off to the rag. It becomes rather tacky and then you are ready to spray the black Vinyle paint. Then i sprayed the Prep all over and did the same cleaning I did earlier using clean micro fiber and the whole grill took 15 minutes to completely clean and make ready for the vinyle paint .
6.- final paint is the easiest and most satisfying. After first layer of paint I let it sit for few minutes as per instruction applied another light coat on. Let it dry completely and I tried to scratch the edge with my nails. It is tough and very durable . Even tough my nail scratches looked like it was doing some damage it wiped right off giving me impression that it was my nail residue ....It looks so even and New everywhere . I could not expect any better . Very satisfied .
Once the chromed edge come back I will put it back and I should look great . I will post some picture later
Cheers!
Last edited:
I scrubbed with dish soap on our 2002 grilles and then shot SEM Trim Black, they look very nice.
I think (haven't tried it myself) that the grilles will behave well when you try to polish them. The plastic is likely ABS or a blend of PC ABS which normally sands and polishes well. Try the back side first, use 400 grit if no scratches need to be evened out. finish with 1000 or 1500 for a mirror shine. Add some elbow grease. I'd say spray paint is optional. Depending on how they come out after sanding.
The torching usually works better in plastics that are PP based. These are the ones that usually sound dull, and feel a fit fatty when rubbed. PP is quite 'springy', and hence used a lot for bumpers and interior parts (of cheap cars). Heating PP based parts (gently) will soften the surface, and smooth scratches. Small scrapings sticking out will be burnt off, and small scratches will soften a bit and pull smooth. I normally use a cigarette lighter for small spots.
What you see in Markos' picture is the plastic simply overheating and starting to make small bubbles; to much heat load on that area.
One thing I noticed on my car, and many others, is that the chrome trim around the headlight grilles often sits uneven. Especially 2 area's; the top at the connection piece following the horizontal front trim, and the corners where they meet the front of the fenders.
the car in the BMW Museum has them fitted quite nicely (see pic), so appearently they were and can fit nicely.
As such, I'm interested to know if/how these trims can be repositioned relative to the grilles?
How do they attach?
If someone has pictures at hand of disassembled trims and/or the attachment method; I'd be interested.
Erik.