RH Fender and Substructure (removal pics)

goodolarchie

Member
Messages
25
Reaction score
0
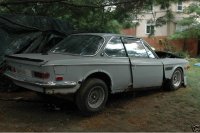
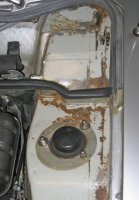
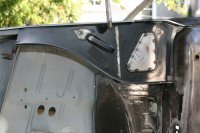
Hey guys, just some lovely eyecandy of the rustbucket. The good news is that nothing underneath (firewall, wheel well) is rusted so badly I can't patch it, and this is the worst area on the car.

Here's the album: http://imgur.com/a/qxASV#0
 

deQuincey

Quousque tandem...?
Site Donor
Messages
8,420
Reaction score
2,432
Location
BIO - 43°15'46.5"N 2°56'03.7"W
you are in my thoughts now !
oh, it is terrible !
wish you a prompt recovery !
best

remark, thanks for the pics, and please continue the gallery, i would love to see when things become better
 

goodolarchie

Member
Messages
25
Reaction score
0
Yes fellas its going to get much worse before it gets better :lol:

All of the panels that are going are out.

Apart from grinding, stripping, rewelding, prepping, coating, sealing, I will also have to weld in some new patches. Here's the mock up

http://i.imgur.com/jgzxl.jpg

It is unbelievable... BMW charges $80 for the connector plate shown in center of http://i.imgur.com/iNXNe.jpg. That is a tiny piece of 16ga steel, less than $2.00 of material. I think I will form my own panels ;-)
 

execmalibu

Well-Known Member
Messages
629
Reaction score
2
That is nothing... Here is my car before and after...

I took my E9 with only minor rust to Earl Schiebe and in just 3 days he did a great job dont you think?
 

Attachments

  • Super Rusty CS.jpg
    Super Rusty CS.jpg
    70.6 KB · Views: 694
  • 3.0CS1.jpg
    3.0CS1.jpg
    93.7 KB · Views: 244

goodolarchie

Member
Messages
25
Reaction score
0
Mine was much worse than that.

You can see the new parts and where they go here:
http://sites.google.com/site/mthompsonorg/Home/bmw/1972-3-0cs/BMW_CS_Front_Fender_replacement.pdf

Good guide, I found it originally in this thead (Nimble's photos were helpful for the removal too):

http://www.e9coupe.com/forum/showthread.php?t=6971

I do have one important question for you regarding the replacement panels. Page 41/2 Part #6 (extension), I do not see where this originally was or where it belongs. I have pulled all of the rotten metal off - panels, extensions, connectors, supporting strut etc. shown here: http://i.imgur.com/5E3ze.jpg

Is this extension found underneath the metal in my above photo somewhere?

Also - is there any reason not to fill in in the goofy triangular hole in the supporting strut? It's the reason I have cancer holes in that photo above..
 

Sven

Well-Known Member
Site Donor $
Messages
1,145
Reaction score
110
Location
Seattle
This piece is the extension of the firewall at each end, across the top of the inner fender just behind the main shock tower opening. See photo.
 

Attachments

  • FWExtension.jpg
    FWExtension.jpg
    66.4 KB · Views: 230

m_thompson

Well-Known Member
Messages
780
Reaction score
141
Location
Rhode Island
I do have one important question for you regarding the replacement panels. Page 41/2 Part #6 (extension), I do not see where this originally was or where it belongs. I have pulled all of the rotten metal off - panels, extensions, connectors, supporting strut etc. shown here: http://i.imgur.com/5E3ze.jpg

Is this extension found underneath the metal in my above photo somewhere?

Take a look at page 5 of the document. At the top middle you can see the 41/2 Part #6 (extension) where it connects to the divider between the engine compartment and the heater/AC intake. It goes over the fenderwell and connects to 41/4 Part #7. I can't believe that the extension has an MSRP of $206.46. I paid about $12.00 for it just 30 years ago.

Also - is there any reason not to fill in in the goofy triangular hole in the supporting strut? It's the reason I have cancer holes in that photo above..

I would not seal the triangular hole without having a vent hole somewhere else. You could drill a hole from the inside above the glove compartment and spray rust preventative inside the sealed area.

You are not going to drive it in the rain anyway so it will never rust again...
 

Bill Riblett

(deceased)
Messages
733
Reaction score
10
Good guide, I found it originally in this thead (Nimble's photos were helpful for the removal too):

http://www.e9coupe.com/forum/showthread.php?t=6971

I do have one important question for you regarding the replacement panels. Page 41/2 Part #6 (extension), I do not see where this originally was or where it belongs. I have pulled all of the rotten metal off - panels, extensions, connectors, supporting strut etc. shown here: http://i.imgur.com/5E3ze.jpg

Is this extension found underneath the metal in my above photo somewhere?

Also - is there any reason not to fill in in the goofy triangular hole in the supporting strut? It's the reason I have cancer holes in that photo above..


Unless you are striving for absolute accuracy, I think filling the triangular openings on the "extensions" is a good rust preventative measure. Those holes allow sand and dirt into a cavity which gets wet and promotes rusting in that area.
 
Last edited:

Sven

Well-Known Member
Site Donor $
Messages
1,145
Reaction score
110
Location
Seattle
Unless you are striving for absolute accuracy, I think filling the triangular openings on the "extensions" is a good rust preventative measure. Those holes allow sand and dirt into a cavity which gets wet and promotes rusting in that area.

Referring to the "supporting bracket" under the lip of the inner fender - I agree. Close off the triangular opening. Also, weld on a pointed extension (and fit to the curve of the 'A' pillar top) to close off the small opening at the very back. You can see this at the very right side of the bracket. There are some weep holes at the corner of the shock tower reinforcing plate and some other small openings that should allow adequate ventilation to this now closed cave. You can use these to insert spray wands for applying cavity wax.
 

Attachments

  • FenderBracket.jpg
    FenderBracket.jpg
    62.9 KB · Views: 243

goodolarchie

Member
Messages
25
Reaction score
0
This piece is the extension of the firewall at each end, across the top of the inner fender just behind the main shock tower opening. See photo.

Odd, that makes sense, just the way they displayed it fitting on the parts order page 41/2 is turned 90 degrees... I intend to reuse my metal here, there was no rust. I'll post some more photos of the patch and prep work soon.
 

Sven

Well-Known Member
Site Donor $
Messages
1,145
Reaction score
110
Location
Seattle
The rocker substructure looks to be in good shape. That should be a relief. The inner fender looks a bit tattered.
 

goodolarchie

Member
Messages
25
Reaction score
0
The rocker substructure looks to be in good shape. That should be a relief. The inner fender looks a bit tattered.

Yes it is very much a relief! :smile:

It looks as though the only cancer remaining on the car is on the floor (lots), and where the floor meets the bulkhead. That is getting off pretty easy compared to some of the photos I have seen here. More panels will be taken off the fenders before any of the substructure rebuilding but that is next.

Oh it is painful my friends, tearing the flesh off
 
Top