Show me your temporary body reinforcement/internal bracing used during rocker repair....

jjs2800cs

Well-Known Member
Messages
277
Reaction score
93
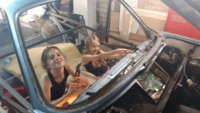
We are about ready to perform rocker panel repair on a 2800CS. Plan is to essentially strip the car, interior out, motor trans out, suspension out, etc. etc.

Body shell to be put on a temporary dolly. I've seen several restoration threads showing several versions of temporary internal bracing when cutting out the rockers.

For those of you who did use bracing, can you provide some more detailed photos, where are the attachment points, dimensions etc. Links to relevant threads also aprreciated.

It looks like in the threads I've reviewed, the doors have to come off.

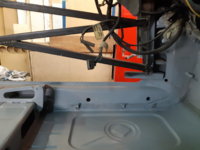
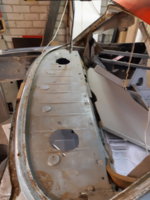
We have purchased the outer rockers from W&N as well as the front, back, left, and right lower quarter and fender repair pieces. As well as the A and B pillar internal supports.

Using an endoscope, the intermediate rocker panels appear to be ok, except for some areas of concern, so no complete replacement is expected. Car spent most of its life in CA.

With the car stripped how necessary is the bracing and if needed, really how stout?

I do not want to reinvent the wheel here, or go overboard with tons of bracing, so appreciate any info.

Thanks very much!

jjs2800cs
 

jjs2800cs

Well-Known Member
Messages
277
Reaction score
93
Found this on You Tube which does explain their bracing system.


Still hoping to see how others have done it with similar detail.

Thanks

jjs2800cs
 

eriknetherlands

Moderator
Site Donor
Messages
2,783
Reaction score
2,020
Location
Netherlands, Eindhoven area
I had never done this stuff before, so I made some choices that proved to be wise. Others weren't so.

These are just the pics I have at hand. I will do some more tomorrow.
Not all of the braces are still there, I removed half of them as my body work is getting close to ending.

I basically had :
2 beams front to rear with a cross in them.
1 beam from a pillar left to a pillar right and
1 beam from b pillar left to b pillar right
1 frame linking the rear subframe mounts to each other and fixing them.jn space relative to the side beams.

I braced my car inside, welding a beam from A-pillar to B-pillar to the rear parcel shelf where it ends in a bolt hole matching the upper belt anchor point.
It runs just under the waistline.

The second beam runs almost parallel to the sill , about 10 cm above it (4 inch) again from A pillar to b pillar, but this one ended just before the trunk seatback.this one is now cut off as you can see in second pic.

The end of the second beam near the trunk was bolted to another frame that made the cross brace in the rear, linking the rear subframe mounts to the 2x2 seat belt holes. And the side frames. It could be removed by unbolting it. That was very helpful.
More pics of that in my build thread.

Benefit is that it is sturdy as hell. Downside is that I cannot mount my doors to check gap and flush while welding the final skins.

I did notice that when I cut off my lower A- pillar and the drivers floor next to it (effectively cutting the connection of the sill to the frame rails under the car), that the remaining single layer of sill bent outward by about 12 mm, half an inch. I had to pull that in when I installed a new floor section. This proved me that it is really necessary to do something.

Welding a sturdy frame also gives peace of mind, and it also guarantees that your lines will be 'as you began'. Fixing a bent car is much,much more time then welding a few tubes in there

Erik.
 

Attachments

  • IMG-20200613-WA0010.jpeg
    IMG-20200613-WA0010.jpeg
    250.8 KB · Views: 188
  • image-02-05-2020_22-37-26-80.jpg
    image-02-05-2020_22-37-26-80.jpg
    206.9 KB · Views: 187
  • image-02-05-2020_22-46-46-01.jpg
    image-02-05-2020_22-46-46-01.jpg
    221.4 KB · Views: 168
Last edited:

jjs2800cs

Well-Known Member
Messages
277
Reaction score
93
I had never done this stuff before, so I made some choices that proved to be wise. Others weren't so.

These are just the pics I have at hand. I will do some more tomorrow.
Not all of the braces are still there, I removed half of them as my body work is getting close to ending.

I basically had :
2 beams front to rear with a cross in them.
1 beam from a pillar left to a pillar right and
1 beam from b pillar left to b pillar right
1 frame linking the rear subframe mounts to each other and fixing them.jn space relative to the side beams.

I braced my car inside, welding a beam from A-pillar to B-pillar to the rear parcel shelf where it ends in a bolt hole matching the upper belt anchor point.
It runs just under the waistline.

The second beam runs almost parallel to the sill , about 10 cm above it (4 inch) again from A pillar to b pillar, but this one ended just before the trunk seatback.this one is now cut off as you can see in second pic.

The end of the second beam near the trunk was bolted to another frame that made the cross brace in the rear, linking the rear subframe mounts to the 2x2 seat belt holes. And the side frames. It could be removed by unbolting it. That was very helpful.
More pics of that in my build thread.

Benefit is that it is sturdy as hell. Downside is that I cannot mount my doors to check gap and flush while welding the final skins.

I did notice that when I cut off my lower A- pillar and the drivers floor next to it (effectively cutting the connection of the sill to the frame rails under the car), that the remaining single layer of sill bent outward by about 12 mm, half an inch. I had to pull that in when I installed a new floor section. This proved me that it is really necessary to do something.

Welding a sturdy frame also gives peace of mind, and it also guarantees that your lines will be 'as you began'. Fixing a bent car is much,much more time then welding a few tubes in there

Erik.
Thanks for the info. Yes your brace looks very stout. I am surprised and maybe not surprised that you saw some flex when cutting the A-pillar. I'm hoping to get a design that can be installed with no actual welding to the car and can be removed just by unbolting.

Fortunately, my floors are solid and we might get away with only replacing part of the outer sill on each side, with the left being the worst around the A and B lower pillars and a bit at the rear near the suspension pickup, again on the left. The right side seems okay.

The car has a factory sunroof (the good) and spent most of its early life in So. CAL. Surprisingly the front fenders "appear" to be very solid with just surface rust. We have been using an endoscope whcih has been helpful in inspection by probing inside the crazy front structure. We think if it was not for the sunroof draining (the bad) into the rockers, the car would be remarkably solid. Yes we will re-route the sunroof drains as others have suggested.

Plan is to remove the 4 suspension corners, remove the motor/trans from the bottom as we have a 4 post lift. Build a dolly (see my other thread on the weight of the shell) and make the dolly such that the shell can be rolled off/on the lift ramps as necessary. Hope it works.

Again THANKS
jjs2800cs
 

paul

Well-Known Member
Site Donor
Messages
321
Reaction score
305
Location
Australia, Queensland, Gold Coast
This is the bracing on my car....it was also on a rotisserie for ease of getting at everything. If you are replacing the outer sill I would cut thru the intermediate sill and see what condition your inner sill is in. These cars can rust from the inside to the outside. Bracing should be weldedto ensure no movement when you unpick the car. Its easy to grind the welds off after.
20180302_112323.jpg
20180302_112323.jpg
20180302_112309.jpg
20180302_112244.jpg
IMG_1487.JPG
IMG_6834.JPG
 

jjs2800cs

Well-Known Member
Messages
277
Reaction score
93
Nice job! Really Nice setup!

So it looks like with your design the doors could be installed to look for even gaps, yes? One of the photos I think shows a door installed.

Is this the current status or are these older photos and you are beyond this?

I am curious about the rotisserie. I have a rotisserie made from two engine stands that was used years ago for VW beetle body shells and more recently for an Austin Healey 3000. But not sure its strong enough for the CS shell and maybe would be too long as attached to fit in my shop.

Here is the rotisserie with Healey frame. As one can see it is pretty light duty. We might be able to use if welded two angle braces on each of the end supports. I can see from your photos how the front of the shell is attached to the rotisserie, how about the rear?

Would you be willing to supply a few photos of your rotisserie in more detail?

MANY THANKS
jjs2800cs

DCP_4086.JPG
 

paul

Well-Known Member
Site Donor
Messages
321
Reaction score
305
Location
Australia, Queensland, Gold Coast
The doors were lined up after the car was taken off the rotisserie because of movement. We actually put the car back on the suspension because that is the way it will always be and gapped doors from there. Rotisseries are fairly cheap to buy ($1500 aud) if you are into restoring cars regularly. My car went onto a trolley after sand blasting and then onto fabricators. It went back onto the rotiserrie when painting was done. I think a Healey would not be much lighter than an E9. My car is now finished....took 2 1/2 yrs for total resto....if you go into "E9 Photographs" on home page here you will see under "Tuerkis E9" You can also view the rebuild process under "72 rotiserrie restoration" I have many pics of fabrication work on my car if and when you need.
20180228_110022_resized.jpg
IMG_6895.JPG
 

jjs2800cs

Well-Known Member
Messages
277
Reaction score
93
Perfect approach you took. We actually followed the exact same procedure steps with the Healey with regards to on/off rotisserie/dolly. Same concern with the doors. Because of the known flex of the Healey chassis we actually fabricated stands that attached directly to the suspension pickup points as it sat on the 4-post lift ramps, and weighted the bare chassis down with lead bricks, sand bags etc when we did the sill/rocker repair. Doors were on and off probably hundreds of times. Was lots of apprehension when the drive-line and body was reinstalled wondering what the resulting door gaps would be. Rotisserie was only used to strip chassis and paint.

Don't think frame sag will be as much of concern on the CS because of the roof and internal bracing.

I think our homemade rotisserie will work if we add some gussets on each of the ends and fabricating the pickup points. Even so as mentioned earlier it might be too long to fit in my garage.

Yes we will look at your photos.

Thanks Mate!
jjs2800cs
 

paul

Well-Known Member
Site Donor
Messages
321
Reaction score
305
Location
Australia, Queensland, Gold Coast
we had same thing with the doors.....on off on off. BTW couple of my mates are into Healeys......1 guy has 3 (all 3 litres) the other has 3 as well including a 100s with Mille Miglia race history. (very rare car and worth a lot of money !)
 

jjs2800cs

Well-Known Member
Messages
277
Reaction score
93
Paul, Again, Mentioning Healeys not to get too far off the CS subject at hand.

I sold my 3000 a couple of years ago for some nice money after an extensive restoration. Came out too nice to drive. Bought a 57 Porsche speedster replica for less than a quarter of the Healey sale and am having a blast with it, drive it everywhere. So have some some nice $$ leftover to put towards the 2800CS which is my all time favorite car.

Dating my self I bought a new Healey 3000, one of the last made in early 1968 for just over $3600 US. Sold it a few years later after it already started to rust and it was not even made by Karmann, sound familiar? Then 20 years later bought the one we just sold, for $4000 finding it rusting and not running in a barn.

The 2800CS (Vin 2205990) is now the longest time I have ever owned a car buying it in Northern CA in 1990, Price $11,000. 4 speed, air and sunroof. Since added a 5-speed and Ac works reasonably well.

So this is the last restoration for me. Just hope my bones are up to the task, just not sure how far to take it.

I had an E3 (72 Bavaria, again 4-speed, air, sunroof) for many years prior to buying the CS. Never should have sold it. What great looking and functional sedans. Not to disparage any BMW's since, I think the Bavaria's and the CS coupes are the most beautiful and practical offerings ever from BMW. I guess these models really got them on the map and off and running into the market place.

Again thanks so much for the replies and info and sorry to all about ramblings off subject.

Jeff
jjs2800cs
 
Top