So I count 23 bearings (#4) along the main worm shaft. Can someone guide me on how these get reinserted? There appears to be two pins or spikes within the housing the worm screws into and my sense is that the bearings fit between these so they cannot migrate up or down. These pins don't seem to be in the schematic
You are using an out of date browser. It may not display this or other websites correctly.
You should upgrade or use an alternative browser.
You should upgrade or use an alternative browser.
Steerig box Rebuild
- Thread starter bavbob
- Start date
Worm Assembly
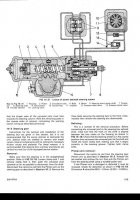
Hi Bob. Are the little tabs inside the bore in this image the ones you referred to?

They are there to 'scoop' the balls as they roll up and down inside the worm. That's where the balls leave the worm, recirculate, and go back in. None of the balls spend any time above the top one or below the bottom one. The balls roll up and down in the helix between the two and when they are scooped out, they travel through the little conduit and back into the helix.

1. Insert the screw assembly into the bore assembly.
2. Insert the first ball into one of the ports.
3. Jiggle the the screw. The ball will pretty much fall in.
4. Put more balls in. They will follow the first ball and by now you will need to rotate the screw to make them start to circulate.
5. Rotate the screw and keep feeding balls until the first one appears at the other port, ready to pop out. You have filled up the helix! And you should have seven balls remaining at this point.
6. Note that there won't be any gaps between balls once everything is fully assembled. That means you have to fill up the conduit with balls and insert that as a unit.

7. Pack the two-piece conduit pod with balls and a thick grease. Put the conduit shell together, securing the balls within.

8. Slide the conduit assembly with the balls in it into the bore piece.
9. Ok, now test it -- when you turn the screw, the balls should circulate! You ought to be able to watch the balls traveling through the conduit shells by looking through the little gap!
Remember not to turn the screw too far (more than four rotations) or you will be left with the screw in one hand and a housing full of loose ball bearings in the other. If that happens, just go to step 1 and repeat.
Chances are you're not to this part yet, but I also used grease to stick the many needle bearings in place:

Hi Bob. Are the little tabs inside the bore in this image the ones you referred to?
They are there to 'scoop' the balls as they roll up and down inside the worm. That's where the balls leave the worm, recirculate, and go back in. None of the balls spend any time above the top one or below the bottom one. The balls roll up and down in the helix between the two and when they are scooped out, they travel through the little conduit and back into the helix.
1. Insert the screw assembly into the bore assembly.
2. Insert the first ball into one of the ports.
3. Jiggle the the screw. The ball will pretty much fall in.
4. Put more balls in. They will follow the first ball and by now you will need to rotate the screw to make them start to circulate.
5. Rotate the screw and keep feeding balls until the first one appears at the other port, ready to pop out. You have filled up the helix! And you should have seven balls remaining at this point.
6. Note that there won't be any gaps between balls once everything is fully assembled. That means you have to fill up the conduit with balls and insert that as a unit.
7. Pack the two-piece conduit pod with balls and a thick grease. Put the conduit shell together, securing the balls within.
8. Slide the conduit assembly with the balls in it into the bore piece.
9. Ok, now test it -- when you turn the screw, the balls should circulate! You ought to be able to watch the balls traveling through the conduit shells by looking through the little gap!
Remember not to turn the screw too far (more than four rotations) or you will be left with the screw in one hand and a housing full of loose ball bearings in the other. If that happens, just go to step 1 and repeat.
Chances are you're not to this part yet, but I also used grease to stick the many needle bearings in place:
Thank You , Exactly what I needed...I do fear I have bitten off quite a bit since I have the worm out but the rest of the box is still intact. Please don't go on vacation for the next few days!
I'll be here!
My conduit has the sharp point at each end, rotated in so that the balls placed in it will stay in it, there is no recirculation. As far as I know, this is the original box to my car. Doesn't seem that way in your images. Surmise each got tagged by one of the balls. I checked all the balls and they look fine so I am going to straighten out the conduit and forge ahead.
Last edited:
Very odd. I wonder if it's possible that nothing has been circulating for a while. Was the steering wheel very difficult to turn? The conduit shells have tines on the ends of them but they should not impinge on the path of the traveling ball bearings. Mysterious.

I think someone was there before and when they loaded the bearings and placed the conduit, the bearings in the conduit did not align with those in the worm gear. Someone then forced the conduit so the clip would fit and allow placement into the housing.
Needless to say, thank you for you help. This was a PIA and I lost one needle for a bearing which I can live with.
Needless to say, thank you for you help. This was a PIA and I lost one needle for a bearing which I can live with.
Thank you Bavbob and Blinking for giving me inspiration to fix my spare steering box.
Some years ago I had an accelerating leak in the intermediate section on my original power steering box.
I pulled out the box and dismantled it with all the ball and needle bearings falling out all over the floor")
Hmm, ordered the repair seal kit from local dealer with the answer it would probably take a few weeks due to late delivery from Germany.
In a hurry to get the car running again I luckily was able to find a used box and had that one installed instead.
So when reading your thread, I finally put the original box together.
Today, with new sealings and paint, it feels and looks like new in the spare part box
Cheers!
Stefan
Some years ago I had an accelerating leak in the intermediate section on my original power steering box.
I pulled out the box and dismantled it with all the ball and needle bearings falling out all over the floor
Hmm, ordered the repair seal kit from local dealer with the answer it would probably take a few weeks due to late delivery from Germany.
In a hurry to get the car running again I luckily was able to find a used box and had that one installed instead.
So when reading your thread, I finally put the original box together.
Today, with new sealings and paint, it feels and looks like new in the spare part box
Cheers!
Stefan
BTW!
Forgotten to mentioned that I tightened the steering box I got in the car just now. Driving at high speed you need to have a tight steering. Some folks say this could/would cause damage wearing to the box.
Like any modern car that got progressive steering with less influence from power steering hydraulics at high speed.
I will still run for this tightened box and see if it does any extra wear on the box. After two years there are no significant wear.
Awesome. A spare box is hard to come by up here and would suffer the same fate as the one I have. Currently a bit tighter than it was. Also swapped the lower U-joint. I had a spare from my E24 that fit fine. Aluminum though. Rest of the column will be rebuilt this winter.