My 73 w/ electric sunroof doesn't slide. Unzipping headliner reveals that motor spins, as does worm gear out of it but center gear in the drive does not. Looks like the worm gear is stripped. So, I need to source a motor and drive assembly. But I suspect that is only the start of my issues because the PO said it worked when he got the car but started jamming up. Spinning the drive center gear does nothing to the sunroof now but it eventually stops spinning so I am guessing the cable is engaged and getting to the end of its length. I suspect that the cable ends have broken so it needs guides and cables too. Problem is, I've never worked on one before and all the previous posts I've seen already have the headliner out. I assume I will need to remove the headliner? Any tips on that without ruining it? Seems like getting it back in under the rear window gasket might be a challenge. Then there are some wooden panels under there. I assume everything will be obvious if I get that far? Any help is appreciated.
You are using an out of date browser. It may not display this or other websites correctly.
You should upgrade or use an alternative browser.
You should upgrade or use an alternative browser.
Sunroof howto wanted
- Thread starter jefflit
- Start date
-
- Tags
- electric roof
I think you can remove the panel that covers the sunroof and make many repairs from there. It probably is the cable(s). There are lots of write ups on sun roof removal here on the site, if you use the search function I think there is even a factory write up on the procedure. I did mine when the headliner was out along with the rest of the interior so it was a little easier.
Good luck and yell if you get stuck!
Good luck and yell if you get stuck!
HowTo Remove
I took a crack at the sunroof today and can pretty much answer my own questions, with one exception (at end).
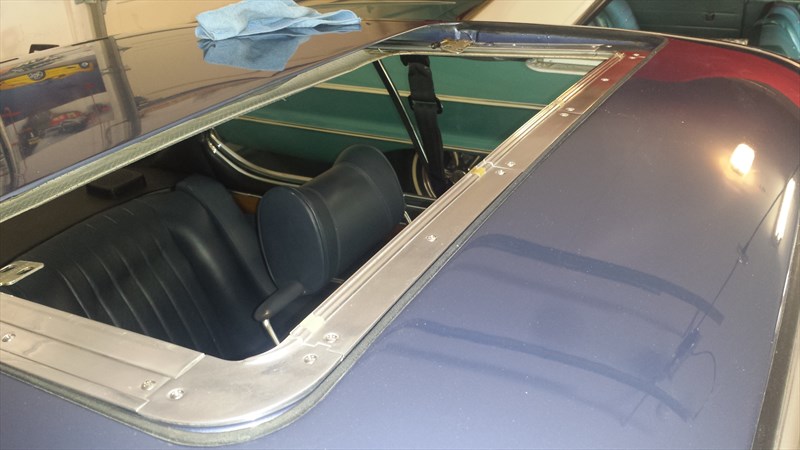
First, yes, the sunroof is fairly easy to service without removing the entire headliner. The zipper provides access to the motor and gear drive and removing the headliner material from just the sunroof itself provides access to everything else.
For the next guy:
To get access to and remove the sunroof panel:
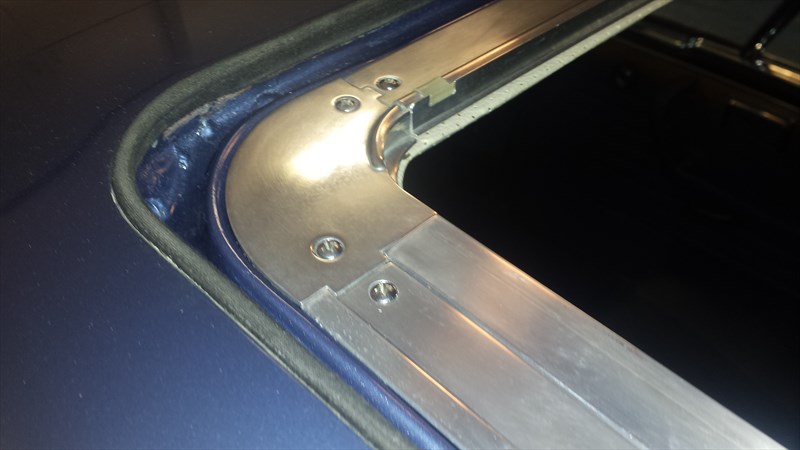
Slide the sunroof panel back an inch or so (mine was completely inoperable so it required some pushing). Using your fingers or a panel trim puller, pull down on the leading edge of the headliner material panel to release the clips that hold it to the sunroof. There are five clips. Once pulled out, the headliner panel can be slid back into the roof cavity.

Shows clips in headliner panel slid back into roof (with sunroof already removed). Also shows guide bracket on track.
Now you have access to the four screws (2 each side) that attach the guide brackets to the sunroof. Remove the screws and the brackets. Take a look at the guide brackets. These are what keeps the suroof in place when it slides. They should have good, non-cracked plastic guides and some non-friction material on the metal tab. The plastic often cracks necessitating bracket replacement.
Remove these screws to separate sunroof from guides and track.
The guides should have good plastic on one side and low-friction material on the other.
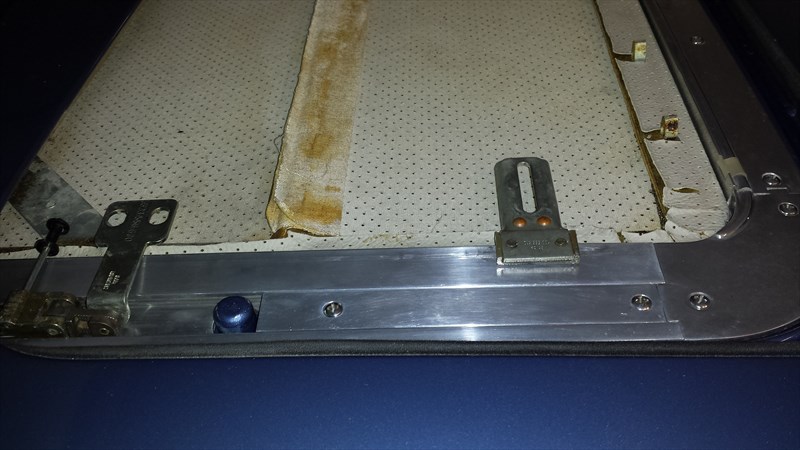
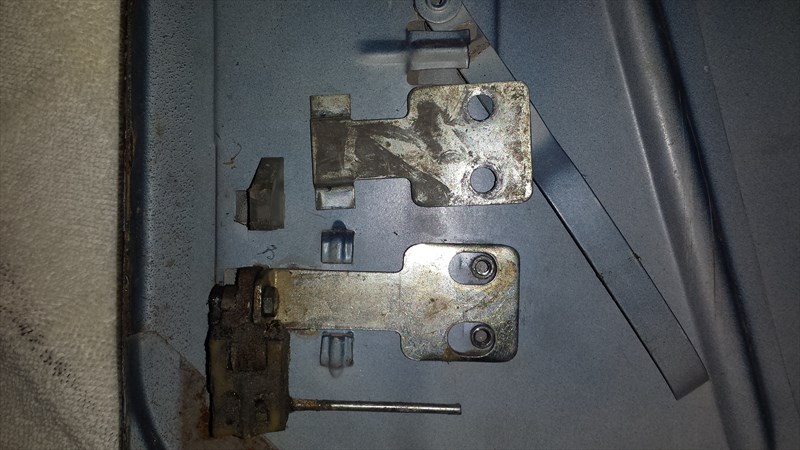
If your cables are both broken like mine then you can now lift the sunroof off the top of the car. If you have any cables still attached then move towards the rear of the sunroof and find the four bolts holding the cable end brackets to the sunroof. There is also a strip of metal over each bracket that you can pivot out of the way. Remove the 4 bolts (2 each side) on the cable brackets and the sunroof is free for sure.
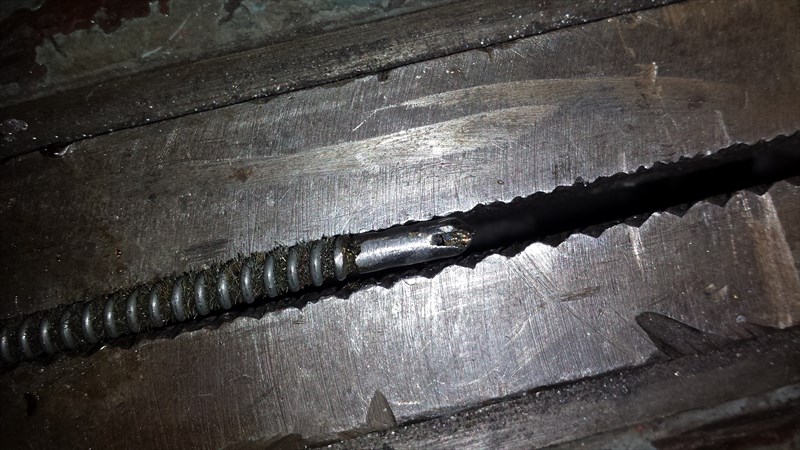
This is where the cable ends bolt to the panel. Pivot the metal guide to the side and you have access to the two bolts. Obviously, this one was already busted off the cable.
With the panel out, you can now attack the cables, which are almost certainly your issue. The stock cables have plastic hinges where they attach to the sunroof and the plastic often breaks. Cables are still available from BMW. Alternatively, I don't have the part number, but everyone says that 1985 Volvo 240D cables are the same except that the plastic hinges are metal.
The other end on my car, even more busted than the previous image. Those plastic hinges get brittle.
To replace a cable:
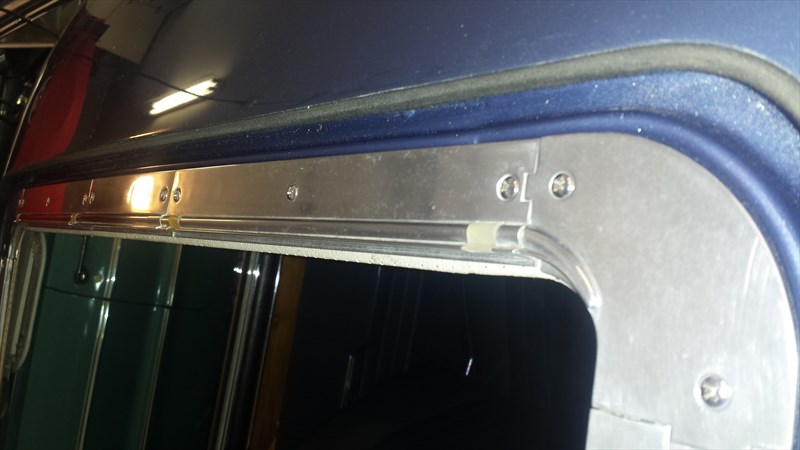
Unscrew the bright aluminum trim and guide tracks around the sunroof opening. Lots of short phillips screws. You don't actually have to remove all the trim but you might as well clean and polish everything while you're in there. The main pieces we're trying to get out are the long tracks that go back into the roof. As you pull them forward, the slider on the end of the cable should slide out the back, assuming any of the plastic remained intact.
The tracks and other trim removed from the car. These polish up nicely.
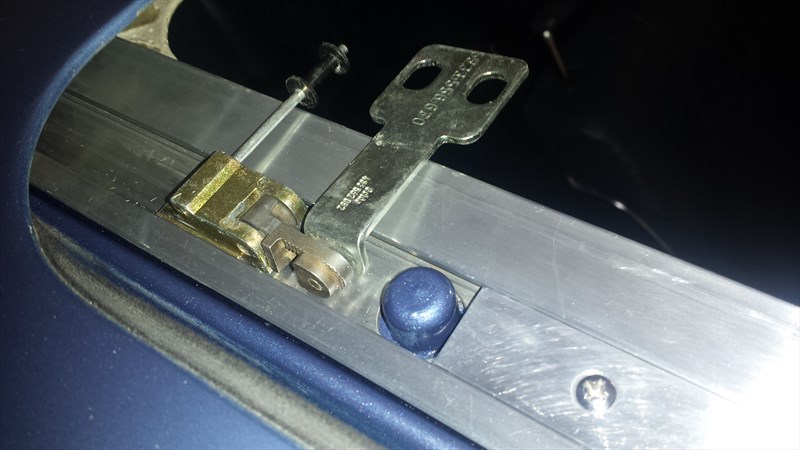
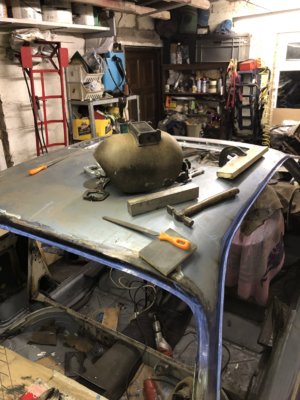
Unzip the headliner and remove the two screws on the drive assembly. Pull the assembly down to get the gear out from between the cables. If you have motor issues, now is the time to pull that too. Just lossen the three wire terminals at the junction block and remove the two 10mm nuts holding the motor to the roof. It will come out through the zipper slot.
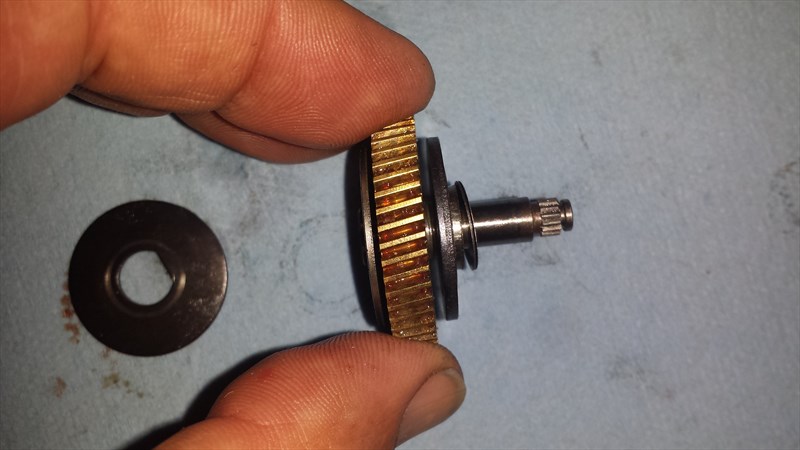
The motor drive unit. Note that the gear shaft (center) is slotted so you can operate the sunroof with a large flat-blade screwdriver if you don't have the manual crank that threads into that hole.
Removing the motor.
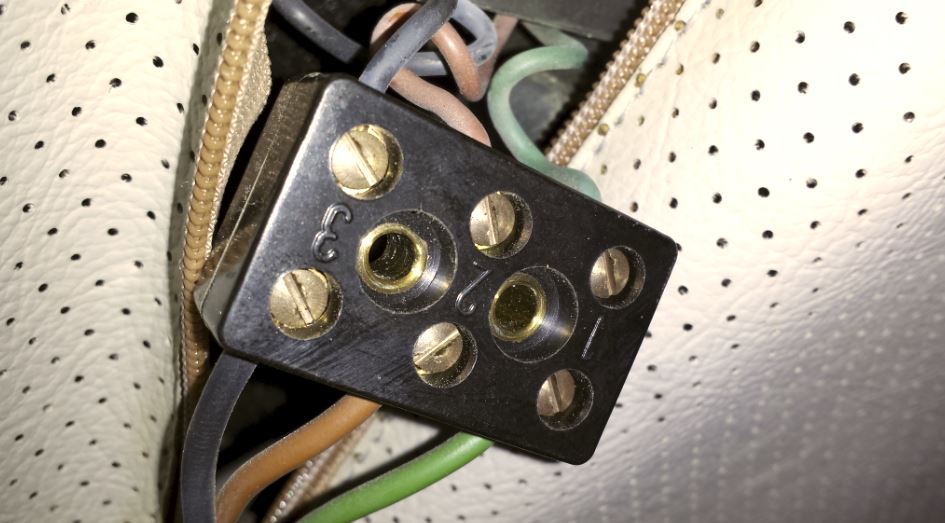
The motor wiring junction block.
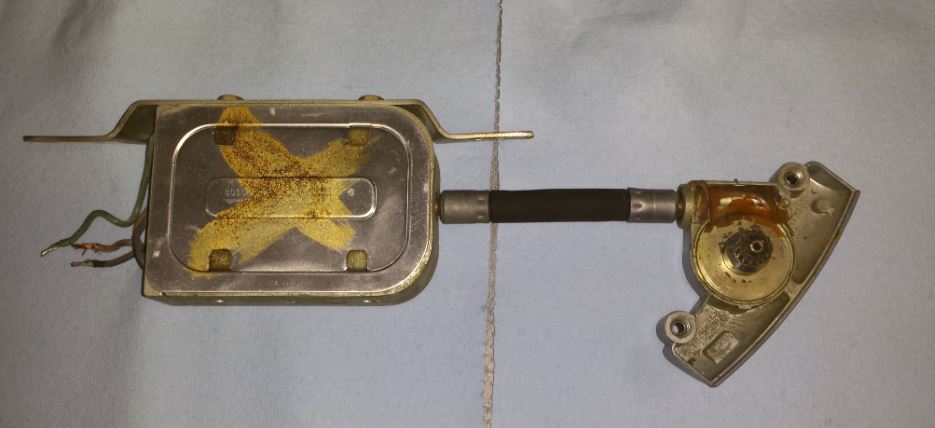
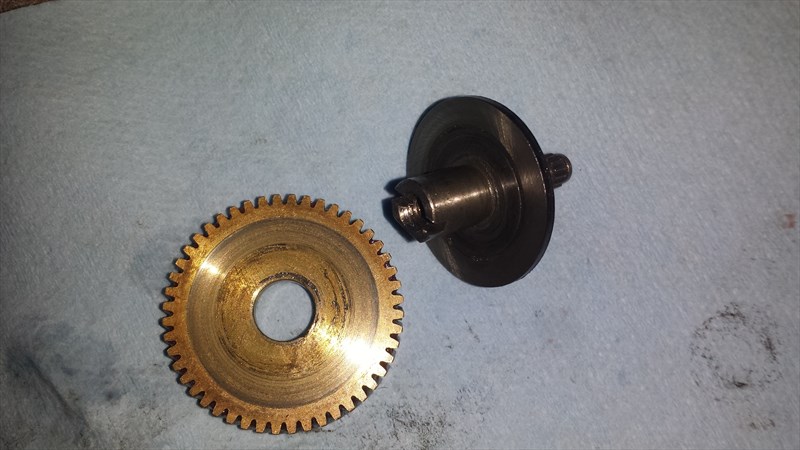
Motor and drive assembly.
With the drive gear lowered and the cable ends slid out of the tracks, the cables can simply be pulled out from the sunroof opening. Grab the cable at the bracket end that used to be attached to the sunroof and pull.
Pull this end out of the car to replace.
Clean, polish, and lubricate. Check the drain holes in the front corners, look for rust, etc.
Honestly, that's as far as I've gotten. I am waiting for my cables to arrive. I will update the post when I'm done. In the meantime, I have a question.
At the back where the cables go into the roof, there is a plastic locating "stick" on each side that I assume is supposed to go into the groove of the track that doesn't have the cable. Trouble is, they bend and a one of mine is quite twisted and since I can't get my hand back there, I can't hold the stick and thread it into the track. I tried using some long pliers to pull it out of the roof, thinking that I could more easily guide it into the roof when already stuck into the guide, but it didn't want to pull out. What's the secret here?
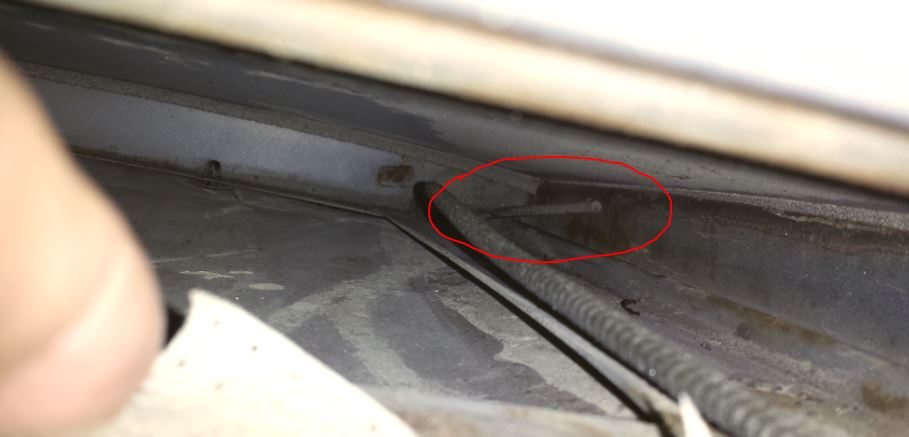
Locating stick (left side)
Right side. There is no way that the track can be pushed onto that.
Any help appreciated.
I took a crack at the sunroof today and can pretty much answer my own questions, with one exception (at end).
First, yes, the sunroof is fairly easy to service without removing the entire headliner. The zipper provides access to the motor and gear drive and removing the headliner material from just the sunroof itself provides access to everything else.
For the next guy:
To get access to and remove the sunroof panel:
Slide the sunroof panel back an inch or so (mine was completely inoperable so it required some pushing). Using your fingers or a panel trim puller, pull down on the leading edge of the headliner material panel to release the clips that hold it to the sunroof. There are five clips. Once pulled out, the headliner panel can be slid back into the roof cavity.
Shows clips in headliner panel slid back into roof (with sunroof already removed). Also shows guide bracket on track.
Now you have access to the four screws (2 each side) that attach the guide brackets to the sunroof. Remove the screws and the brackets. Take a look at the guide brackets. These are what keeps the suroof in place when it slides. They should have good, non-cracked plastic guides and some non-friction material on the metal tab. The plastic often cracks necessitating bracket replacement.
Remove these screws to separate sunroof from guides and track.
The guides should have good plastic on one side and low-friction material on the other.
If your cables are both broken like mine then you can now lift the sunroof off the top of the car. If you have any cables still attached then move towards the rear of the sunroof and find the four bolts holding the cable end brackets to the sunroof. There is also a strip of metal over each bracket that you can pivot out of the way. Remove the 4 bolts (2 each side) on the cable brackets and the sunroof is free for sure.
This is where the cable ends bolt to the panel. Pivot the metal guide to the side and you have access to the two bolts. Obviously, this one was already busted off the cable.
With the panel out, you can now attack the cables, which are almost certainly your issue. The stock cables have plastic hinges where they attach to the sunroof and the plastic often breaks. Cables are still available from BMW. Alternatively, I don't have the part number, but everyone says that 1985 Volvo 240D cables are the same except that the plastic hinges are metal.
The other end on my car, even more busted than the previous image. Those plastic hinges get brittle.
To replace a cable:
Unscrew the bright aluminum trim and guide tracks around the sunroof opening. Lots of short phillips screws. You don't actually have to remove all the trim but you might as well clean and polish everything while you're in there. The main pieces we're trying to get out are the long tracks that go back into the roof. As you pull them forward, the slider on the end of the cable should slide out the back, assuming any of the plastic remained intact.
The tracks and other trim removed from the car. These polish up nicely.
Unzip the headliner and remove the two screws on the drive assembly. Pull the assembly down to get the gear out from between the cables. If you have motor issues, now is the time to pull that too. Just lossen the three wire terminals at the junction block and remove the two 10mm nuts holding the motor to the roof. It will come out through the zipper slot.
The motor drive unit. Note that the gear shaft (center) is slotted so you can operate the sunroof with a large flat-blade screwdriver if you don't have the manual crank that threads into that hole.
Removing the motor.
The motor wiring junction block.
Motor and drive assembly.
With the drive gear lowered and the cable ends slid out of the tracks, the cables can simply be pulled out from the sunroof opening. Grab the cable at the bracket end that used to be attached to the sunroof and pull.
Pull this end out of the car to replace.
Clean, polish, and lubricate. Check the drain holes in the front corners, look for rust, etc.
Honestly, that's as far as I've gotten. I am waiting for my cables to arrive. I will update the post when I'm done. In the meantime, I have a question.
At the back where the cables go into the roof, there is a plastic locating "stick" on each side that I assume is supposed to go into the groove of the track that doesn't have the cable. Trouble is, they bend and a one of mine is quite twisted and since I can't get my hand back there, I can't hold the stick and thread it into the track. I tried using some long pliers to pull it out of the roof, thinking that I could more easily guide it into the roof when already stuck into the guide, but it didn't want to pull out. What's the secret here?
Locating stick (left side)
Right side. There is no way that the track can be pushed onto that.
Any help appreciated.
restart
Well-Known Member
Nice how to. Thanks.
Nice photos and write up.
Could you trim off the bend section of the plastic rod, leaving just enough to engage the empty slot? You might be able to reach it with a small cutting disk on the end of a flexible dremel tool?
Could you trim off the bend section of the plastic rod, leaving just enough to engage the empty slot? You might be able to reach it with a small cutting disk on the end of a flexible dremel tool?
I haven't done a sunroof in a coupe, but I did a bunch of work on my son's e34 sunroof. What to do with those things may depend on why they are there.
For example, if the function of the plastic sticks is to hold the rear of a u-shaped track in place so that it doesn't move laterally and bind on the sunroof, you might use a wooden dowel between the ends of the U instead. Is there a frame piece across the back of the track?
Another function might be to stop the inner liner of the sunroof from rolling back into the headliner too far and getting stuck in there.
Any idea what those things are supposed to do?
Sunroof Sticks
That's the $64k question: what is the purpose of the sticks? The tracks have round tunnels all along each side. The cable goes through one side and it appears that the sticks line up with the other. The car has a short (3/8" or so) "nipple" sticking out where the cable goes through. The track seems to fit over that so it is secure laterally without the sticks. I'm not sure what their purpose is but I fear that if they are not properly installed they may interfere with the panel or cable end when retracted all the way. Does anyone know how this is supposed to work?
That's the $64k question: what is the purpose of the sticks? The tracks have round tunnels all along each side. The cable goes through one side and it appears that the sticks line up with the other. The car has a short (3/8" or so) "nipple" sticking out where the cable goes through. The track seems to fit over that so it is secure laterally without the sticks. I'm not sure what their purpose is but I fear that if they are not properly installed they may interfere with the panel or cable end when retracted all the way. Does anyone know how this is supposed to work?
Installation
An update on sunroof repair now that I have my cables replaced and the sunroof back in the car.
When we last left off, I was confused about the "sticks" in the back of the roof. I have now determined that they are indeed intended to do through the other groove in the long track, not occupied by the cable. I have also determined that they are not as difficult to align and get into the groove as I had feared.
But before we get to that, a word on the cables.... Everyone says the cables are available from BMW. Maybe they used to be but I couldn't find any. Every dealer I talked to said there are none in the world inventory right now and it will take three months to make more in Germany. Maybe someone outside the dealer network has some but I couldn't locate any.
Instead, I bought a pair of presumably Volvo cables advertised on eBay for a 2002 or E9. These looked to be perfect and have the improved metal hinges. Other than being about 10 inches too long, they looked like they would work fine. Maybe everyone else knew that manual sunroof cables won't work on an electric sunroof car but I didn't. The slider is mounted on the wrong side of the cable, meant to be routed to the front of the car, not the back.
Given that I had them in hand and couldn't find any correct cables, I set about modifying the manual pair. This isn't an easy task. The sliders are pot metal and crimped around the cable. Being pot metal they aren't suitable to welding. I ended up using an angle grinder to cut a slot along the crimp, opened it up enough to get it off the cable, flipped in around, crimped it back onto the cable, and soldered it back together for assurance. The outer sheath is missing where the slider crimps to the cable so it really holds in place well and there isn't anywhere for it to go once slid into the track so this modification seems to work fine. I also lopped off 10 inches and crimped the end cap back onto the end.

Opened up the crimp and flipped it around and recrimped.
Soldered to fill in the gap.
Now the orientation matches the original.
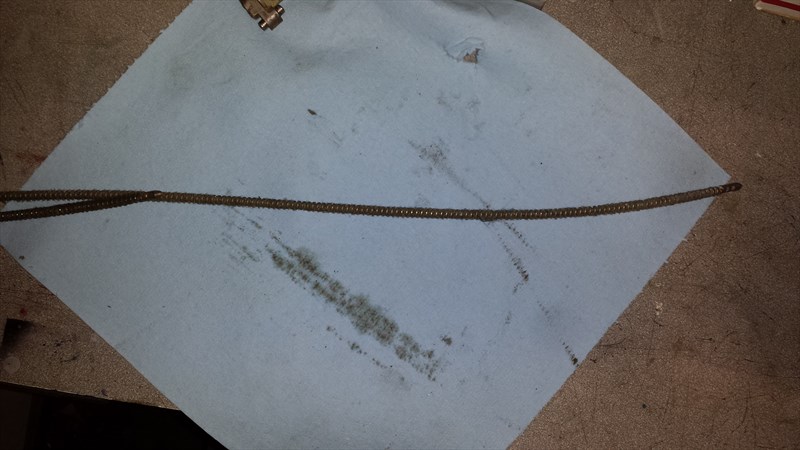
This is how much longer the Volvo manual cable is than the original
Cut, file down the outer casing for half an inch or so, crimp on end cap (cut from old end).
This is how the cables should sit in the tracks for an electric roof.
With the correct cables, it was time to prep the car for installation. I sanded and repainted the area around the tracks, making sure the front drain holes were clear. I got a local paint supply shop to match the color and shot the base and clear coat with my airbrush since the space is so small.
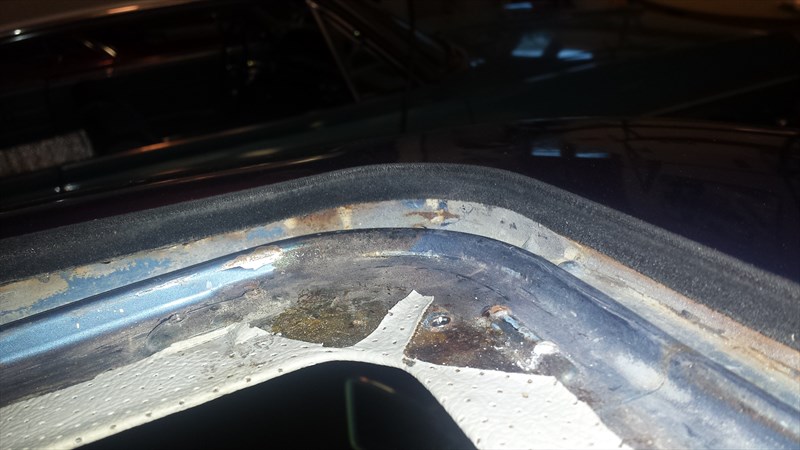
Before. A little grungy but not rusty.
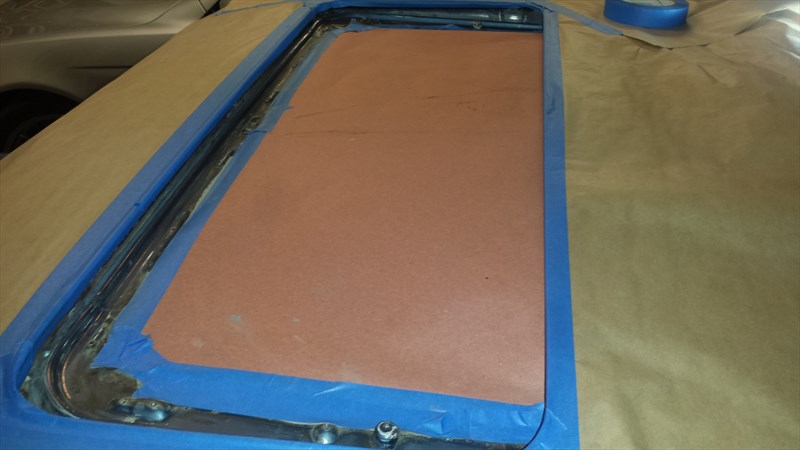
During. Sanded and masked off.
After.
The cables are too flexible to try to push through the guides in the car with the headliner still in place. I found the easy way to get the cables into the car is to slide them into the long track, leaving 4 or so inches sticking out.
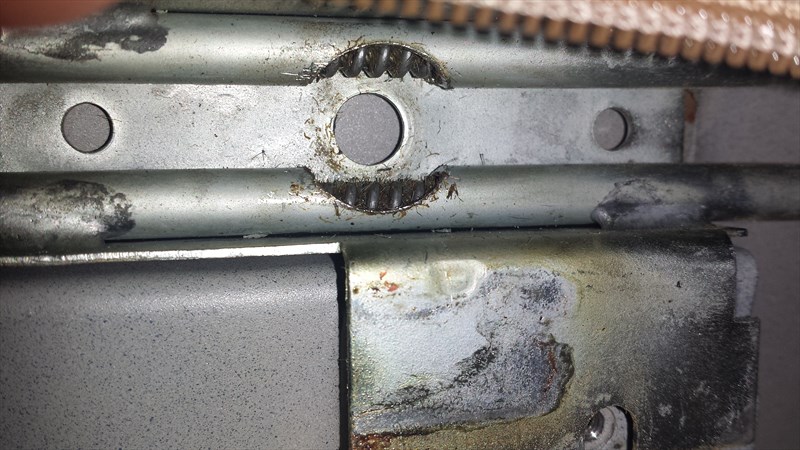
Put a towel on the front of the roof and guide the track into the rear roof cavity from the top. When you get about 6 inches from the back, shine a light back there and tilt and move the track around until you get the "stick" lined up with the proper groove in the track. Slide the track onto the stick a little bit and then aim the end of the cable into the hole in the car. With the cable started, you can then feed it through the track, using the track to keep it stiff. You can also slide the track a little further down the stick. Keep feeding the cable until the slider is on the track and in the sunroof opening area. When in far enough, push the track back over the little nipple where the cable enters the car. Between this nipple and the stick, the track will be very secure. Slide the cable past the stop bumper and lay the track in place. Repeat for the other side.
This is how the cable sits in the track when installed. Note: this picture also shows the teeth in the hinge that allow adjustment of the rear height.
Before you screw the tracks to the car, grab the sunroof headliner and slip it into the grove on one track, then move the tracks apart enough to slip it into the other track as well. Slide the headliner panel back into the roof and out of the way.
Headliner panel in the grooves. Slide it back to gain working room.
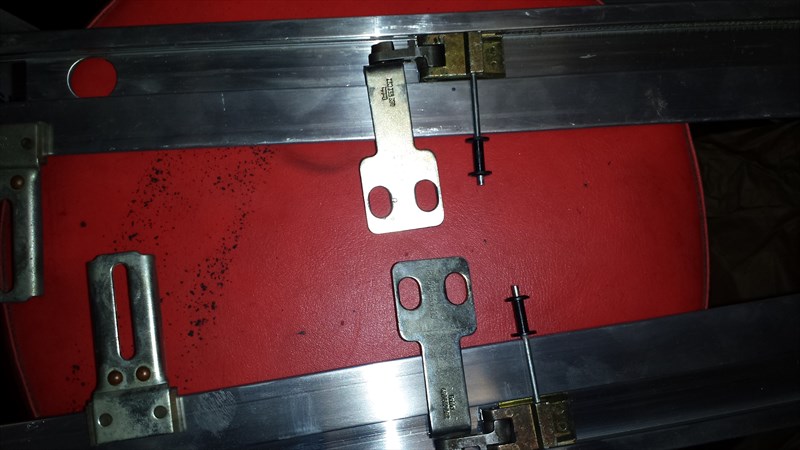
Now you can screw down the track and the rest of the aluminum trim pieces. Slip the front slider brackets onto the track near the front of the car.
Put the sunroof into the car, rear portion first. Slide it into the roof about 1 inch or so. Pull or push the cables so that they line up with the appropriate holes in the sunroof. Slide the front brackets into the proper place as well. Slip the metal T cover over the rear brackets and into the tabs on the sunroof. Install the screws in the rear brackets. Screw the front brackets to the sunroof as well.
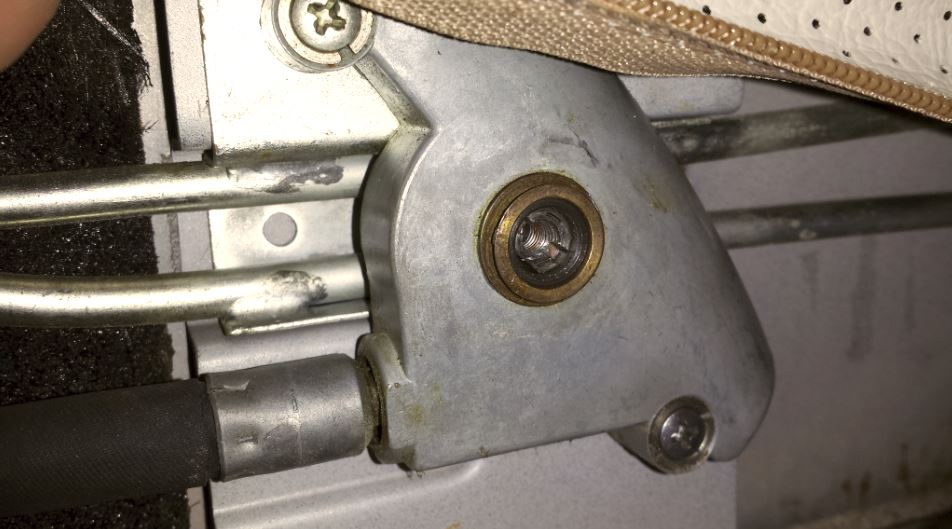
Note that the holes in the rear brackets are elongated to allow side to side adjustment. The "T" shaped plates slide into the tabs over the top to allow the screws to tighten without falling through the oval holes. Slide the metal guide back over when bolted in.
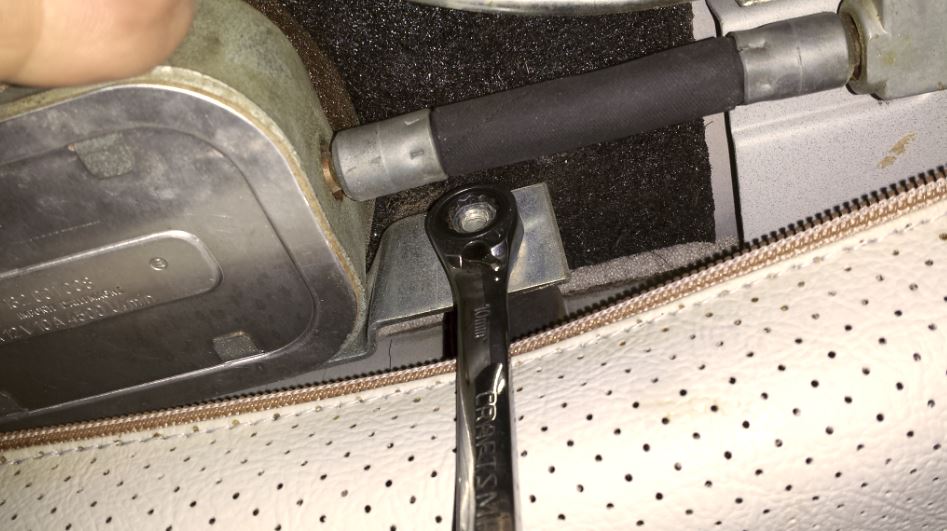
Make sure the sunroof panel is even on both sides. Now you can install the motor. You might need to use a flat blade screwdriver to turn the gear a little as it engages the cables. Once installed, use the screw driver to manually close the sunroof slowly, taking note of alignment.
The gear on the motor drive slips in here between the two cables.
It it is too high or too low in front you can remove the screws on the front brackets and turn the knurled plastic fittings in or out to lower or raise the front. To adjust the back, you need to remove the sunroof panel, loosen the bolt holding the two halves of the hinge together, extend or shorten the hinge , and reinstall.
Once adjusted, slide the headline panel forward and snap in the 7 clips to hold it to the sunroof panel.
With any luck you are now done. Hit the switch and see.
If you are like me then luck is not your friend and the motor will spin without the sunroof actually moving. If this is the case, you'll need to pull the motor back out and disassemble the gearbox. It is a simple worm drive on a brass gear that is held to the shaft that engages the cables via a friction clutch assembly. Most likely, you will need to adjust the preload on the clutch plate as it has probably worn.
I'll post my fix for that once I get it all dialed in properly. In the meantime, here are pieces:
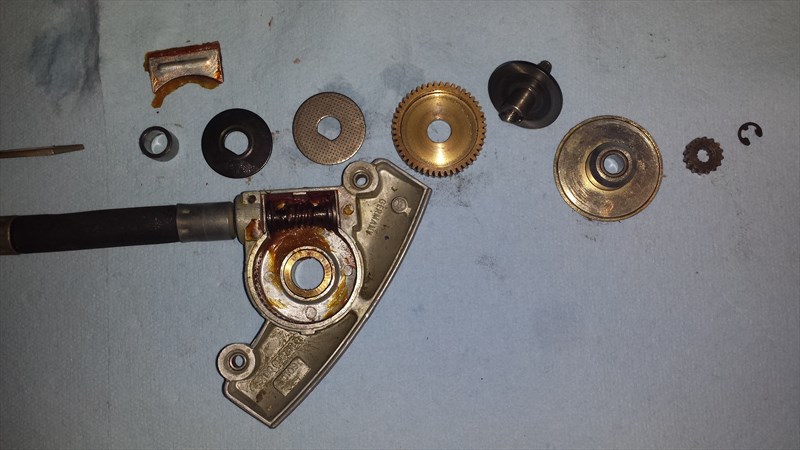
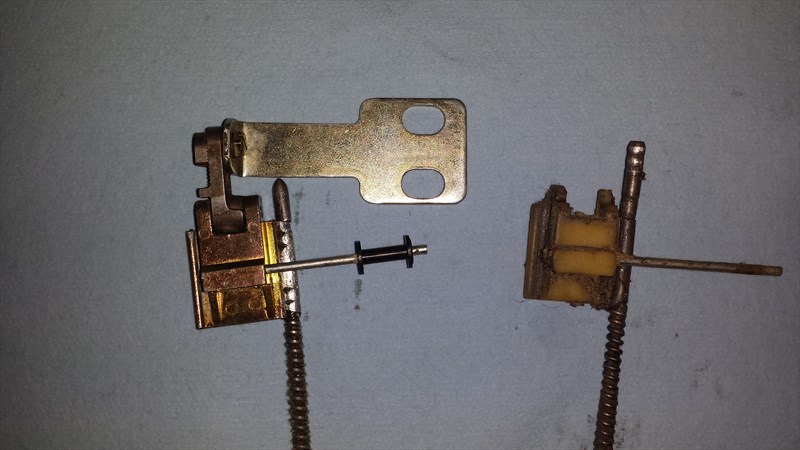
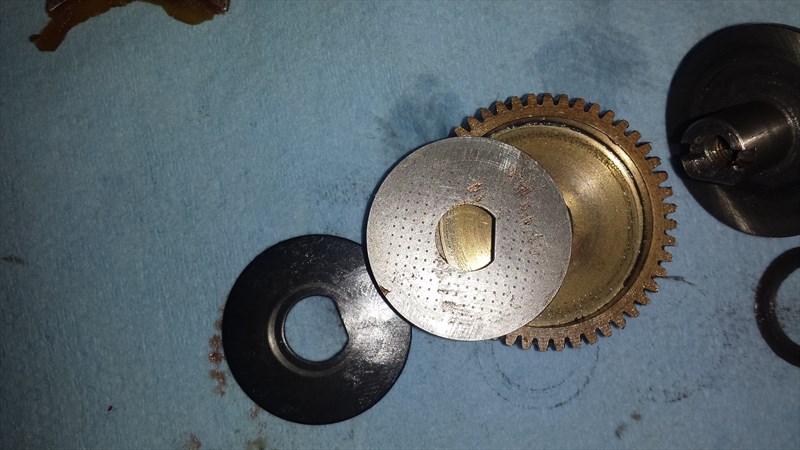
Exploded.
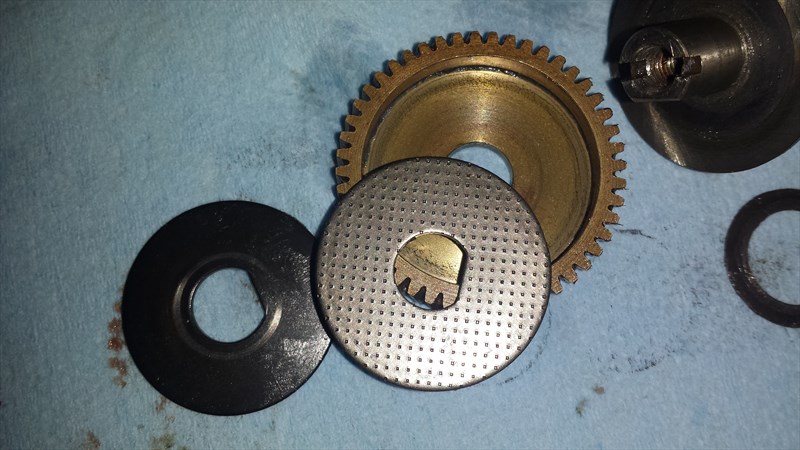
The friction clutch disc (good side)
Clutch disc (worn side)
How the large gear is sandwiched by the "clutch" assembly. Those two thin washers on the shaft adjust the preload. The disc on the towel is dome shaped and gets squeezed to apply pressure to the friction disc.
You can see where the surface on the shaft has been slipping on the flat portion of the gear.
An update on sunroof repair now that I have my cables replaced and the sunroof back in the car.
When we last left off, I was confused about the "sticks" in the back of the roof. I have now determined that they are indeed intended to do through the other groove in the long track, not occupied by the cable. I have also determined that they are not as difficult to align and get into the groove as I had feared.
But before we get to that, a word on the cables.... Everyone says the cables are available from BMW. Maybe they used to be but I couldn't find any. Every dealer I talked to said there are none in the world inventory right now and it will take three months to make more in Germany. Maybe someone outside the dealer network has some but I couldn't locate any.
Instead, I bought a pair of presumably Volvo cables advertised on eBay for a 2002 or E9. These looked to be perfect and have the improved metal hinges. Other than being about 10 inches too long, they looked like they would work fine. Maybe everyone else knew that manual sunroof cables won't work on an electric sunroof car but I didn't. The slider is mounted on the wrong side of the cable, meant to be routed to the front of the car, not the back.
Given that I had them in hand and couldn't find any correct cables, I set about modifying the manual pair. This isn't an easy task. The sliders are pot metal and crimped around the cable. Being pot metal they aren't suitable to welding. I ended up using an angle grinder to cut a slot along the crimp, opened it up enough to get it off the cable, flipped in around, crimped it back onto the cable, and soldered it back together for assurance. The outer sheath is missing where the slider crimps to the cable so it really holds in place well and there isn't anywhere for it to go once slid into the track so this modification seems to work fine. I also lopped off 10 inches and crimped the end cap back onto the end.
Opened up the crimp and flipped it around and recrimped.
Soldered to fill in the gap.
Now the orientation matches the original.
This is how much longer the Volvo manual cable is than the original
Cut, file down the outer casing for half an inch or so, crimp on end cap (cut from old end).
This is how the cables should sit in the tracks for an electric roof.
With the correct cables, it was time to prep the car for installation. I sanded and repainted the area around the tracks, making sure the front drain holes were clear. I got a local paint supply shop to match the color and shot the base and clear coat with my airbrush since the space is so small.
Before. A little grungy but not rusty.
During. Sanded and masked off.
After.
The cables are too flexible to try to push through the guides in the car with the headliner still in place. I found the easy way to get the cables into the car is to slide them into the long track, leaving 4 or so inches sticking out.
Put a towel on the front of the roof and guide the track into the rear roof cavity from the top. When you get about 6 inches from the back, shine a light back there and tilt and move the track around until you get the "stick" lined up with the proper groove in the track. Slide the track onto the stick a little bit and then aim the end of the cable into the hole in the car. With the cable started, you can then feed it through the track, using the track to keep it stiff. You can also slide the track a little further down the stick. Keep feeding the cable until the slider is on the track and in the sunroof opening area. When in far enough, push the track back over the little nipple where the cable enters the car. Between this nipple and the stick, the track will be very secure. Slide the cable past the stop bumper and lay the track in place. Repeat for the other side.
This is how the cable sits in the track when installed. Note: this picture also shows the teeth in the hinge that allow adjustment of the rear height.
Before you screw the tracks to the car, grab the sunroof headliner and slip it into the grove on one track, then move the tracks apart enough to slip it into the other track as well. Slide the headliner panel back into the roof and out of the way.
Headliner panel in the grooves. Slide it back to gain working room.
Now you can screw down the track and the rest of the aluminum trim pieces. Slip the front slider brackets onto the track near the front of the car.
Put the sunroof into the car, rear portion first. Slide it into the roof about 1 inch or so. Pull or push the cables so that they line up with the appropriate holes in the sunroof. Slide the front brackets into the proper place as well. Slip the metal T cover over the rear brackets and into the tabs on the sunroof. Install the screws in the rear brackets. Screw the front brackets to the sunroof as well.
Note that the holes in the rear brackets are elongated to allow side to side adjustment. The "T" shaped plates slide into the tabs over the top to allow the screws to tighten without falling through the oval holes. Slide the metal guide back over when bolted in.
Make sure the sunroof panel is even on both sides. Now you can install the motor. You might need to use a flat blade screwdriver to turn the gear a little as it engages the cables. Once installed, use the screw driver to manually close the sunroof slowly, taking note of alignment.
The gear on the motor drive slips in here between the two cables.
It it is too high or too low in front you can remove the screws on the front brackets and turn the knurled plastic fittings in or out to lower or raise the front. To adjust the back, you need to remove the sunroof panel, loosen the bolt holding the two halves of the hinge together, extend or shorten the hinge , and reinstall.
Once adjusted, slide the headline panel forward and snap in the 7 clips to hold it to the sunroof panel.
With any luck you are now done. Hit the switch and see.
If you are like me then luck is not your friend and the motor will spin without the sunroof actually moving. If this is the case, you'll need to pull the motor back out and disassemble the gearbox. It is a simple worm drive on a brass gear that is held to the shaft that engages the cables via a friction clutch assembly. Most likely, you will need to adjust the preload on the clutch plate as it has probably worn.
I'll post my fix for that once I get it all dialed in properly. In the meantime, here are pieces:
Exploded.
The friction clutch disc (good side)
Clutch disc (worn side)
How the large gear is sandwiched by the "clutch" assembly. Those two thin washers on the shaft adjust the preload. The disc on the towel is dome shaped and gets squeezed to apply pressure to the friction disc.
You can see where the surface on the shaft has been slipping on the flat portion of the gear.
Jeff,
What a great write-up, makes me glad though that I don't have a sunroof! Nice meeting you yesterday at Mike's shop. You should follow up with a post about your coupe that you bought last month, I think you got a screamin deal.
Chris
What a great write-up, makes me glad though that I don't have a sunroof! Nice meeting you yesterday at Mike's shop. You should follow up with a post about your coupe that you bought last month, I think you got a screamin deal.
Chris
its a cool bit of kit - the way that the frame works. i have some spare sunroof rails / perimeter sliding bits ... and i don't have a sunroof.
Motor and Alignment
I have to admit that this repair has had me frustrated more than once.
Motor drive repair: Inspection of the brass gear and two mating surfaces indicated little wear so I figured I just needed to increase the preload a little bit. But there are a couple confusing aspects to this.
One is that the bushing in the housing that supports the end of the shaft that is visible when mounted in the roof has no retainer to hold it in place. It can just drop down into the headliner. I still haven't figured that out, other than there is enough friction in the fit and nothing forcing it out so it just stays in place.
The other confusing bit is how the assembly is pressed together. It depends upon being tight enough to squeeze the brass gear between the friction disc and the mating surface on the shaft. But there is nothing forcing the unit together when not installed in the car. The topmost piece just pushes on. There is no clip or anything holding it there. No, when screwed into the roof of the car it is held in place by a couple sheet metal shelves but they don't cover the entire surface so it is all a bit suspect. And there is no great way to test the unit when out of the car -- I had to fashion up a sort of press in my vice to simulate being bolted in place.
Confusing aspects aside, the brass gear was slipping. I original said there were two thin washers affecting preload. It turns out there were four. Each is only .004" thick. I punched out an additional spacer made from .006" thick copper sheet and reinstalled but it didn't budge the cables at all.
I then tried putting a large washer on top of the whole assembly, between it and the roof mounting surfaces, thinking this would increase the overall pressure but it didn't help either.
At this point I was frustrated and confused. In desperation, I used some emery cloth to etch a little cross hatch into the surfaces of the brass gear, hoping to increase purchase. I also abandoned the entire spacer stack for a single washer (I didn't even measure it I was so fed up, but I know it was thicker than the old stack). This configuration finally made the cables move!
Now on to alignment... sigh.
I originally stated that the teeth in the hinges on the cable ends allow height adjustment but I now realize that isn't really true, or at least isn't all they do. What they actually do is allow the effective length of the cable to be adjusted so that both cable ends are exactly even.
With the sunroof panel off, I suggest sliding the cable ends to the point that they each just touch the stoppers. Then insert the gear from motor drive in between the cables and screw the unit into place. You'll need to use a large flat blade to spin the shaft in order to get the gear fully engaged. Now go back and inspect the cable ends. Most likely they will no longer each be evenly up against the bumpers -- one will probably be slightly closer than the other. If left like this, one side of the sunroof will be higher than the other.
Adjust the hinges until both cables are even. Now you can install the sunroof panel. Close and see how it fits. The front height is adjusted by turning the knurled spacers in or out. The rear is pushed up when the plastic triangles on the panel touch the bumpers in the roof, lifting the panel, then the cables push the sunroof closed and up. It should be even if you got the cables aligned properly. If not, you have to remove the sunroof panel to adjust the hinges again.
I found that my motor still didn't have enough grab on the gear to push the sunroof all the way up. I could turn it a bit further with the flat blade. So I'll be taking it out once more to see if I can scuff it up a bit more.
Almost done.
Really enjoying this guide, very impressed with how thorough you have been.
I also own an E3 and she has problems with the sunroof, I'm suspecting a similar problem with the motor now after reading your guide.
On a side note, I wonder if any of the other forum members have any experience comparing the E3 sunroof vs the E9's. I mention this due to the fact you say BMW at the moment do not supply the cables for the E9, W&N appears to stock cables for the E3. In my mind they cannot be too dissimilar, if at all, any one else have any thoughts ?
http://www.wallothnesch.com/dach/bmw-2500-3-3-li-e3/katalogbild-54-03.html
or..
You could get absolutely everything working on the car perfectly and make sure the sunroof is closed and fits tightly, then you can claim that the car is 100% perfect... except the sunroof- and no one uses it anyhow")
You could get absolutely everything working on the car perfectly and make sure the sunroof is closed and fits tightly, then you can claim that the car is 100% perfect... except the sunroof- and no one uses it anyhow
Cables
Those cables do indeed look similar. However, they are backwards for an E9 electric motor sunroof. Basically, like the ones I bought and had to modify.
Sorry my pictures are offline. My server is being moved.
Those cables do indeed look similar. However, they are backwards for an E9 electric motor sunroof. Basically, like the ones I bought and had to modify.
Sorry my pictures are offline. My server is being moved.
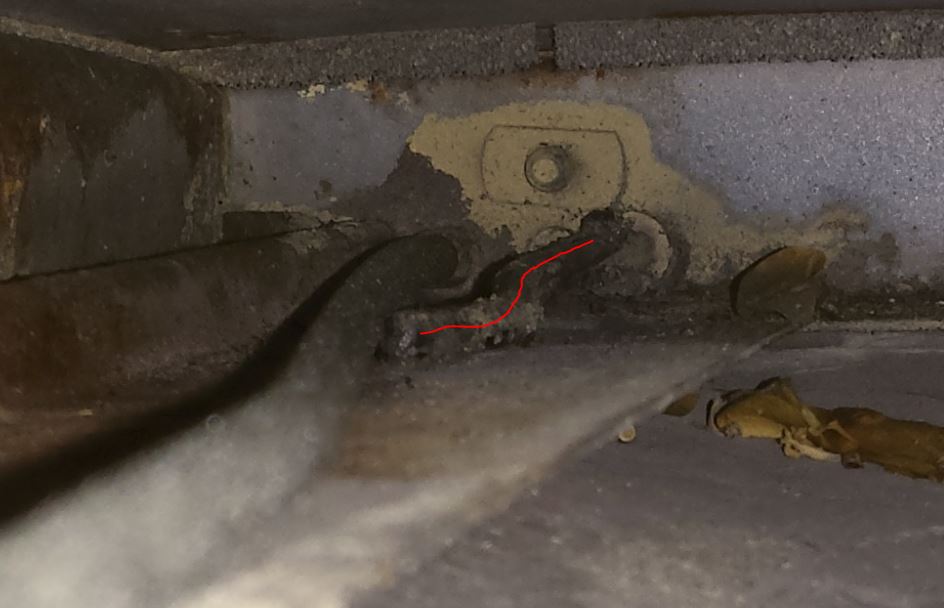
Just to keep everything I've learned about sunroofs in one thread.... There have been a few people recently asking about why their sunroof doesn't rise in the back when fully closed. I've posted previously about this but I was at the shop Friday and had my sunroof apart so I took some better photos illustrating what I'm talking about.
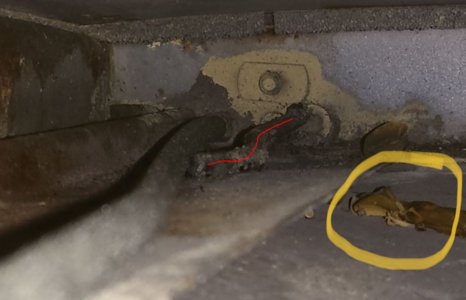
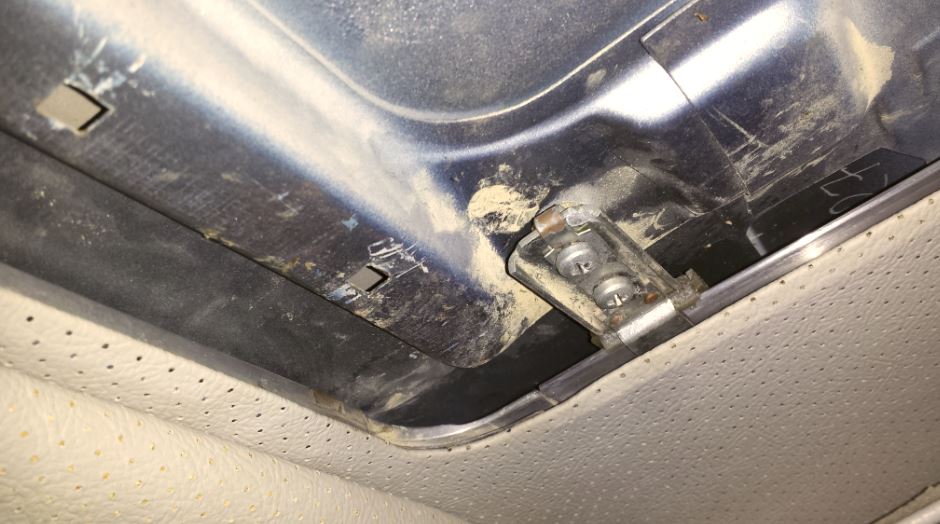
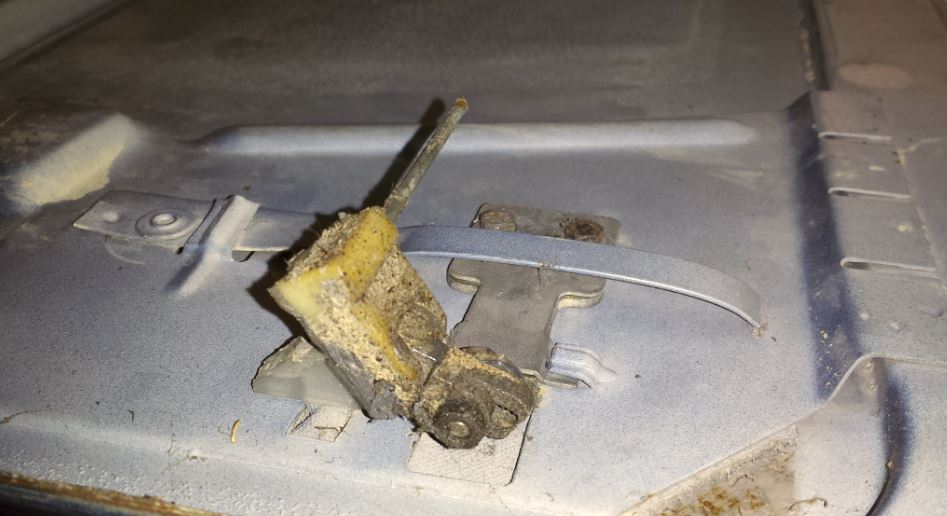
In short, the sunroof has to lower in the back in order to be able to slide under the roof. In fact, gravity being so reliable, the default position for the roof panel is to be low against the rails. It requires something in order to lift it at the end of the closing motion. And this being early 70s technology, it isn't anything fancy. The cables just blindly push the panel forward and when it gets to the last 20mm or so there are angle-shaped plastic blocks that act as ramps. When they come in contact with the large alignment "bumps" in the car's track they ride up on top of those bumps, raising the roof panel.
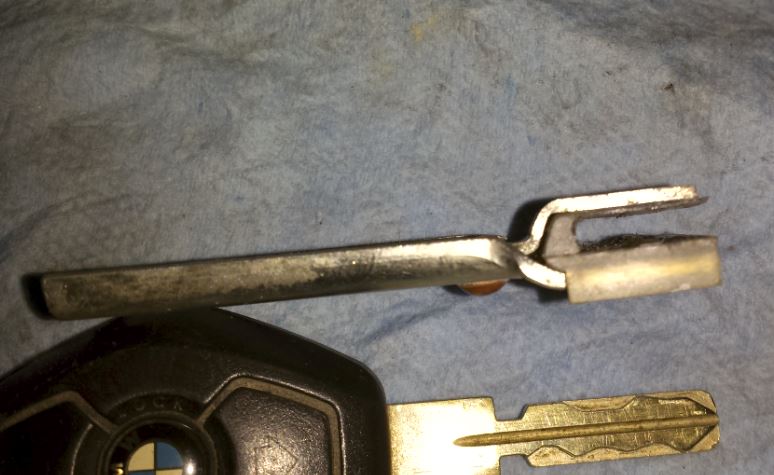
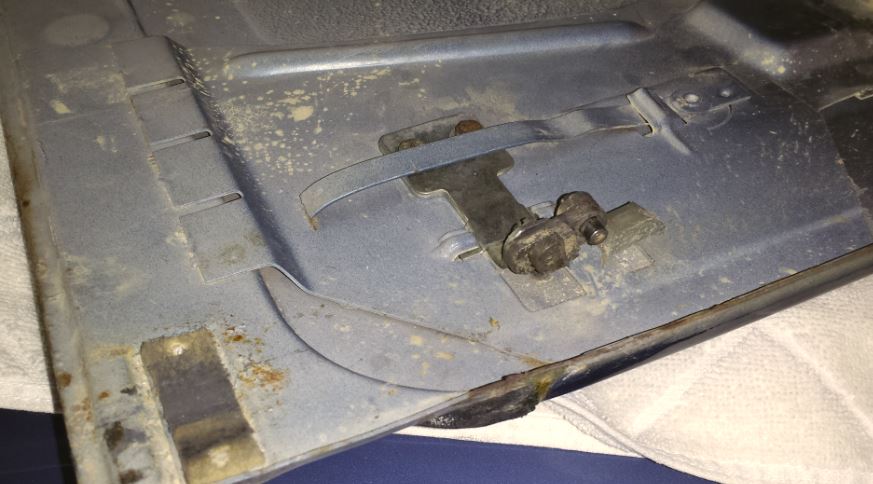
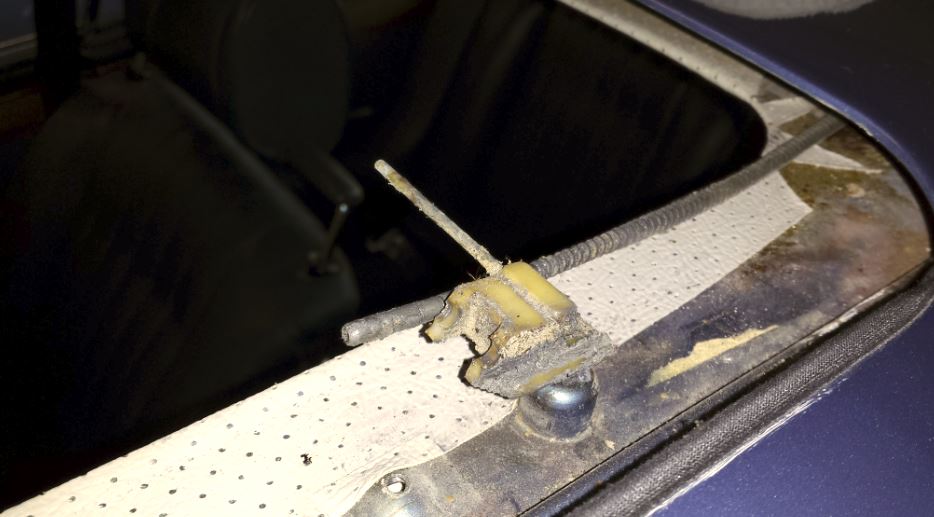
If your sunroof doesn't rise properly my guess would be that those plastic ramps have either broken or fallen off. They are "attached" to the roof panel by simply slipping over a 8mm x 8mm metal tab stamped out of the panel. See below:


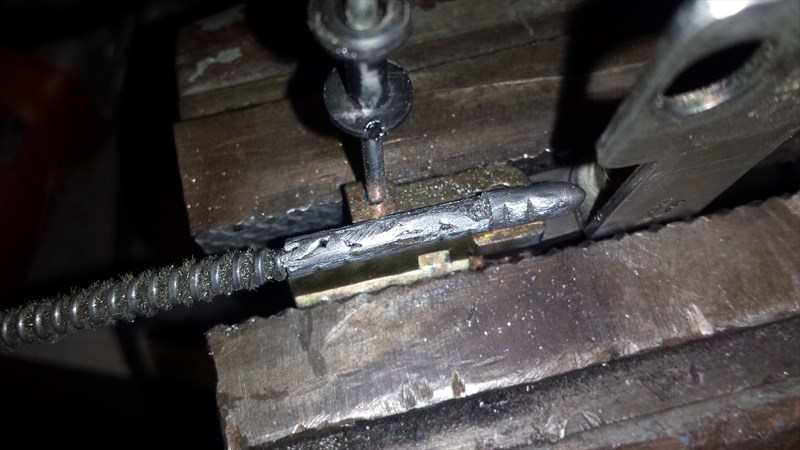
Obviously these aren't a terribly complicated part. In fact, I whipped one up in CAD quite quickly and 3D printed out some prototypes.


I printed in PLA, which I'm sure is a harder material than the original plastic, and I haven't been back to the shop to test fit so I'm not sure how snug they will be over the tab. It might require a dab of adhesive to keep them secure. Or I might need to adjust the design a tad.
If anyone wants the STL file to print their own just PM me and I'll email it to you. Or, if you don't have a printer and want a pair, PM me and I can send them to you for $10 to cover time, materials, and shipping.
In short, the sunroof has to lower in the back in order to be able to slide under the roof. In fact, gravity being so reliable, the default position for the roof panel is to be low against the rails. It requires something in order to lift it at the end of the closing motion. And this being early 70s technology, it isn't anything fancy. The cables just blindly push the panel forward and when it gets to the last 20mm or so there are angle-shaped plastic blocks that act as ramps. When they come in contact with the large alignment "bumps" in the car's track they ride up on top of those bumps, raising the roof panel.
If your sunroof doesn't rise properly my guess would be that those plastic ramps have either broken or fallen off. They are "attached" to the roof panel by simply slipping over a 8mm x 8mm metal tab stamped out of the panel. See below:
Obviously these aren't a terribly complicated part. In fact, I whipped one up in CAD quite quickly and 3D printed out some prototypes.
I printed in PLA, which I'm sure is a harder material than the original plastic, and I haven't been back to the shop to test fit so I'm not sure how snug they will be over the tab. It might require a dab of adhesive to keep them secure. Or I might need to adjust the design a tad.
If anyone wants the STL file to print their own just PM me and I'll email it to you. Or, if you don't have a printer and want a pair, PM me and I can send them to you for $10 to cover time, materials, and shipping.
The learning curve for the sunroof is steep. This info is great. Keep in mind Porsche used the same sunroof and some parts are interchangeable.
I had purchased my cables from W&N about 2 years ago. They seem to still be available. I do know someone recently purchased one from the dealer and it was about 180$ per side so that makes W&N cheaper (150$) even with shipping.
Hagerty values says subtract 25% for an automatic, add 15% for a sunroof. I say add 25% for a sunroof that works!
Hi thereJust to keep everything I've learned about sunroofs in one thread.... There have been a few people recently asking about why their sunroof doesn't rise in the back when fully closed. I've posted previously about this but I was at the shop Friday and had my sunroof apart so I took some better photos illustrating what I'm talking about.
In short, the sunroof has to lower in the back in order to be able to slide under the roof. In fact, gravity being so reliable, the default position for the roof panel is to be low against the rails. It requires something in order to lift it at the end of the closing motion. And this being early 70s technology, it isn't anything fancy. The cables just blindly push the panel forward and when it gets to the last 20mm or so there are angle-shaped plastic blocks that act as ramps. When they come in contact with the large alignment "bumps" in the car's track they ride up on top of those bumps, raising the roof panel.
If your sunroof doesn't rise properly my guess would be that those plastic ramps have either broken or fallen off. They are "attached" to the roof panel by simply slipping over a 8mm x 8mm metal tab stamped out of the panel. See below:
View attachment 114255
View attachment 114256
View attachment 114257
View attachment 114260View attachment 114261
View attachment 114262View attachment 114263
Obviously these aren't a terribly complicated part. In fact, I whipped one up in CAD quite quickly and 3D printed out some prototypes.
View attachment 114258
View attachment 114266
I printed in PLA, which I'm sure is a harder material than the original plastic, and I haven't been back to the shop to test fit so I'm not sure how snug they will be over the tab. It might require a dab of adhesive to keep them secure. Or I might need to adjust the design a tad.
If anyone wants the STL file to print their own just PM me and I'll email it to you. Or, if you don't have a printer and want a pair, PM me and I can send them to you for $10 to cover time, materials, and shipping.
I am just trying to get my sunroof working and I was wondering if you ever managed to stop your sunroof motor drive clutch from slipping.
Mine does work but lacks oomph at the fully closed point .
I just re skinned my roof , but I need to close my sunroof to check for alignment before I do the spot welds around the sunroof opening.
By the way your article was great and very informative !!!
Thanks!
Attachments
Nothing to add, but I recorded this video a
few years ago that shows the popup effect with the little ramps and the bar.
few years ago that shows the popup effect with the little ramps and the bar.