Sunroof motor slipping

Barry.b

Well-Known Member
Messages
635
Reaction score
447
Location
Ireland
Hi guys
I am just wondering if anyone knows why the clutch seems to slip too easily before my sunroof rises up at the fully closed position.
I have heard about maybe the drive gear needs to have new shims put in .
Has anyone done this ?? And if so where can you buy the shims ???
And how many shims are supposed to be in there ????
 
Gears in the sardine can motors have been known to strip.
Hi Chris
Thanks for the reply ,
I have had my motor on the bench and it does run , and it does transfer its drive to the output drive gear , so I think it is not stripped, but it does slip or loose drive quite easily when back in the car.
Also with a large screwdriver I can use the manual override method which does work.
So I think it’s clutch is worn ( maybe)
 
Last edited:
Hi Chris
Thanks for the reply ,
I have had my motor on the beach and it does run , and it does transfer its drive to the output drive gear , so I think it is not stripped, but it does slip or loose drive quite easily when back in the car.
Also with a large screwdriver I can use the manual override method which does work.
So I think it’s clutch is worn ( maybe)
I did see these photos put up a while back On a previous discussion,
I wonder was it ever solved back then ?
 

Attachments

  • 26A78147-812E-47CE-B787-FF0033733C09.png
    26A78147-812E-47CE-B787-FF0033733C09.png
    3.6 MB · Views: 141
  • 1207ADC0-0A3D-4680-8EE3-5EC294719C74.png
    1207ADC0-0A3D-4680-8EE3-5EC294719C74.png
    3.3 MB · Views: 132
  • 647CDE77-E845-420D-8A84-41C271D38947.png
    647CDE77-E845-420D-8A84-41C271D38947.png
    3.2 MB · Views: 133
First start with clearing the cable tracks along the brushed alum parts and lube them. Also (See below), the motor retracts the cables and they criss-cross as they travel inside these tubes when opening. The tubes get crud and rust and add tremendous resistance . Of course, if the gear is stripped, none of this will help. The center part in the image can be adjusted a bit towards or away from the roof so if your gear is slipping because there is not enough "bite", that will help.

1621981474527.png
 
First start with clearing the cable tracks along the brushed alum parts and lube them. Also (See below), the motor retracts the cables and they criss-cross as they travel inside these tubes when opening. The tubes get crud and rust and add tremendous resistance . Of course, if the gear is stripped, none of this will help. The center part in the image can be adjusted a bit towards or away from the roof so if your gear is slipping because there is not enough "bite", that will help.

View attachment 119956
Okay
Thanks for the advice !
I might have made a big mistake also too , I sprayed some wd40 and a bit of engine oil into the motor gear drive.
At the time I didn’t realise that there was a friction clutch in there :(
Anyway , it’s back to taking it all out again to take another look at all the parts .
Thanks again !
 
Hi Chris
Thanks for the reply ,
I have had my motor on the beach and it does run , and it does transfer its drive to the output drive gear , so I think it is not stripped, but it does slip or loose drive quite easily when back in the car.
Also with a large screwdriver I can use the manual override method which does work.
So I think it’s clutch is worn ( maybe)
Okay , I just realized I said I had the motor on the beach ...... I meant to say I had the motor on the bench :)
Oops...
 
Hi again
So I took my sunroof out again and I checked everything.
I do have 1 sunroof cable that is not great , it will need replacement.
I then took out the motor and with it stripped I can see that the friction clutch between the brass gear and the metal cable drive cog is slipping.
Now I did get oil on everything last weekend , so that probably wouldn’t help things .
I think I need to add more shims or something to get the clutch to be more positive.
The black washer that I highlighted with a red arrow in the photo is not flat. It is concave and is made from a type of spring steel.
So it acts like a pressure plate acting on the friction plate which is highlighted with a green arrow. The shims are highlighted in purple. So if I can increase the shim thickness below the pressure plate, in theory i should get more force and more of a positive drive to the sunroof cables.
(Maybe)
 

Attachments

  • 8706A905-D225-43F8-A1F7-DD4B0A1B5332.jpeg
    8706A905-D225-43F8-A1F7-DD4B0A1B5332.jpeg
    318.3 KB · Views: 147
I just found this online . This is the golden ticket I think .
Or should that be Golde ... n ticket :)
I am not sure they ship to Europe though , I have emailed them , so fingers crossed.
 

Attachments

  • FAF65C25-451A-4B7D-9C5E-95BB9C53699B.png
    FAF65C25-451A-4B7D-9C5E-95BB9C53699B.png
    1.2 MB · Views: 154
  • FBBDDE7E-34C3-4A6B-9F53-AE436C55E90A.png
    FBBDDE7E-34C3-4A6B-9F53-AE436C55E90A.png
    898.7 KB · Views: 159
Hi guys

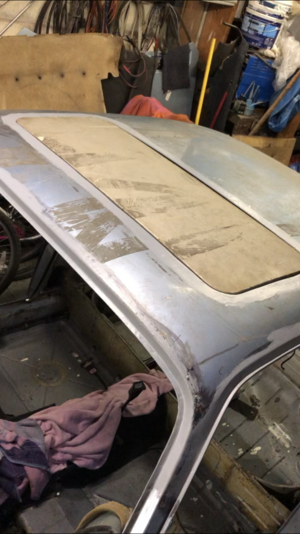
I fixed the Slipping sunroof motor so my sunroof slides along and rises up to close properly now as it should :)
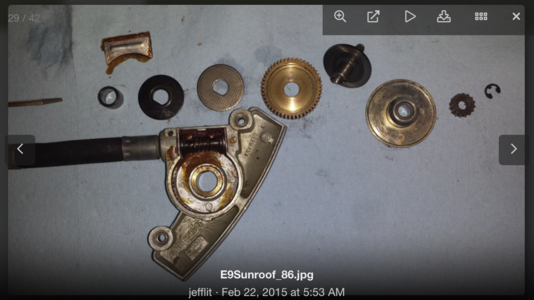
I stripped the sunroof motor gearbox.
I cleaned everything and then I made 3 changes to it before reassembling it.

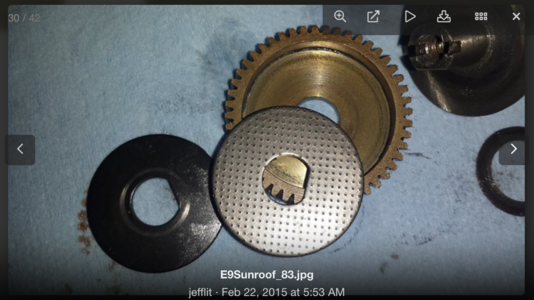
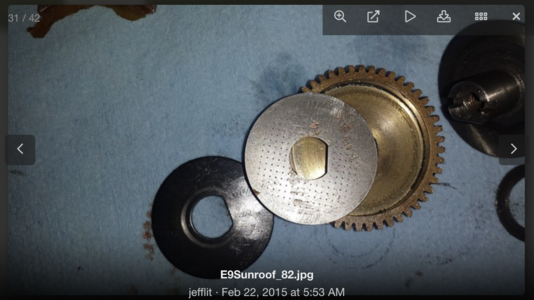
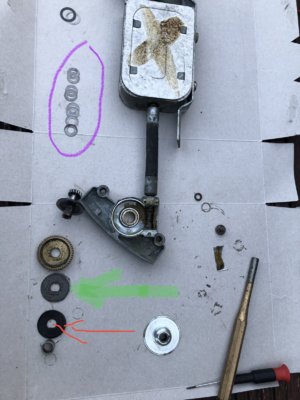
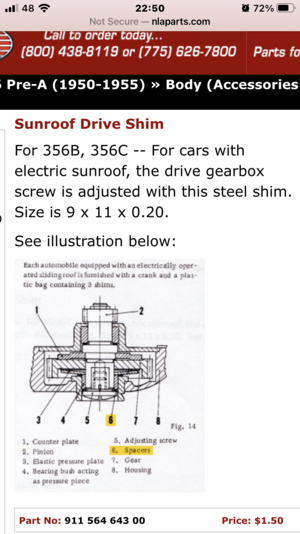
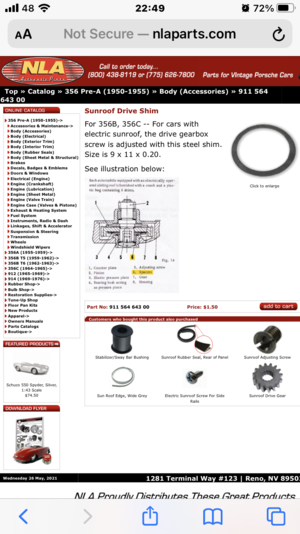
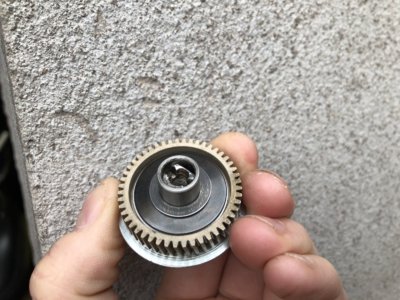
1. I media blasted the face of the brass drive gear ( arrowed in blue ) to give more grip.
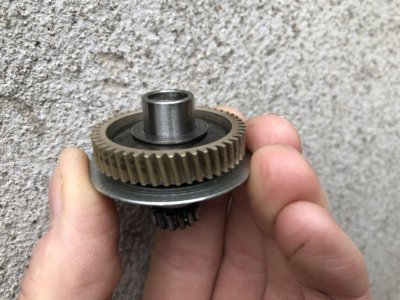
2. I took the 2 larger diameter shims (circled in yellow ) and measured them ,they were 0.2mm thick and 0.1mm thick. I then got a friend of mine to machine a new shim 0.5mm thick ( anything thinner and he could not part it off on the lathe) I then took away the 0.2 shim and replaced it with the new 0.5mm one. This change now increased the preload tension on the concave clutch pressure plate ( red arrow ) by 0.3mm .
3. I turned the friction plate (green arrow ) around 180 degrees. From the factory it comes with a dimpled / textured surface on both sides .one side wears smooth over the years. So I flipped it around to allow the fresh dimpled side to now be in contact with the brass drive gear thus increasing its friction grip on the brass drive gear.

the stack of smaller shims I left as they were- just cleaned them and reused them (circled in purple)
make sure all friction faces are dry and lubricant free before reassembling everything.
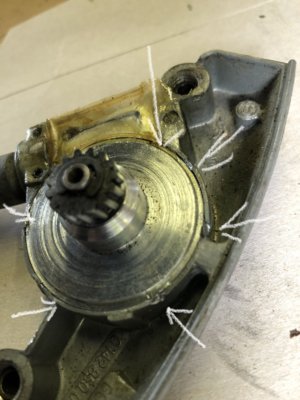
When you do re install the “stack of parts back into the housing you will have to crimp / dot punch the housing (white arrows ) to keep the assembly together. Once fitted back into the car the 2 m4 screws also keep it all together.
By the way I don’t think the diameters mentioned on the Porsche sketch are correct for our roofs so if you are getting shims made or if you are buying some, take the time to measure your own one beforehand.
Also a word of warning !!!
If the plastic end of your sunroof cables are brittle from old age but still in 1 piece ... when you make your sunroof motor work properly they may now give up under the increased load.
one of mine was broken already ,beforehand I had glued it back together temporarily so that I could get everything sliding again. But once I fixed the motor the glued part gave up predictably... ( I had another one on order in the post to replace it anyway)
 

Attachments

  • F230D9E6-10A7-4148-AC1B-200282BBB50A.jpeg
    F230D9E6-10A7-4148-AC1B-200282BBB50A.jpeg
    320.4 KB · Views: 138
  • 4FED7322-0B8D-4BB9-AFB0-76AE5590135B.jpeg
    4FED7322-0B8D-4BB9-AFB0-76AE5590135B.jpeg
    289.6 KB · Views: 145
  • ECE53943-AED9-46EE-8417-A7221035D95B.png
    ECE53943-AED9-46EE-8417-A7221035D95B.png
    1.2 MB · Views: 126
  • 0510A4CF-F205-455E-8904-90FCBE569D3E.jpeg
    0510A4CF-F205-455E-8904-90FCBE569D3E.jpeg
    363.2 KB · Views: 134
  • 52B62C69-EA6A-4180-9033-63D7885EFDB2.jpeg
    52B62C69-EA6A-4180-9033-63D7885EFDB2.jpeg
    301.6 KB · Views: 136
  • 97CE81A6-F2E4-4E66-83EA-C029AC43F8FA.jpeg
    97CE81A6-F2E4-4E66-83EA-C029AC43F8FA.jpeg
    301.6 KB · Views: 125
  • 94A727B3-BC67-41BF-B92B-267A0286B411.jpeg
    94A727B3-BC67-41BF-B92B-267A0286B411.jpeg
    306.5 KB · Views: 134
  • BCB7A05E-9006-45AA-887C-6CA735139C45.jpeg
    BCB7A05E-9006-45AA-887C-6CA735139C45.jpeg
    264.8 KB · Views: 132
  • 5EC1F195-5670-4F1C-8D22-78F6BC94AB54.jpeg
    5EC1F195-5670-4F1C-8D22-78F6BC94AB54.jpeg
    202.1 KB · Views: 132
  • A6BE2F69-AB6E-47FF-95F2-B2F8A2E5FD0E.png
    A6BE2F69-AB6E-47FF-95F2-B2F8A2E5FD0E.png
    4.2 MB · Views: 138
Back
Top