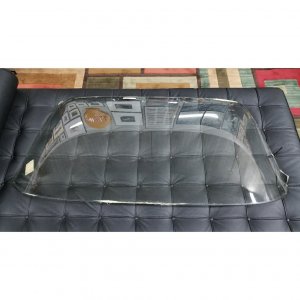
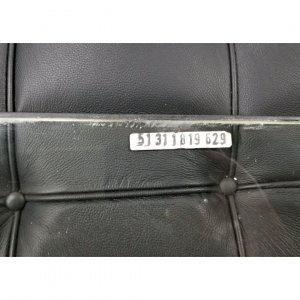
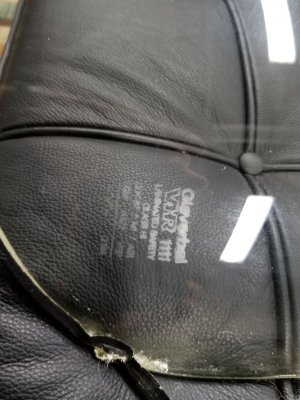
I have been attempting to fit my Windscreen on my 1972 CSL , I had 3 companys attempt it and no luck , I have had 4 attempts no luck!.What is happening is that it is just to tight, I am on my second windshield rubber. I cut the old rubber into 30mm lenghts fitted about 10 to the opening, I then fitted the glass , I then adjusted the gap between the glass and the body, then I saw that the gap on the corners was tighter, next step was taking the glass to a large local glass compay , where they cut approx 5mm off each corner useing a high pressure water cutter. I was feeling pretty confident prior to the next fitting attempt, no luck! much better , but no luck, on the left vertical side of the glass it has more curvature than the body?I had seen the difference but had hoped that trimming the glass would overcome the issue. The glass is not original it has an Australian stamp , it has never been in my car, my car sat in a shop for many years with another E9 which was assembled over time , perhaps the windscreens were mixed up?.Quite the mystery,. The next step is to source a BMW Glass. I will add that my car was stripped to bare metal and other than a small dent on the right rear guard it has never been in a accident . Has anyone else had these kind of problems , especially the Aus owners with non OEM glass?, The second mystery is how the glass with the corner trimming and all of the bashing , and as my frustration level rose I tended to hit harder, is still in one piece, They make em strong in Aus , don,t Fit but strong.
You are using an out of date browser. It may not display this or other websites correctly.
You should upgrade or use an alternative browser.
You should upgrade or use an alternative browser.
Windscreen fitting Problems
- Thread starter burky
- Start date
Euro/csl and US glass is different with unique rubber as well. Perhaps they were mixed.
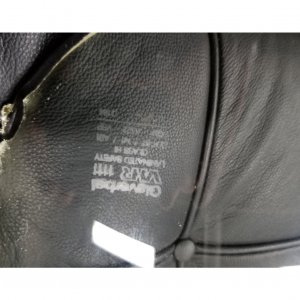
The original "lightweight" CSL glass was definitely unique. By Glaverbel.. Same firm that did the RS lightweight (not touring) 911's. Unobtainable... Almost.Euro/csl and US glass is different with unique rubber as well. Perhaps they were mixed.
Attachments
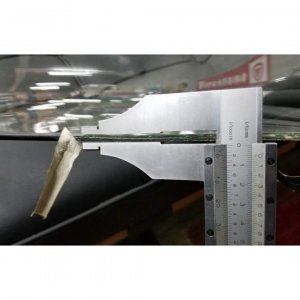
Euro glass is not laminated like US glass and is thinner, looks like CSL glass is thinner stil?
Yes, a whole other levelEuro glass is not laminated like US glass and is thinner, looks like CSL glass is thinner stil?
Honolulu
Well-Known Member
Okay, tip from long ago... Coupe bodies get some stiffening from the windshield (easy to imagine). If the wshield is out and the car improperly supported, or was tweaked through stress, age or accident, removing the wshield releases those stresses and the body sags, making refitting difficult or impossible. I think this is why aftermarket glass has such a bad reputation besides possibly simply not having the correct dimensions or curvature.
And that was from Carl Nelson, many years ago. In those days I was an impressionable young tick, and soaked up what the masters related. Alas I have lost the youth part.
And that was from Carl Nelson, many years ago. In those days I was an impressionable young tick, and soaked up what the masters related. Alas I have lost the youth part.
I finally got my windshield in a few weeks ago, but the gasket was weakened by the many attempts made prior to removing the upholstery clips that were present on the sides and the top.
The gasket was torn and I also found that somehow the corners on the windshield molding had popped out of the channel and of course once the glass is in there was no way to get the molding seated in the rubber channel.
I have a new gasket and hope to tackle the installation again this weekend, but the glass has been a real PIA. Any tips on how to keep the molding in the rubber channel during installation will be appreciated. I will pay more attention this time to make sure they are seated once the glass is placed in the opening and as the molding is pulled into place.
Last edited:
Prior to my last unsuccessful fitting attempt I put a bead of urethane deep in the channel where the moulding seats , the glass did not go in , but the mouldings stayed in place , small victory . I have found another glass and will try that with my new W+N rubber ? PS its very important that the mouldings are seating down in the rubber correctly ,and when you are working the corners of the glass into place you have downward pressure on the moulding from the outside.
Last edited:
It’s hard to find glass guys who are good at doing old school vintage glass installation. Most are old and retired (like you).Any tips on how to keep the molding in the rubber channel during installation
(1) do not go solo. Get a knowledgeable friend to assist.
(2) use wide masking tape around the windshield to hold the gasket/molding onto the glass. The rope stays on by itself, being tucked under the flange.
(3) set the glass on the lower opening. while the person on the inside carefully pulls the rope (starting at the bottom, the experienced person on the outside applies inward pressure on the glass. GO SLOW and check/adjust the orientation of glass to body as you go.
Since you had problems at the upper corners: when you get to the vertical sides, stop and pay particular attention to getting the glass/gasket seated as far down in the opening as possible. Push/shift the glass down tightly as you can. FWIW, this tendency to ride up has happened to me every single time I’ve put in a windshield. Before the upper edge of the glass is in place there is no pressure keeping the bottom of the glass well seated or the lower part of the gasket compressed.
(5) A pair of large diameter suction ‘handles’ (made for handling sheet glass, cheap off Amazon) are invaluable to aiding the job of shifting the glass left/right and up/down as you slowly install it. Basically, it gives you something to push/pull on with some real force. Of course I couldn't find mine when assisting BavBob with his glass. So, We had to resort to the redneck/shade tree technique of loud grammatically incorrect cursing and slapping the glass in glancing blows with an open hand(s). The impact will shift the glass (slowly), but it does cause a little redness and swelling in your palms. Using this technique, I think we got BavBobs front glass really well centered in the body opening.
(6) A rubber mallet can be used to reseat the molding if it starts to come out a little bit (lubricate with squirt of rubbing alcohol or glass cleaner). Push and pound carefully on the moulding as you can bend it . Once distorted it is fiddly to straighten when installed on the car.
JF
I've posted this before. It is essentially the process described by John but with pictures. Not a BMW but the same glass system.

 dicksteinkamp.wordpress.com

Wagonaire – Installing the Windshield
I’ve watched this being done before, but was still too chicken to try it myself. Last fall, I sold an MGB GT to a young man who lives in the neighborhood. He had shared with me that he had a…
I don't know if there is a difference in European windows or windows made for the US market but I have two e9`s and have installed windows from W&N in the first car (2800CS) and from a Swedish supplier in my latest CSL project. Their windows are made in Finland by a well renowned company producing for a lot of European car manufacturers (their words). Non of them was easy to install, and I don't think the window manufacturer can be blamed, but the Bavarian factory, due to the fact that the curvatures is very complicated. The windows (front and rear) are are a part of the roof structure and makes is more rigid. It is probably the worst job to do on an E9!!
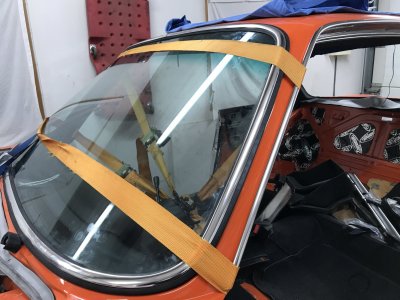
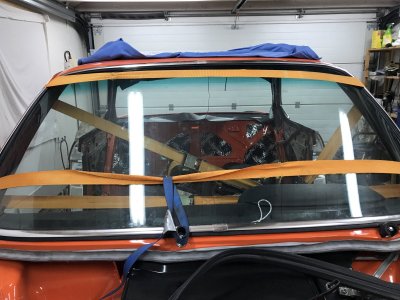
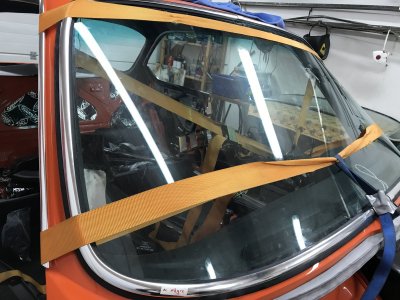
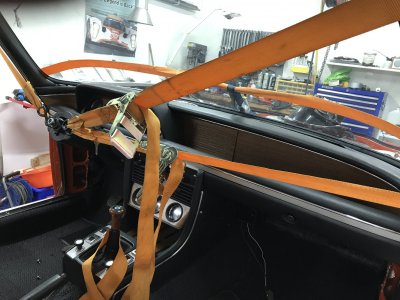
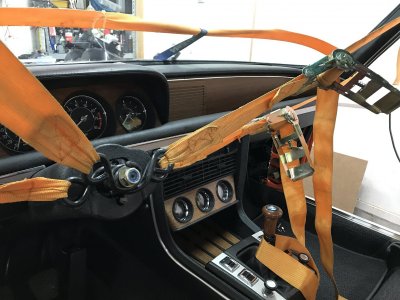
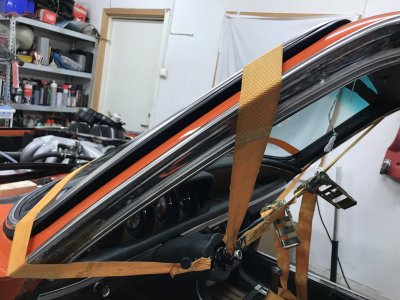
After a lot of effort to get in the front windshield on the CSL with help from friends and family, with no luck, I started to think if I could do this on my own.
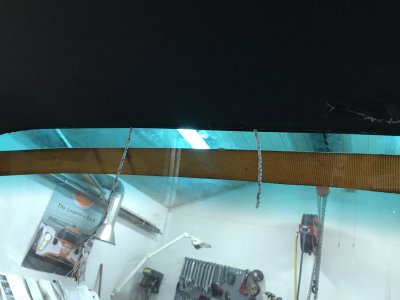
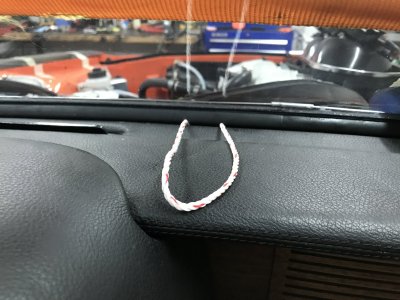
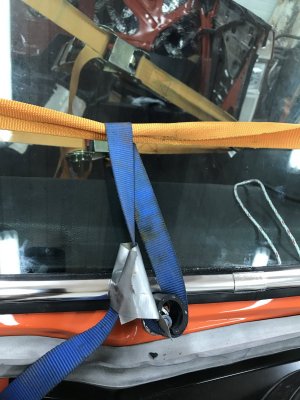
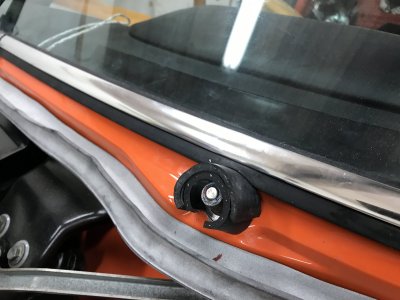
The pictures will tell more than words but It actually worked well. I got time to think out the next steps without any interruptions.
First of all:
Window rubber must be greased with silicon grease or similar in the parts that will be in contact with the window (glass) and the window frame (steel) before you start. (Of course, the molding must be in place before U start) This will help to "seat" the window when you use (brutal) force in the next steps!
The rope ( I used a 3-4 mm rope) must be placed in the channel before you put the windscreen on the car. IMPORTANT to make it possible to start pulling the rope both from the top and from the bottom of the window in sequence (50mm top and then 50mm bottom) to observe how it will fit. The Cornes are the most difficult part, and they need a lot of force to get into place. When you look at the windscreen before you start you will never think it will get into place
To help me with the job I used some silent helpers called load straps. They gave me the opportunity to think clearly before making any decisions before the next step (meaning where to put on more force on the window).
When the window is in place you can celebrate with beer or a wine (well deserved), but remember next morning: seal the rubber, window and frame with a proper sealant to secure it!
Attachments
-
 IMG_0863.JPG306.9 KB · Views: 200
 -
 IMG_0864.JPG328.3 KB · Views: 213
 -
 IMG_0865.JPG357.6 KB · Views: 188
 -
 IMG_0866.JPG339.5 KB · Views: 188
 -
 IMG_0867.JPG334.4 KB · Views: 182
 -
 IMG_0868.JPG328.7 KB · Views: 179
 -
 IMG_0869.JPG192.3 KB · Views: 183
 -
 IMG_0870.JPG293.3 KB · Views: 186
 -
 IMG_0871.JPG324 KB · Views: 183
 -
 IMG_0872.JPG231.7 KB · Views: 199
Interesting. I know Dick S used a sealer also. I did not. I did not see any when I cut the original gaskets to remove the glass but that assumes my original glass was original to the car and never touched. I bought some sealer but have been hesitant to use it.
This is all making me think that John Feng and I just got lucky. We had to restart the front twice but the back glass was a one-shot deal. All told was about 1.5 hours for both from prepping the glass (alum into gasket, gasket on window, window installed). The PIA was getting that little lip of the top dash to go under the gasket.
This is all making me think that John Feng and I just got lucky. We had to restart the front twice but the back glass was a one-shot deal. All told was about 1.5 hours for both from prepping the glass (alum into gasket, gasket on window, window installed). The PIA was getting that little lip of the top dash to go under the gasket.
When I started to restore my CS years ago I removed the window only by pushing it gently from the inside, and I have seen front windows popping out after minor crashes on other cars so for my own peace of mind I prefer to use sealant. Also to avoid water ingress between the rubber and the steel frame. Typical rust issue on the lower left and right corners on our cars.
I support that!!The PIA was getting that little lip of the top dash to go under the gasket.
We probably have 20years of post-graduate education between us. So let’s say it was brains as much as luck ;-)just got lucky
I think it is easier to have the window smacker, not be the owner, that was the trick.
vabole.lv
Member
I had the same problem > this was the answer from Walloth & Nesch:
Each coupe has a different size at the body where the screen sits when they are made by Karman in Germany.
So the windscreen must be big enough for all cars.
If the screen is too big you can grind it smaller un the size you need.
So, I ground it... wasn't easy to find somebody willing to do that... but at the end - yeah, I did it!
Interesting, I'll have to check the size of my new windshield against the one currently installed when I pull it out to do the rust repair in the corners.I had the same problem > this was the answer from Walloth & Nesch:
Each coupe has a different size at the body where the screen sits when they are made by Karman in Germany.
So the windscreen must be big enough for all cars.
If the screen is too big you can grind it smaller un the size you need.
So, I ground it... wasn't easy to find somebody willing to do that... but at the end - yeah, I did it!
I have an update on my windscreen installation story, and regrettably it remains a work in progress.
I took the car to a local restoration shop today with high hopes that their outsourced windscreen company would get the job done. I had a call this afternoon from the owner explaining that the experienced technician (in his 60's so he has been doing this for a while and knows these types of installations) worked on the car for over 3 hours and was able to get the windscreen in, but the final attempt was without the molding.
This is now the second installer that has been unable to install the W&N windshield. I worked with the first installer at my house, using the W&N supplied gasket and it took us about 5 hours across three attempts to get the glass installed, but the molding had popped out of the gasket at the corners and the gasket was torn. This attempt was with the same windshield and with a BMW supplied gasket.
I will pick the car up in the morning, and have asked the shop if the installer is willing to give it another try, but will bring the original windshield (pitted) for installation.
I am hopeful that we will find that the glass might need to be trimmed, but for now the nightmare continues.
Paul’s 74 has those same clips along the top and sides, he has not yet installed his glass though. I bought Walloth glass and BMW rubber and mine fits fine, this was Don’s recommendation I think.
My clips are long gone at this point.Paul’s 74 has those same clips along the top and sides, he has not yet installed his glass though. I bought Walloth glass and BMW rubber and mine fits fine, this was Don’s recommendation I think.
The glass is Walloth, the first gasket was Walloth and the second is BMW.


