Wood refinishing options

rsporsche

Moderator
Site Donor $$
Messages
10,634
Reaction score
3,671
Location
Atlanta, GA
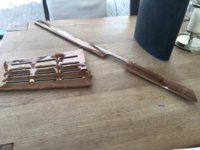
it takes some time. first get the old lacquer stripped. if the lacquer is not flaking, use a chemical stripper. if it is flaking you can use a flexible putty knife ... to gently peel things off. be careful not to gouge the wood below. if the veneer is flaking then you want to remove it ... if it is not you can gently sand it and veneer over it. if it is cracking you need to peel it off ... again be careful not to gouge the wood underneath.

after you get the veneer off if you have any gouge holes, fill them with a little wood putty. then sand everything very smooth because irregularities will telegraph thru the veneer.

depending on the type of veneer, you will either have open pores or closed pores which will have different looks with the finish. the more open the pores, the less sheen you want to have. to fill the pores, you have to use a sanding sealer - perhaps 2 to 3 coats. sanding + wiping clean each time. we didn't use any stain on mine, just a clear finish.
 

JFENG

Well-Known Member
Site Donor
Messages
3,177
Reaction score
1,393
Location
Bahston (Boston)
What did you use to finish these. Was it varnish or some other coating. I have experimented with two part clear epoxy, with patchy results.

Most epoxy finishes are formulated for strength and durability and not optical clarity. Back when I was young and apprenticing under a master furniture maker, he created a stunning kitchen work table with a three inch thick quarter sawn sugar maple top. He knew it would see heavy use so as an experiment it was finished in a thick, high quality clear epoxy used most often in the high end custom sail boat business. Well, it certainly was durable but it did not bring out the wood grain as nicely as other more traditional finishes plus over the course of a few years it got more and more cloudy. I don’t mean opaque, just that it didn’t stay water clean but rather slightly foggy. I do not think it would buff out like on a traditional clear finish. . I don’t think we ever used that finish again on anything that needed to be cosmetically beautiful. It was that experiment that inspired me to try two part automotive clear finishes on furniture. Those turned out gorgeous and held up very well over the decades). We would’ve done more of that but we lacked “supplied air” for the health of the person spraying (me) and we lacked a correct air filtration system to properly clean the toxic exhaust fumes sucked out of the booth.

Don’t get me wrong, I think epoxy is wonderful stuff and I just used a 1/2 pint of West System to fix a badly damaged grip door for a vintage sports racer. But I wouldn’t use it for fine woodwork.
 

JFENG

Well-Known Member
Site Donor
Messages
3,177
Reaction score
1,393
Location
Bahston (Boston)
FWIW, nothing wrong with using body filler to address cosmetic voids when preparing a substrate for veneering. You just need to used a compatible adhesive like epoxy.
 

Rek

Well-Known Member
Messages
1,113
Reaction score
351
Location
Islington London England
Most epoxy finishes are formulated for strength and durability and not optical clarity. Back when I was young and apprenticing under a master furniture maker, he created a stunning kitchen work table with a three inch thick quarter sawn sugar maple top. He knew it would see heavy use so as an experiment it was finished in a thick, high quality clear epoxy used most often in the high end custom sail boat business. Well, it certainly was durable but it did not bring out the wood grain as nicely as other more traditional finishes plus over the course of a few years it got more and more cloudy. I don’t mean opaque, just that it didn’t stay water clean but rather slightly foggy. I do not think it would buff out like on a traditional clear finish. . I don’t think we ever used that finish again on anything that needed to be cosmetically beautiful. It was that experiment that inspired me to try two part automotive clear finishes on furniture. Those turned out gorgeous and held up very well over the decades). We would’ve done more of that but we lacked “supplied air” for the health of the person spraying (me) and we lacked a correct air filtration system to properly clean the toxic exhaust fumes sucked out of the booth.

Don’t get me wrong, I think epoxy is wonderful stuff and I just used a 1/2 pint of West System to fix a badly damaged grip door for a vintage sports racer. But I wouldn’t use it for fine woodwork.

I might agree with you if I cannot get the results I need. Its frustrating, as imperfections appear after you've walked away after addressing the bubbles. The stuff I used is a glass finish so that looks nice and gives a really thick coat on the flat pieces. On the curved pieces its a nightmare as it is poured rather than sprayed so its flows down and its hard to get a consistent thickness. I wanted the high shine look but may change this if the overall effect is not good.

It doesn't help that I do not have a workshop but have a tolerant wife, up to a point. I think that point is very close now so I may have to finish with a less than perfect result to get rid of the clutter in the house. There is only so many times that one can re-finish the same piece without ending a marriage.

This is all new to me but I like to learn new things and this car has been great for presenting me with challenges. Things I have learned so far from bitter experience:

  1. Veneer does not like water, at least the stuff I used.
  2. Epoxy can burn. I had a swollen face and eyes like Mary Feldman for a few days, despite gloves goggles and correct face mask.
  3. The epoxy can be sanded and then varnished, or just polished. Just don't use wet n dry paper as thats how I found out about 1. above.
  4. Vacuum bags can exert a lot of force which can cause bending of objects if not placed correctly.
  5. When it does work, it looks quite good.

I used the epoxy for time saving, but on reflection I would have preferred using just varnish or lacquer.
 

Attachments

  • IMG_4030.JPG
    IMG_4030.JPG
    298.9 KB · Views: 277

Rek

Well-Known Member
Messages
1,113
Reaction score
351
Location
Islington London England
The instrument section worked out Ok but I am struggling with the grab rail.
 

Attachments

  • FullSizeRender.jpg
    FullSizeRender.jpg
    319.3 KB · Views: 277

autokunst

Well-Known Member
Site Donor $$
Messages
3,605
Reaction score
2,618
Location
Milwaukee, WI
Don’t get me wrong, I think epoxy is wonderful stuff and I just used a 1/2 pint of West System to fix a badly damaged grip door for a vintage sports racer. But I wouldn’t use it for fine woodwork.
There are special/different formulations of marine epoxy by West Systems and others, specifically made for bright work. Which is to say, it is water clear and designed to enhance and maximize the wood grain and appearance through it. The downside of these 2-part epoxy systems are that they are not UV stable. You cannot just put a 2-part epoxy on the car parts (or a boat) and have it last. They will yellow and haze when exposed to the sun. Boats require varnish coats over the top of the epoxy with UV inhibitors in order to protect the epoxy finish. This is true of all marine systems.

For our work inside the car, I don't know that a 2-part epoxy (requiring the additional layers of UV protection) would be worth it. Rather, an application specific finish such as the 2-part catalyzed lacquer system that Scott mentions above, or a varnish system would likely be a better choice.
 

JFENG

Well-Known Member
Site Donor
Messages
3,177
Reaction score
1,393
Location
Bahston (Boston)
cutting to the chase: I still cannot think of a better finish for our wood than a traditional high quality furniture finish or automotive clear coat (e.g. the 2nd stage portion of a 2-stage body paint system). All the other things people are trying are insufficient or inappropriate and generally more costly and troublesome. You don't need Imron, epoxy or some other high-tech bullet proof miracle finish. Furniture finishes are easily applied by amateurs with spray or brush and well suited to DIY situations. Automotive finishes are a little more tricky, but can be done at home if you are know what you are doing.
 

m5bb

Well-Known Member
Site Donor $
Messages
2,081
Reaction score
909
Location
Peachtree Corners, GA
the finish was an automotive 2 part lacquer with a satin sheen. it was recommended to Gary by someone ... so i don't know the actual name. Gary did have a little trouble with air bubbles. the finish cost about 75 bucks a quart. Gary is working on getting his car home from the paint shop so i know he isn't spending too much time on the forum.

it is a lot of work to do this, Gary is an experienced woodworker and has built some custom furniture. it is not easy and i highly recommend sending to Bela if you don't have the proper tools. Gary has a vacuum bag that we put the door pieces in and the instrument cluster piece in ... but the vacuum will suck the veneer into the instrument holes and that can make it not turn out / ruin the veneer (we did a few experiments with spare pieces of veneer). we ended up making some plugs to fill the holes, then wet the veneer and shaped it in the bag ... then laid it up and put it back in the bag. the big curved pieces were laid up with a lot of clamps and backing pieces.

The finish is actually what would be the gloss of a 2 part automotive paint job.
This happens to be the satin version. The drawback with satin is that once you spray it on you can't touch it like you can the gloss. I mean if there is a spot or small bubble you can compound the gloss and get rid of small defects. If you do this with satin you will never get the finish to look even or satin.

The product is called Finish 1 and is sold by Sherwin Williams automotive.
It's 2 part. 1 Quart was $75.
It sands easily and can be used as a filler to fill the grain in the wood.
It takes about 3-4 coats to get the grain filled.
Original walnut in the coupes was filled grain. Smooth with no little holes or pits.
This finish will hopefully avoid the cracking and crazing that we all see on the original walnut in our 40 year old cars. That finish was lacquer.
That is the primary reason I chose to use this finish. It will also handle heat and cold better as it can expand and contract without cracking.
 

JFENG

Well-Known Member
Site Donor
Messages
3,177
Reaction score
1,393
Location
Bahston (Boston)
I have yet to see any stain finish on wood that doesn't benefit from some degree of hand finishing.
But this is per my preference. YMMV.

On wood, I would never use a satin that can't be 'flattened' and then "rubbed out" after spraying/curing
Spraying most non-gloss finishes results in a surface texture that neither looks nor feels top class to me. A quick flattening with some W&D followed by a proper rubbing out and wax job transforms a satin finish from flat-looking surface with non-descript 'hand' into something that is looks and feels smooth/luxurious. To me that's the difference between mass produced furniture and truly custom made, bespoke cabinet making.
 

JFENG

Well-Known Member
Site Donor
Messages
3,177
Reaction score
1,393
Location
Bahston (Boston)
"The downside of these 2-part epoxy systems are that they are not UV stable."
I'm sure that contributed to the gradual hazing of the West Epoxy we used on that work table. Sometimes Marine varnish is still the best thing on a boat. FWIW, at the time I also starting trying out a variety of waterborne finishes. They were all uniformly tough but visually significantly inferior to solvent based finishes. I'm sure things have improved a great deal in the last 35 years... But at home, I still spray mostly solvent based finishes for furniture and autobody work (with a eco-friendly HVLP gun, disposable liners, and a gun cleaner that recycles solvent).
 
Top