WTB: seat mount/ stamped metal, welded in

bossrobot

Well-Known Member
Site Donor
Messages
347
Reaction score
109
Location
Berkeley ca.
I need to source the seat mounts. The actual stamped metal part, welded into floor, that the back and forth seat release mechanisms mounts into.
Someone brutalized them theworst is my passenger outside is pedastall.

20210301_091451.jpg
20210301_090418.jpg
 
New parts will work, but with some tender bashing, I think you're much quicker to fold back the flange. Cutting out the old ones, finding new ones, aligning them and welding them in is more difficult/ time consuming compared to straightening the old ones.

Note that the seat bases have bolt holes that allocate the sliding rails, they do not have much wiggle room. If you weld something in, good chance that your rails dont slide because they are non parallel in 3d.

It looks like only the vertical flange was pounded over. It is supposed to be vertical.
Pound it over, use a hammer a steel block as counterweight (anvil). Spend half an hour, and see if this allows you to in install the sliding rails.
 
The seat release mechanism can be removed, then I think you have no choice but to bend the top to gain access to straighten the vertical part. Hit it with some heat while doing (carpet out of course). Agree that removal/replacement will create problems with seat alignment. Disorganized bashing can usually be undone with organized bashing.
 
Last edited:
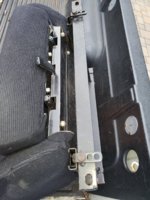
Now working on a PC I see the images a bit bigger. I now also notice the vertical side is buckled, I missed that at first working of my phone.
That will be a bit more tricky to correct. Getting something inside (an anvil/dolly of some sort) is the key to shape the steel.

wrt Bavbob's suggestion; If you choose this route, then i would drill 2 or 3 small holes through the bashed seam, before separating the lot. After all is straight, you can then use the drilled holes to drive a screw through (or use a CLECO). This will ensure the horizontal and vertical surface will go back to their original positions relative to each other.
Bending the horizontal surface up & back and getting it flush again may not be easy: This is the part that is actually not (really) deformed now, and thus it helps you now to keep everything in place (keeps the top of the vertical plane in place when you bash it); it is your 'reference' so to say. Deform it and your reference may be off.

Some other suggestions:
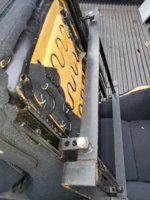
- You could also cut open a small 'letter box' shaped opening on the horizontal surface, to allow you to access the back of the vertical panel. If you position this 'letter-box' opening carefully, it will be fully hidden by the seat rails. It allows also to hold something behind it when you hit it. You may need to fabricate something with a steel tube and a block.

or
- (and this is more cumbersome, but it will leave most of your vehicle intact): Fabricate a tool that will allow you to hold a solid steel block behind the buckled wall, and slide it in through the seat release opening (need to dismount it first). Think about an L-shape: two tubes at 90 degree + a steel block welded to the end. With about 500 gram (a pound in US terms) of mass behind the area where you'll be hitting it. This will help you tremendously in getting it all back where it belongs. Given the room to play with, I think you may not reach all the way in the back with such a tool.

Regarding cutting & welding; mind you that if you should want to weld the horizontal piece to the sill, it will give burn marks inside your sill, that you cannot treat effectively. They will rust from day one....)

Between these suggestions I'm sure there is something that will get you started.
Still, organized basking will be quicker & easier compared to cut & weld.
 
I love this kind of challenge. My seats are not yet installed. I'm gonna stare at the thing and try to figure this out. If the horizontal part that holds the rail, can be securely attached, the holes for the rails, the ones that take the M6 bolts, can be used to place bolts and pull vertically to reverse this "crush injury".

Was this purposely done to make room for some other form of seat rail and seat, must of been!


Block of hardwood on each side, two large C clamps
 
Last edited:
Also check with @Bavman. Unfortunately it can be tricky to source sheetmetal due to the effort required to remove. Paying for labor mostly. I’ve done it several times.
 
It looks like the person who was installing the flo-fit seats panicked when the seat did not drop in ( correct adaptive mounts were there) but they had something wrong and this being the starting point, they beat on it to try to get clearance instead of moving to the next bolt hole up on the flo-fit mount. I say this because the other side is barely molested and the mount was on a higher setting. So I guess they figured it out?
Ironically I have the manual/catalog and receipt for the Flo-fit seats and probably the horrendous installation too. Maybe I can find the person who did it in 1986 and yell at them ! I will most likely be offering these seats for sale, I am hopeful of using the stock seats ones in Bianka Black unless this issue derails me completely.
 

Attachments

  • 20210302_170921.jpg
    20210302_170921.jpg
    402.1 KB · Views: 107
  • 20210302_170928.jpg
    20210302_170928.jpg
    396.6 KB · Views: 116
  • 20210302_171037.jpg
    20210302_171037.jpg
    360.4 KB · Views: 102
  • 20210302_171048.jpg
    20210302_171048.jpg
    439.1 KB · Views: 117
  • 20210302_171053.jpg
    20210302_171053.jpg
    345.8 KB · Views: 122
Are there any members with parts shells near me in California ? I can remove the parts, have tools, skills working metal.
I wondered about bavaria parts interchange on the seat mounts?
I will have a better look once all the carpet is out too, should be this week.
Johnny
 
Last edited:
Are there any members with parts shells near me in California ? I can remove the parts, have tools, skills working metal.
I wondered about bavaria parts interchange on the seat mounts?
I will have a better look once all the carpet is out too, should be this week.
Johnny

No go on e3 comparability. I suggest that you email @Bavman. He has e9 parts cars, and has his email listed frequently in the forum.
 
Back
Top