Love An old vehicle on my favorite kind of tires, sitting on snow.I didn't expect to find this similar interest here~ Here's my other 4 wheeled project (there's also some 2 wheeled)
View attachment 49681
You are using an out of date browser. It may not display this or other websites correctly.
You should upgrade or use an alternative browser.
You should upgrade or use an alternative browser.
'51 GMC 100 Project
- Thread starter dang
- Start date
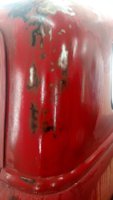
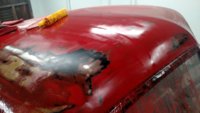
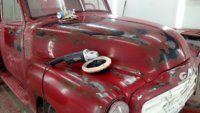
I started creating the "patina" on the truck over the weekend. I'm going for a worn look versus a rusty truck-found-in-a-field look. The paint on the truck is old and not very good paint, like one step above rattle can paint, but this made for an easier process of creating the worn out look. After trying a few things I ended up using Acetone with a scratch pad. If I rubbed it I could get layers of paint to come off and make a two-tone effect with the color underneath, or take it down to metal. I would also let the wet pad sit for 10-15 seconds in one spot and it would loosen up the paint in a rough pattern, then go lightly to keep the roughness. Here's how it turned out on the hood and fender. I still need to figure out the "rusting" process since the ones I've tried so far are not great.
Acetone with a scratch pad


Sanding with 400 grit.

Wiped down. Will need to get the bare metal to rust, sand for paint prep and put a clear coat on.

Acetone with a scratch pad
Sanding with 400 grit.
Wiped down. Will need to get the bare metal to rust, sand for paint prep and put a clear coat on.
I still need to figure out the "rusting" process since the ones I've tried so far are not great.
If you want it to look authentic use your e9. Pull the e9 up to the truck so that you have metal to metal contact. The clean metal on the truck will immediately begin to rust. I beleive the technical term is karmannoxide-transference.
Trying to get this thing running and can't get spark at the plugs. Since this is a very complicated ignition system  I need some advice! It's a 6v negative ground system. I get power to both sides of the coil and to the side of the distributor but no spark when I check the center post of the coil. Everything is fairly new on the system except for the coil so I was wondering if it could be that. The points look good and are opening when cranking. What's left?
I need some advice! It's a 6v negative ground system. I get power to both sides of the coil and to the side of the distributor but no spark when I check the center post of the coil. Everything is fairly new on the system except for the coil so I was wondering if it could be that. The points look good and are opening when cranking. What's left?The way I do it with an unknown vehicle: Disconnect dist. to coil wire from coil - attach ohm meter to wire and crank engine, to prove points are grounding coil. If good hook volt meter to other coil terminal and ground the other lead - look for voltage while cranking to check key switch - pedal starter setup may not need this test but can't hurt. If these tests work out you should have spark, next look to timing, but that won't effect no spark~
Thanks Rod, I'll check the coil to dist with the ohm test, that's the only thing I wasn't sure how to test but knew it was important. I get 6v at the batt side of the coil and the starter circuit is separate so I think that's okay.The way I do it with an unknown vehicle: Disconnect dist. to coil wire from coil - attach ohm meter to wire and crank engine, to prove points are grounding coil. If good hook volt meter to other coil terminal and ground the other lead - look for voltage while cranking to check key switch - pedal starter setup may not need this test but can't hurt. If these tests work out you should have spark, next look to timing, but that won't effect no spark~
Turns out that a ballast resister was added inline for some reason and was robbing current. I bypassed the resister and it started right up. Going through the fuel system now so it will run on it's own. This thing is such a simple design inside and out that it makes me want to fix more and more on it. I'm thinking... "The interior is painted all the same color, if I pull a couple gauges and unscrew the door trim I can paint it in no time" "Hey, the engine compartment is so simple and open I can paint it really easy!" I'm getting sucked in, I can't help it.

There's a carb kit in one of the boxes that came with it. I laughed when i saw the contents.Even though it is running, throwing a carb kit at it might be enjoyable.
")
That is by far the most complex engine bay that I have set my eyes upon.
I've been thinking of buying one of these for the shop.
Mine will be for sale at some point, always later than I plan of course...I've been thinking of buying one of these for the shop.
please keep me in mind. PM me your price.Mine will be for sale at some point, always later than I plan of course...
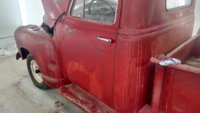
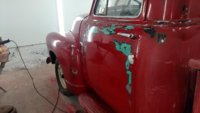
Thought I'd add some more photos... Faux-patina is coming along. I've pretty much finished removing the paint, now I'm sanding the edges off and going over everything with 320 grit before clear coat. It's a slow process by hand.
Attachments
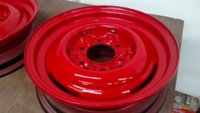
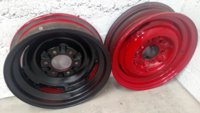
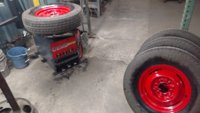
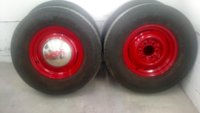
Decided to rattle-can the wheels so they'd be easier to touch up in the future when they get scuffed, then picked up a good used set of tires and mounted them. The old wheels don't have a safety bead on them and when you air up the tires after mounting they don't "pop" like a normal wheel. I was a little confused when I mounted the first one until I realized what it was doing.
Attachments
I haven't been the same since I sold my 54 as part of my divorce settlement back in 95...I have a nice 03 shortbed 4wd I'll trade you..meet in OKC?
Dave V. in NC
Dave V. in NC
Looks great Dan!
I haven't been the same since I sold my 54 as part of my divorce settlement back in 95...I have a nice 03 shortbed 4wd I'll trade you..meet in OKC?
Dave V. in NC
Ha! I'm trying to reduce my inventory but you get credit for trying.
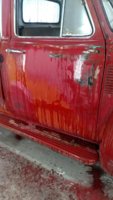
Big decision over the weekend... no clear coat going on. I've been on the fence from the beginning whether or not to put a clear coat on but since the truck is so straight and solid I thought the next owner might like to clean it up and paint it so a hard clear coat would make it that much harder to do. So, cut and polish it is. It's a lot of work, more sanding, several cutting passes and several polish passes but it should look decent.
This is one pass of cutting compound. Also, I sanded the paint off the front emblem and then blocked the face with 150 grit. I like the result.
This is one pass of cutting compound. Also, I sanded the paint off the front emblem and then blocked the face with 150 grit. I like the result.
Attachments

Last edited:
I started creating the "patina" on the truck over the weekend. I'm going for a worn look versus a rusty truck-found-in-a-field look. The paint on the truck is old and not very good paint, like one step above rattle can paint, but this made for an easier process of creating the worn out look. After trying a few things I ended up using Acetone with a scratch pad. If I rubbed it I could get layers of paint to come off and make a two-tone effect with the color underneath, or take it down to metal. I would also let the wet pad sit for 10-15 seconds in one spot and it would loosen up the paint in a rough pattern, then go lightly to keep the roughness. Here's how it turned out on the hood and fender. I still need to figure out the "rusting" process since the ones I've tried so far are not great.
Acetone with a scratch pad
View attachment 50327
View attachment 50328
View attachment 50329
Sanding with 400 grit.
View attachment 50330
Wiped down. Will need to get the bare metal to rust, sand for paint prep and put a clear coat on.
View attachment 50332
Wow, never thought I would be photographing my '78 F250 for the E9 forum, but here goes: this is actual, natural, rust-trying-to-come-through original paint, patina. I think your technique is capturing the essence rather well
Carry on! Mike