bimmerboy73
Well-Known Member
Hello all,
Just wanted to start yet another thread on fitting the rear seats from the e24 and the fronts from an e21. I've done a lot of digging around on the topic and finally decided to bite the bullet and give it a try. Quite a few members have posted their experiences regarding the swap and have contributed knowledge to the subject. My goal, the gods willing, will be to add to that pool of knowledge with a step by step DIY complete with photos.
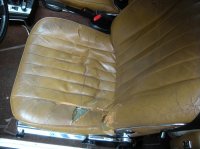
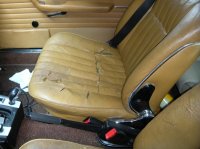
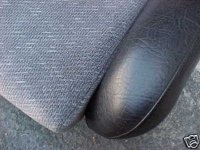
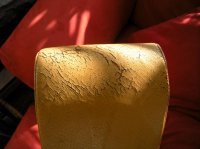
Two weeks ago i scored a set of pearl beige e24 rear seats on ebay for the staggering price of $19.99. the seats came complete with the arm rest (which i can now confirm will not fit in the e9 rear without some significant reworking of the seats and/or arm rest and underseat support brackets) and are about a 7.5 on a scale of 1 to 10 with 10 being the best. Thankfully, the seller was in Richmond VA, so i was able to take the 3 hour trip down to pick them up and avoid the shipping charges. No major blemishes at all... just a couple of surface scratches here and there. There was a 'pinky finger' sized hole in the arm rest but since i wont be using it...
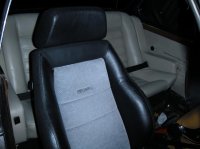
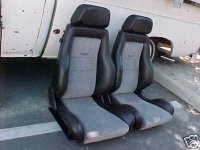
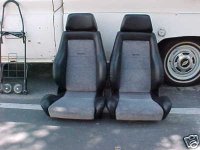
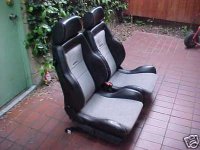
The front seats were also nabbed on ebay...Recaro Trophies from an e21. Black Vinyl with grey fabric seat/back insert. Also thrilled to get them for right around $600. They are from what i can tell, a 9 out of 10. - Nine because they are vinyl and cannot yet confrim the quality of the restoration. However, judging from the pictures, they look pretty good..
So the plan (as of right now) is to swap out entirely my tattered stock seats for the new ones. I had been going back and forth between changing the interior color black to match the new front seats or going with the tone of the pearl beige rears, but have decided to (against my better judgement) try to dye the fronts to pearle beige. I know, i know... its almost impossible to dye black seats a lighter color. But I'm stubborn, so i'm going to give it a shot. the way i figure it, if it doesnt work out, i can get the seats completely reclad in original Pearl Beige leather for a reasonable figure and still be well under the $$ it would have cost to re-skin my stock seats ... which was my initial plan. BTW- I'll be using Leatherique products for the seat / interior restoration. As part of the color conversion, i'll also be recoloring the door panels, kick panels, rear interior quarters, and rear arm rests pearl beige. the center, fabric insert on the recaros will be dyed black as will the carpet. The headliner will go to either entirely black, or a combination pearl beige roof with front trim section and visors in black (i've seen this combo on a german e9 and it looked fantastic!... also the same color combo on my euro e28... Snazzy!).
In the beginning...
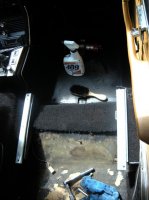
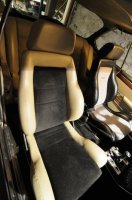
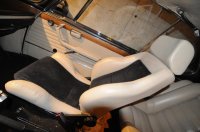
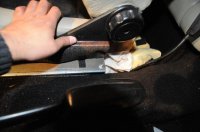
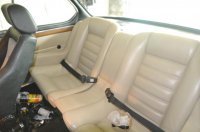
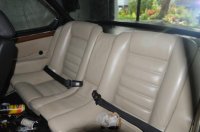
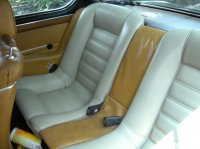
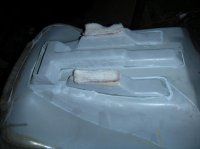
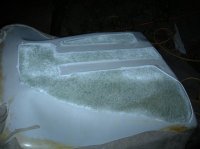
Still waiting on the front seats to arrive so in the meantime i've begun the process of cleaning up the rear seats and prepping them for restoration. I've also done a test fit of the seats (sans the e24 arm rest) into the coupe. As many of you may know, the shell of the e24 seats has a significantly different shape than the e9 seats. The major difference is the additional molded projections along the back and underside. The projections have to be removed all together to get the seats to sit flush against the rear deck in the e9. Also, the e9 shells were contoured to receive the rear wheel arches. The e24s dont have this concave indentation and so material must be removed. I was able to fairly easily cut away the problem material using a dremel and small cuttoff wheel. The job is a little messy, so you'll probably want to do it outside. The rear shell projections are where i started. There are 3 total. All three took about 5 minutes to remove. The wheel arch sections are a little trial and error. To get a rough idea of how much material to remove, i set the e24 seats upside down next to the e9s and 'eyeballed' the general form, taking a little material out at a time and testing the fit between each cutting. Be careful here not to remove too much material as i'd imagine that at some point, you'll probably begin to compromise the structural integrity of the seat. I'm considering (if necessary) having fiberglass in-laid into newly contoured rear but will wait to see how much ultimately needs to be removed before making that decision.
So... first test, the seats are in and fit relatively well. Only problem i can see right now is that the seats project about 6cm higher above the rear deck than the originals. I had anticipated this after doing a little research. I'm going to see what can be done (short of swapping shells) to get the seats to sit a little lower in the car. my first guess is that i may be able to remove some material from the the underside of the e24 shell. i was initially hesitant to do this for fear of weakening the seat, but will give it a second look this week to see what can be done.
Pictures to come...
To be continued...
Just wanted to start yet another thread on fitting the rear seats from the e24 and the fronts from an e21. I've done a lot of digging around on the topic and finally decided to bite the bullet and give it a try. Quite a few members have posted their experiences regarding the swap and have contributed knowledge to the subject. My goal, the gods willing, will be to add to that pool of knowledge with a step by step DIY complete with photos.
Two weeks ago i scored a set of pearl beige e24 rear seats on ebay for the staggering price of $19.99. the seats came complete with the arm rest (which i can now confirm will not fit in the e9 rear without some significant reworking of the seats and/or arm rest and underseat support brackets) and are about a 7.5 on a scale of 1 to 10 with 10 being the best. Thankfully, the seller was in Richmond VA, so i was able to take the 3 hour trip down to pick them up and avoid the shipping charges. No major blemishes at all... just a couple of surface scratches here and there. There was a 'pinky finger' sized hole in the arm rest but since i wont be using it...
The front seats were also nabbed on ebay...Recaro Trophies from an e21. Black Vinyl with grey fabric seat/back insert. Also thrilled to get them for right around $600. They are from what i can tell, a 9 out of 10. - Nine because they are vinyl and cannot yet confrim the quality of the restoration. However, judging from the pictures, they look pretty good..
So the plan (as of right now) is to swap out entirely my tattered stock seats for the new ones. I had been going back and forth between changing the interior color black to match the new front seats or going with the tone of the pearl beige rears, but have decided to (against my better judgement) try to dye the fronts to pearle beige. I know, i know... its almost impossible to dye black seats a lighter color. But I'm stubborn, so i'm going to give it a shot. the way i figure it, if it doesnt work out, i can get the seats completely reclad in original Pearl Beige leather for a reasonable figure and still be well under the $$ it would have cost to re-skin my stock seats ... which was my initial plan. BTW- I'll be using Leatherique products for the seat / interior restoration. As part of the color conversion, i'll also be recoloring the door panels, kick panels, rear interior quarters, and rear arm rests pearl beige. the center, fabric insert on the recaros will be dyed black as will the carpet. The headliner will go to either entirely black, or a combination pearl beige roof with front trim section and visors in black (i've seen this combo on a german e9 and it looked fantastic!... also the same color combo on my euro e28... Snazzy!).
In the beginning...
Still waiting on the front seats to arrive so in the meantime i've begun the process of cleaning up the rear seats and prepping them for restoration. I've also done a test fit of the seats (sans the e24 arm rest) into the coupe. As many of you may know, the shell of the e24 seats has a significantly different shape than the e9 seats. The major difference is the additional molded projections along the back and underside. The projections have to be removed all together to get the seats to sit flush against the rear deck in the e9. Also, the e9 shells were contoured to receive the rear wheel arches. The e24s dont have this concave indentation and so material must be removed. I was able to fairly easily cut away the problem material using a dremel and small cuttoff wheel. The job is a little messy, so you'll probably want to do it outside. The rear shell projections are where i started. There are 3 total. All three took about 5 minutes to remove. The wheel arch sections are a little trial and error. To get a rough idea of how much material to remove, i set the e24 seats upside down next to the e9s and 'eyeballed' the general form, taking a little material out at a time and testing the fit between each cutting. Be careful here not to remove too much material as i'd imagine that at some point, you'll probably begin to compromise the structural integrity of the seat. I'm considering (if necessary) having fiberglass in-laid into newly contoured rear but will wait to see how much ultimately needs to be removed before making that decision.
So... first test, the seats are in and fit relatively well. Only problem i can see right now is that the seats project about 6cm higher above the rear deck than the originals. I had anticipated this after doing a little research. I'm going to see what can be done (short of swapping shells) to get the seats to sit a little lower in the car. my first guess is that i may be able to remove some material from the the underside of the e24 shell. i was initially hesitant to do this for fear of weakening the seat, but will give it a second look this week to see what can be done.
Pictures to come...
To be continued...
Attachments
-
 !BWRVD2Q!mk~$(KGrHgoH-CIEjlLl0nU1BKWnvIlrfw~~_1.JPG12.2 KB · Views: 1,293
 -
 !BWRVEyQ!2k~$(KGrHgoH-D!EjlLl0oH(BKWnvNwRbg~~_1.JPG17 KB · Views: 763
 -
 !BWRVFow!Wk~$(KGrHgoH-E!EjlLl0T+JBKWnvRLjSw~~_1.JPG12.3 KB · Views: 849
 -
 !BWRVRjQ!Wk~$(KGrHgoH-EMEjlLluimHBKWnv+TNHw~~_1.JPG20.7 KB · Views: 675
 -
 !BWRVSmg!mk~$(KGrHgoH-C8EjlLly(kEBKWnwDRBRw~~_1.JPG15 KB · Views: 789
Last edited:
") )
)