Coupeking used to sell them. i might have some, i will look tomorrow
You are using an out of date browser. It may not display this or other websites correctly.
You should upgrade or use an alternative browser.
You should upgrade or use an alternative browser.
1971 2800 Sahara
- Thread starter Frederick
- Start date
I have some extra retainers. Sending PMOne snap installed. Fairly easy but had to dig to find the screw holes. Went from under the car but the front post holes for the rear carpet are on the raised portion.
I have all the post, but only three retainers.View attachment 170816
Agreed, should see the ring on top.question - shouldn't the retainers be mounted the other way? i thought only the fine ring showed on top of the carpet ... so you don't need a hole through the carpet
Man, I was scratching my head wondering how I was going to get this retainer through the carpet like the picture shows. I thought I was gonna have to use osmosis.happy to be of assistance sir ... you are building a gorgeous e3 ... keep it going!!!
Then I found this picture and realized I was missing a piece, and they are actually five parts to this device, six if you
count the screw.
I had seen this piece, lying around and wondered what the hell it was for, fortunately I kept it but unfortunately I only have one.This Lakewell site sells four for 16 pounds.
Et voila’!


@Frederick - i have 5 new sets for you. please PM me your address and i will get them coming your way.
And now for something completely different:
Angels Landind,Zion National Park. Two weeks ago.


Angels Landind,Zion National Park. Two weeks ago.
really cool + great photos. i was at the Grand Canyon last week - haven't sorted my pictures yet ... but here is one

And you didn't stop by Phoenix?? Would have been great to meet you. River rafted the Canyon many years ago and that was a lifetime experience.
sorry, i flew in / out of Las Vegas
Installed rear windscreen. Fabricated a gasket out of the old front windscreen gasket, which was in pretty good shape. The biggest difference, of course is the size which is easily cut down, but the difficult part was the bottom corners. The front windshield is rounded where as rear bottom corners are almost 45°. Went in like a charm but that adhesive is about to drive me nuts. Nothing takes it off of painted surfaces. Easily comes off the chrome and rubber, and here I thought the door weather seal adhesive was a bitch!

3MMM adhesive remover And if you have to lightly scrape it use a credit card or some such
i am a big believer in plastic razor blades - they fit in a scraper that holds single edged razor blades for scraping dirt / paint off of glass. won't damage the paint ... or at least i have never damaged the paint with one while taking old speed film off of a porsche
Yes, the plastic razor blades were on the list as well as some bad ass f ing adhesive remover, cause I’m exhausted., WD-40, goof off,which melts the door weatherstrip adhesive, soapy water, which actually worked when it wasn’t dry, mineral spirits, acetone, Gojo, and even toyed with lacker thinner, which, of course immediately begin to remove the paint, but not the adhesive.
When it wasn’t dry, soapy water or WD-40 work the best.. been looking at the PPG DX 330 which is now the SX 330 but it seems hard to find.
I will be extremely cautious, and use copious amounts of blue tape on the front windshield
When it wasn’t dry, soapy water or WD-40 work the best.. been looking at the PPG DX 330 which is now the SX 330 but it seems hard to find.
I will be extremely cautious, and use copious amounts of blue tape on the front windshield
Got the dash in. Excruciating and time consuming, but rewarding. Console a bit low on the right. After putting the dash in it was a little high. I shaved quarter inch off the left, but not the right thinking it might work out, but it didn’t . once the seats go in, you’ll never see it but I it’s an easy fix. The carpet needs to be tweaked as well. The wooden inserts and the clock were really a
PITA. they are the same wood as the console, but appear darker, probably the light. Deleted the lighter for a starter button. Getting the wiper switch in isn’t gonna be fun either.
Also solved my brake booster issue. Damned if I know what happened to that part. the phone had a mishap right after I did the removal so there may be photos on that it that didn’t get to the cloud. I also took pictures of everything at the powder coater, but can’t locate those, so I think they were on that phone.
I sure hope the plastic razor blades work because nothing else does. May end up being an issue for the painter. still needs to go back to the shop for final sanding and buffing. Plus touchups. This could be a big touchup. Really the only thing I’ve done so far that I’ve messed up and can’t fix.i am a big believer in plastic razor blades - they fit in a scraper that holds single edged razor blades for scraping dirt / paint off of glass. won't damage the paint ... or at least i have never damaged the paint with one while taking old speed film off of a porsche
Beautiful Frederick! 
Keep up the excellent work. Looks truly beautiful
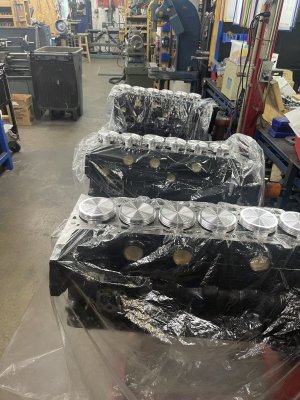
Engine update. ETA on motor is January. Been a while but not much I could have done had it been sooner..
This month marks almost two years since beginning this project.
Jim Rowe, even at 80, gets animated and excited when he talks about his new pistons and rods, made by his crew in Richland Missouri.
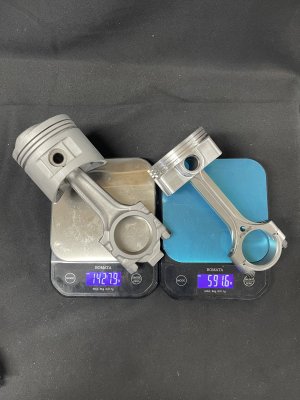
I am the farthest thing from an engineer, but basically, he has lightened the piston/rod duo by two thirds using titanium and his CNC Machine.
Pistons are 10 to 1 compression, but the lightweight should allow the engine to spool up much quicker to significantly higher redline. The engine comes out at about. 3.6 L. He thinks it should make more than 300 hp.
One of these is mine
Also, a photo of the piston rod set up. The left is of course the original.
This month marks almost two years since beginning this project.
Jim Rowe, even at 80, gets animated and excited when he talks about his new pistons and rods, made by his crew in Richland Missouri.
I am the farthest thing from an engineer, but basically, he has lightened the piston/rod duo by two thirds using titanium and his CNC Machine.
Pistons are 10 to 1 compression, but the lightweight should allow the engine to spool up much quicker to significantly higher redline. The engine comes out at about. 3.6 L. He thinks it should make more than 300 hp.
One of these is mine
Also, a photo of the piston rod set up. The left is of course the original.
Attachments
e30strube
Well-Known Member
Any words of wisdom on doing the door seals? Between not getting the adhesive to actually adhere to anything and not being able to close the doors because the new seals are too "thick", the job is a huge pain.