'73 Golf Bavaria Build Thread

GolfBavaria

Well-Known Member
Site Donor $$
Messages
1,798
Reaction score
713
Location
Coeur d'Alene, IDAHO
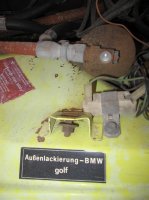
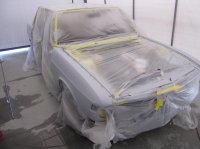
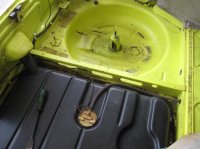
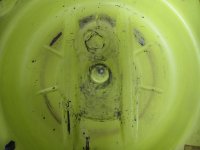
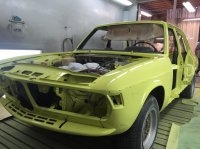
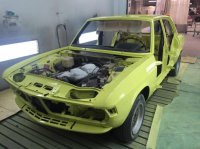
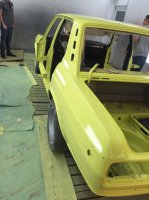
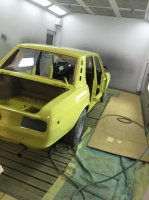
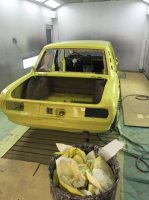
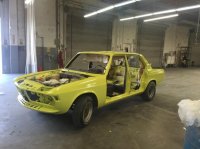
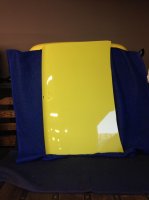
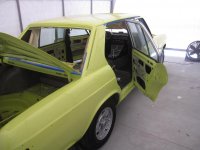
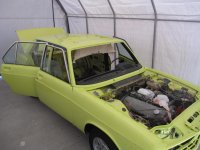
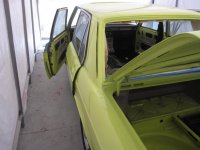
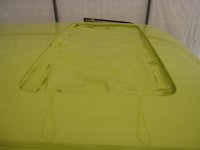
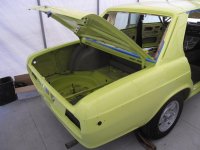
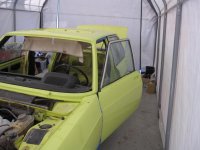
I finally had a chance to snap some photos of the progress, I told you guys not very exciting pictures at this time but I am hoping it comes together quicker than I think. I say mini build thread because I am not going to go super crazy on the updates. The hood and trunk are painted, was able to keep original paint under the trunk lid. We are saving as much as possible as you can see in door jams, inside engine bay, trunk, under the back seat, etc. We are going to blend new paint in as best we can. Since such a rare color I wanted to save as much as possible original. It will be garaged so should not rust too much over the years as I will be keeping very good care of it. I will update when I can when there is some significant progress. Thanks for looking, I'm very excited for this build. Here is the Shutterfly site instead of uploading a bunch of pics here. Click on the second tab pictures and videos and then bottom right you should see a view album link with (24) pictures at the moment.

I guess I forgot to add link:

https://shanesgolfbavaria.shutterfly.com/

-Cheers,

-Shane
 

Attachments

  • IMG_2286.jpg
    IMG_2286.jpg
    88.8 KB · Views: 622
  • IMG_2298.jpg
    IMG_2298.jpg
    86.6 KB · Views: 572
  • IMG_2292.jpg
    IMG_2292.jpg
    90.6 KB · Views: 569
  • IMG_2276.jpg
    IMG_2276.jpg
    88.1 KB · Views: 586
Last edited:

GolfBavaria

Well-Known Member
Site Donor $$
Messages
1,798
Reaction score
713
Location
Coeur d'Alene, IDAHO
HB: He he he....... It will get moved into the booth when it's ready for paint, just using the tent for sanding and priming. Not that I needed to know this wasn't originally Golf, but it never hurts. I paid for the certificate for future use at events or whatever, I am just curious what they look like but here was the email I got back from BMW Group Archiv. Thanks for that info:

Dear Mr Cummings,

Thank you for your email.

The BMW 3.0 S VIN 3105798 was manufactured on April 16th, 1973 and delivered on April 25th, 1973 to the BMW importer Hoffman Motors Corp. in New York City. The original colour was Golf, paint code 070.

Please let us know if we shall issue the certificate which was ordered on February 26th.

We hope this information is helpful for you.

Yours sincerely,

Julia Oberndörfer
BMW Group Archiv

WAY Group
Alfred-Arndt-Str. 2
80807 München
URL: www.waygroup.de
-------------------------------------------------------
WAY GmbH
Geschäftsführerin: Manuela Freudenberg
Sitz und Registergericht: München HRB 164739
-------------------------------------------------------
Erreichbarkeit bei der BMW Group Classic:
Tel.: +49 (0) 89-382-68281
E-Mail: [email protected]
Gutenbergstraße 25, 85748 Garching
 

GolfBavaria

Well-Known Member
Site Donor $$
Messages
1,798
Reaction score
713
Location
Coeur d'Alene, IDAHO
Oh what a difference a day makes......

So to my surprise tonight, the car was painted today..... Shock is more like it but in a good way. I was at the shop this morning with the guys, it looked close but when they said they should finish tonight, I thought they meant the body work, sanding, and primer. So, when I was sent these pics I almost fell over. I got word that it turned out really nice. What sucks is I won't be able to see it person until Monday. But very excited, doors and sunroof where painted too. Just thought I would post the progress, starting to look like a Bavaria again and not a trash bag.
 

Attachments

  • IMG_2578.jpg
    IMG_2578.jpg
    59.8 KB · Views: 617
  • IMG_2579.jpg
    IMG_2579.jpg
    62.5 KB · Views: 658
  • IMG_2580.jpg
    IMG_2580.jpg
    53.5 KB · Views: 638
  • IMG_2581.jpg
    IMG_2581.jpg
    54.3 KB · Views: 549
  • IMG_2582.jpg
    IMG_2582.jpg
    54.2 KB · Views: 637
  • IMG_2577.jpg
    IMG_2577.jpg
    54.4 KB · Views: 585
  • IMG_2571.jpg
    IMG_2571.jpg
    86.9 KB · Views: 624
Last edited:

Peter Coomaraswamy

Well-Known Member
Site Donor $$
Messages
3,787
Reaction score
896
Location
Austin, TX
Nice Shane, no one is going to miss that one driving down the road for sure. Please post some pictures once the doors are on, etc, I'm interested in seeing how well everything lines up. When they are done right these are absolutely beautiful and the performance is wonderful. I had 2 in my younger years and I'm thinking of seriously trying to find another when Hamleta (polaris) is finished. I'm thinking black for the color so if there is anyone out there that knows of one please let me know. I'm just tire kicking right now but it never hurts to start looking. Hmm, a Gulf Bavaria, I'm sure I have never seen one "live".

Thanks for posting
 

GolfBavaria

Well-Known Member
Site Donor $$
Messages
1,798
Reaction score
713
Location
Coeur d'Alene, IDAHO
Peter..........oh I assure you this one is being done right....HB Chris knows who is helping me is all I can say.......and we aren't cutting any corners.....thanks for encouragement!!! Things will line up fine......
 

leonine99

Well-Known Member
Site Donor $
Site Donor $$
Messages
386
Reaction score
126
Location
Palm Springs, CA
Shane

Very nice - saw it before the paint was off - with the Resedagruen or whatever repaint it was - this is so much nicer - and correct! Always glad when another e9 or E3 gets back on the road. Can't wait to see it out on our drives and the shows coming up

Jeff
 

GolfBavaria

Well-Known Member
Site Donor $$
Messages
1,798
Reaction score
713
Location
Coeur d'Alene, IDAHO
Some more progress pics

Got the doors hung but not aligned yet, re-installed trunk and all the little gadgets, hood needed a little more paint so not quite there yet but making headway! Oh and of course put on the secret weapons...the wheels are on. Springs/shocks not on yet but are in! So stance will change drastically. But for now, it is what it is. There is still more paintwork needed in doors and other places, don't worry just some pre-lim shots.
 

Attachments

  • 2015-03-28 10.46.53.jpg
    2015-03-28 10.46.53.jpg
    86.5 KB · Views: 531
  • 2015-03-28 10.47.18.jpg
    2015-03-28 10.47.18.jpg
    87.4 KB · Views: 512
  • 2015-03-28 10.48.03.jpg
    2015-03-28 10.48.03.jpg
    85.9 KB · Views: 513
  • 2015-03-28 10.48.16.jpg
    2015-03-28 10.48.16.jpg
    87.7 KB · Views: 491
  • 2015-03-28 10.46.40.jpg
    2015-03-28 10.46.40.jpg
    85.8 KB · Views: 530
  • 2015-03-28 10.47.32.jpg
    2015-03-28 10.47.32.jpg
    87.7 KB · Views: 481

Stan

Well-Known Member
Site Donor $$
Messages
6,997
Reaction score
1,526
Location
Newmarket, New Hampshire
Nice work! I am sure HBChris will be telling you to send some of the engine parts to Speedway for polish and clear coat. Only right to "pretty up" the engine in a beautiful car.
 

GolfBavaria

Well-Known Member
Site Donor $$
Messages
1,798
Reaction score
713
Location
Coeur d'Alene, IDAHO
Nice work! I am sure HBChris will be telling you to send some of the engine parts to Speedway for polish and clear coat. Only right to "pretty up" the engine in a beautiful car.

Hey Stan, yes, engine is actually last on the list. Once everything is back on, buttoned up, then we are going to focus on engine, driveline, and exhaust. I want to get it running and tuned, Then one piece at a time depending on priority. I'm hoping to be at the running/driving part in like a month, but the motor, tranny, and exhaust may take upwards of a year before it is all gussied up properly. It's going to get a whole new exhaust, actually that may happen end of month. I do have the air filter at the powder coaters however! It's a start! But thanks for compliment, looking like a car again. Can't wait until rubber is all back in etc. Still waiting on some back order pieces but should be able to start in a bit.
 

GolfBavaria

Well-Known Member
Site Donor $$
Messages
1,798
Reaction score
713
Location
Coeur d'Alene, IDAHO
First time the new rear shocks installed since factory, had to drill through shelf.....Oh well, lighter right? Thanks Carl for the suspension parts!!!
 

Attachments

  • IMG_2346[1].jpg
    IMG_2346[1].jpg
    86.7 KB · Views: 530
  • IMG_2347[1].jpg
    IMG_2347[1].jpg
    91.6 KB · Views: 537
  • IMG_2348[1].jpg
    IMG_2348[1].jpg
    94.2 KB · Views: 514
  • IMG_2349[1].jpg
    IMG_2349[1].jpg
    95.7 KB · Views: 541
Last edited:

bavbob

Well-Known Member
Site Donor
Messages
3,354
Reaction score
1,569
Location
Boston, Ma
Why did you have to drill??? Its not clear to me. I did the same thing but no drilling.
 

Markos

Well-Known Member
Site Donor
Messages
13,369
Reaction score
7,502
Location
Seattle, WA
Hey I finally visited your thread. Awesome project. I've heard reference to "golf" but finally put two and two together. Great color! I love the 70's! :)

Sorry I couldn't scoop up those steelies. I know someone selling a set of dog dish hub caps. Are these desirable or difficult to obtain?
 

GolfBavaria

Well-Known Member
Site Donor $$
Messages
1,798
Reaction score
713
Location
Coeur d'Alene, IDAHO
Why did you have to drill??? Its not clear to me. I did the same thing but no drilling. - BAVBOB

Bob, good question and part of the reason I posted the pic. I was going to see if I got a response like yours from somebody that was able to swap out w/ out having to cut a large hole or drill some smaller holes like we did.

Simple answer is I was told it is a "bitch to do it without having to drill some kind of hole. Not that it couldn't have been done by not drilling from the top. Of course I would have liked to keep it pristine, but I trust my mechanic and if he says he had to to it, he had good reason. I don't mind it soo much, as we all know, this is all covered up, shouldn't present any rust issues or structural issues and if it makes for easy adjustments down the road, so be it. Plus, like I joked about, lighter weight..I'm still joking of course but there is nothing I can do about it now.

Maybe you can share a technique for others in the future that can access this area without having to do this to where it isn't a "bitch" to do otherwise....Any advice is appreciated, that is why we are here. It's already done so I'm going to move on, but you might help someone else save their shelf.
 
Last edited:

bavbob

Well-Known Member
Site Donor
Messages
3,354
Reaction score
1,569
Location
Boston, Ma
The technique is shared with the E12, E28, E24 etc. A ratcheting wrench, 14mm I believe to remove the three nuts in the tower, access via the trunk. You can remove the entire unit and then work on a bench. A hole wasn't needed to put it in in the first place. I just have to come out and say it.....your mechanic didn't do his homework.
 

GolfBavaria

Well-Known Member
Site Donor $$
Messages
1,798
Reaction score
713
Location
Coeur d'Alene, IDAHO
They have some material now that can come close to resealing. I'll figure it out, nice looking wrench. For Snap on, not a bad price either.
 
Top