DIY - Chassis reinforcement ideas

One thing I notice when driving the car hard on tight twisted roads is that the chassis flexes. As I’m about to get my car repainted I was wondering what people have found to be the most useful for chassis strengthening. I know Coupeking is doing that almost as standard procedure. A lot of the work seems to be around adding welds to things like the rear wheel well to the bulkhead behind the rear seats. I’ve also seen a triangle shape being added in the engine bay between the frame rail and the firewall.

Does anyone have any experience to share in that area?
 
Last edited:

eriknetherlands

Moderator
Site Donor
Messages
2,698
Reaction score
1,929
Location
Netherlands, Eindhoven area
I would not take them out without compensating for them. They are doing more then just raising the seats. I think they are assisting in 2 major points:

1. Torsional stiffness.
Imagine only having the two sills, the floor with tunnel and the two seat frames as a singular construction; if you lift one sill corner, the seat frames are put under torsion load. Ofcoarse the firewall and back end help to keep it all in shape, but torsional forces in our coupes are higher then what it can cope with( as can be seen by the warping that occurs on most coupes around the shifter opening, even in my automatic which has likely not be driven very hard).

2. The cantilever that holds the ends of the frame rails. The frame rails support on one end the engine pushing down and wheels pushing up; about halfway down their length is the firewall. Imagine this is acting as a hinge: the seat frames thus act to hold the rear end of the rails in up/down position between the tunnel and sill.

Now your question "how much..." is one that asks for an exact answer. I wouldn't know without doing CAE analysis on it, but I'd guess you'll loose about 20% (plus/minus 20) of torsional rigidity.

If you place a roll cage, then your rigidity will increase by a factor 5 or 10; zero worries then.
I think it will be doable to replace them with something with less height without too much loss.
I wouldn't chop em out and leave it with that.
 

sfdon

Well-Known Member
Site Donor
Site Donor $$
Messages
8,150
Reaction score
4,472
Location
sfbay area
The brackets are important!
 

Attachments

  • 1C5DC7A6-1BAB-4CDE-BC76-1A679BF2C8CF.jpeg
    1C5DC7A6-1BAB-4CDE-BC76-1A679BF2C8CF.jpeg
    293.6 KB · Views: 301

rsporsche

Moderator
Site Donor $$
Messages
10,634
Reaction score
3,671
Location
Atlanta, GA
so Don and others, who else sells the diff mount reinforcement - Carl is out of stock, sent an email to see when they will be off back order ... waiting
 

andyleonard

Well-Known Member
Site Donor
Messages
196
Reaction score
42
Location
Topanga, CA
Not sure this is applicable to the "stock" issue but when we cut one for a convertible here's what we did:

Body flex on one of these cuts is pretty easily tamed. Remove the rocker covers and weld in 1x3 steel tubes down the gunnels with a tab pointing at the center of the car at each end. Replace rockers. Fab 4 1" straps that bolt to above tabs and attach to each corner of a 8" square plate in the center, under the driveshaft, resulting in a large removable "X." The car is much stiffer this way than with the roof. We had to change the shocks.
 

Gazz

Well-Known Member
Site Donor
Messages
945
Reaction score
620
Location
Gold Coast Australia
The diff reinforcement is relatively easy to fabricate. I did mine with extended side arms that run further along the cross chassis members. Create a schematic and have an engineering shop make it up.
 

Bmachine

Well-Known Member
Site Donor $
Site Donor $$
Messages
3,525
Reaction score
1,779
Location
Northern California coast
Excellent info again everyone. Thank you. I currently have a system that allows the installation of a lower seat without modifying any of the existing metal, but it is not very elegant. So I was trying to figure out better options to lower the seat and was wondering how some people got away with removing that “bridge”. Reading your comments confirms my suspicions that that this bridge plays a significant role in the chassis.
 

Bmachine

Well-Known Member
Site Donor $
Site Donor $$
Messages
3,525
Reaction score
1,779
Location
Northern California coast
Not sure this is applicable to the "stock" issue but when we cut one for a convertible here's what we did:

Body flex on one of these cuts is pretty easily tamed. Remove the rocker covers and weld in 1x3 steel tubes down the gunnels with a tab pointing at the center of the car at each end. Replace rockers. Fab 4 1" straps that bolt to above tabs and attach to each corner of a 8" square plate in the center, under the driveshaft, resulting in a large removable "X." The car is much stiffer this way than with the roof. We had to change the shocks.
Do you have any pics of this setup?
 

Erik

Well-Known Member
Site Donor
Messages
416
Reaction score
163
Location
NorCal, CA
Not sure this is applicable to the "stock" issue but when we cut one for a convertible here's what we did:

Body flex on one of these cuts is pretty easily tamed. Remove the rocker covers and weld in 1x3 steel tubes down the gunnels with a tab pointing at the center of the car at each end. Replace rockers. Fab 4 1" straps that bolt to above tabs and attach to each corner of a 8" square plate in the center, under the driveshaft, resulting in a large removable "X." The car is much stiffer this way than with the roof. We had to change the shocks.
Saw this kind of bracing under a 2002 many years ago that had received a Sawzall roof removal conversion. (Back when there were more of them around) No pictures taken at the time, but the owner said that the car was stiffer than it had been with the roof intact, - and that's a car with an actual, if thin, "b" pillar.
 

Bmachine

Well-Known Member
Site Donor $
Site Donor $$
Messages
3,525
Reaction score
1,779
Location
Northern California coast
I think he meant 4 pieces of steel, one inch wide, creating a giant X under the car. At the center of the X the 4 steel straps come together.,bolted to a steel plate there. The 4 straps originate at the ends of the sills.
Ok. So the 1” refers only to width, not length. That would make more sense.
 

autokunst

Well-Known Member
Site Donor $$
Messages
3,606
Reaction score
2,619
Location
Milwaukee, WI
I'd love to see an image of the X brace solution. Perhaps I am not fully understanding where it is located, but it seems to me that it would be very effective only stabilizing "racking" on a single (horizontal) plane. But I imagine it would do nothing for torsional movement (twisting). Bending stresses need depth to resist forces. In this case, the width of the car is the depth, but for vertical stresses the solution would be the thickness of the strap?
 

Bmachine

Well-Known Member
Site Donor $
Site Donor $$
Messages
3,525
Reaction score
1,779
Location
Northern California coast
I'd love to see an image of the X brace solution. Perhaps I am not fully understanding where it is located, but it seems to me that it would be very effective only stabilizing "racking" on a single (horizontal) plane. But I imagine it would do nothing for torsional movement (twisting). Bending stresses need depth to resist forces. In this case, the width of the car is the depth, but for vertical stresses the solution would be the thickness of the strap?
I was thinking the exact same thing.
 

eriknetherlands

Moderator
Site Donor
Messages
2,698
Reaction score
1,929
Location
Netherlands, Eindhoven area
It is also my hesitation. To resist torsion most effective you indeed need a volume as large as possible between the elements.
Though the X would be added *below* the car and therefore it adds a little extra height.
 

Gransin

Well-Known Member
Site Donor
Messages
1,528
Reaction score
1,271
Location
Vasa, Finland
This is a Swedish e24, so not exactly an e9. But it might give some inspiration.
The owner says it did a pretty big difference.

2021-06-13-09-11-45_alla_stag_bak.jpg


2021-06-13-09-11-45_under_kardan.jpg


2021-06-13-09-11-45_under_baksate2.jpeg


2021-06-13-09-11-45_kardanring.jpeg


2021-06-13-09-11-45_fjaderbensstag.jpeg


2021-06-13-09-11-45_stag_bak.jpeg


2021-06-13-09-11-45_alla_stag.jpeg


2021-06-13-09-11-45_xbar.jpeg


2021-06-13-09-11-45_stag1.jpg


2021-06-13-09-11-45_xstag2.jpeg
 

shanon

Well-Known Member
Messages
2,026
Reaction score
563
Location
NorCal
An excellent thread gents, and thanks to all that have contributed. And now I'll add a little to the pile ;)

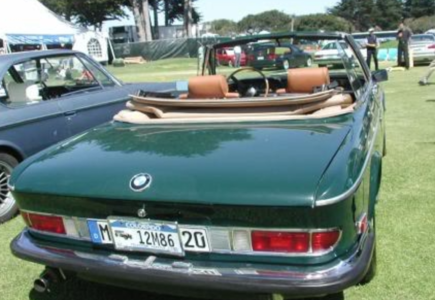
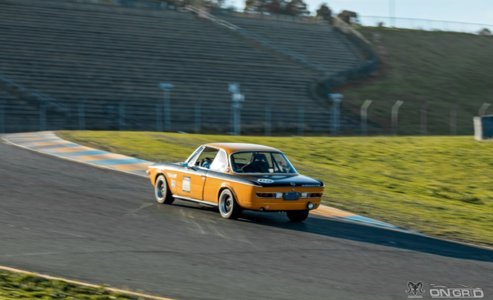
My 1970 example is far from stock and I have takin many liberties to enhance its overall ease of use. I'll call it a dual purpose or an 'event' car, that has numerous modifications for 'sporting' use including weight reduction. It incorporates an front strut cross brace (IE's), a rear strut brace/battery relocation (Aardvark mfg?) and a custom, welded-in 4pt roll bar (by a pro BMW race shop in Sacramento, CA area). In addition to these structural enhancements, it has poly bushings just about everywhere, front coil overs and beefy Billi's and spring in the rear....and most recently, a lot more power is being put down with the Weber triple addition...blah blah blah...

....and I'm still chasing da 'flex'.

Since the completion of the long awaited (an 18 year dream) triple Weber enhancement this last Spring, the 52year old girl (oh yeah! her birthday is coming soon on Dec 30th!) has been on track 3 separate times, joyfully driven in anger harassing much younger machinery. All in all, it has been a wonderful 20 year adventure (80+k miles?) since first completing my E9 'experiment'.

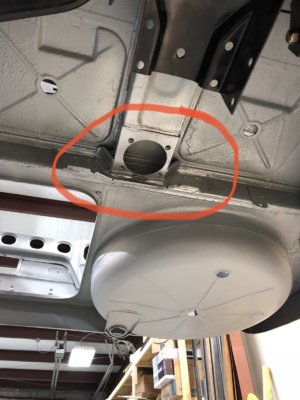
Recently, I had been experiencing some shifting/tranny issues (Getrag C/R 5spd) and I cut my last track session short when I heard a loud 'noise'. And after all the miles together, I do know all her endearing 'noises'. But this one was different, the kind where ya put your arm out the window and get off the track asap.

"WelI, shit.... I am out boys, it's been fun playin with ya'll", I said exiting.

I am hoping that a simple gear selecting hardware piece liberated itself and just made a ruckus upon exiting at speed. Upon initial visual inspection back in the paddock, nothing was obvious and the old girl soldiered the 70 mile drive home easily.

Over the weekend, I was able to do a little exploratory surgery looking into the shifter issue (has a UUC DSSR unit/kit) before she goes into her shop appointment hoping to discover something 'easy'......nope.

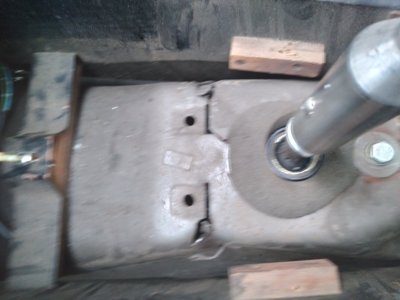
Damn....she's gonna need some surgery. Damn....

So, how timely was it to dicover find and read this thread about cracks in the tranny tunnel around the shifter area. Yep, the old girl needs some stitches. I guess the new luscious power and recent hair pullin' track sessions have kinda tweaked things. Shit. She goes in for a looksie at the race shop (they build & support a number of E46 racers, et al) after Xmas where we will form a plan. I hope we come up with some clever solutions (it's just metal) and she can get back out and about soon. She sure is going like stink!

Thanks again for the inputs to this thread and I'll share our solutions. Stay tuned. (Sorry for the long yarn , it's a slow day at the office)

Now where did I put the keys to the Bav... ;)
 

Attachments

  • Essex into Turn 2.jpg
    Essex into Turn 2.jpg
    196.3 KB · Views: 177
  • Essex E9 tranny1 (1).jpg
    Essex E9 tranny1 (1).jpg
    206.1 KB · Views: 213
Last edited:
Top