Mini restoration

Adaptor

Active Member
Site Donor
Messages
49
Reaction score
91
Location
Aalesund, Norway
I recently joined the forum, so my plan is to post smaller and bigger jobs on the E9 in this thread. The first one here is one of the bigger ones!

When i put it away for the season, back in october. I made a list of what would need repairing for the next season. Before i got started on the list, I saw that the front left fender was starting to stick out more than usual. I, stupidly, took of the sill cover and found some rust. At first i didn't think it was so bad. But when i started to poke on it with a screwdriver, it was only the paint holding it together.

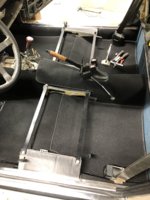
First I cut of a part of the front outer sill and revealed the A-pillar support, it did not look good, pictures below. There was also welded in som extra pieces of metal to the middle sill to substitute the rotted metal that was cut out. Too thin metal gauge and poorly executed. Since I have to buy the entire sills only to get a small section, why not change it all? So I cut off the entire outer sill and middle sill. Doing this, I had to take out most of the interior to weld in some reinforcements, so the car won't bend. When most of it was out, why not get it reupholstered? So i sent the front seats, rear seat, arm rests front and rear, door cards and senter console to a re upholsterer. The interior job will be posted in this thread later.

In advance; sorry for the low-quality cellphone pics!

Picture of the bottom of the A-pillar:
IMG_0134.JPG


I cut of the bottom and revealed some art work. Some quality welding going on here.:
IMG_0137.JPG


The middle sill didn't look too bad. Most of it was good metal.
IMG_0040.JPG


Most of the outer sill was formerly just removed and not changed. I found parts of it in here. The rear fender was just welded over it all an covering it all up.
IMG_0043.JPG


Where the triangle part is supposed to be, I found a fence post reinforcing the jackpoint. It was probably strong, but not beautiful. I would like my car mostly original structurally, so no place for a fence post in here!
IMG_0063.JPG


Long story made short; I took it all of and started fixing the inner sill and recreating the triangle parts from pictures found on this forum:
IMG_0207.JPG


2K epoxy primer:
IMG_0226.JPG


Painted with a rust preventive "waterproof" paint. I used the same stuff outside mye house on some rusted steel 5 years ago, and it still look like new.
IMG_0238.JPG


The other sills got the same spa treatment on both sides:
IMG_0253.JPG


IMG_0239.JPG


IMG_0264.JPG


Made a new piece at the bottom of the wheel arch. Dont ask me why i painted it on the outside before welding it in place, I dont know!
IMG_0267.JPG


The piece in place:
IMG_0269.JPG


Bottom of the B-pillar was in god shape, so i just sandblasted both sides, painted it with 2K epoxy etc and welded it back in.
IMG_0270.JPG


A new A-post bottom in place:
IMG_0297.JPG


All-black. I actually regret using black because i kind of hides all the hard work :p
IMG_0310.JPG


Put the door back on to ensure panel gaps. Notice the inner wheel house is now fixed properly. Sadly forgot to take pictures.
IMG_0351.JPG


Rear fender (quarterpanel?)
IMG_0359.JPG


Looking like a car again:

IMG_0375.JPG


Not exactly an original-paint car :cool:
IMG_0361.JPG


This is right about where I am in the process. Will post more soon :)
 

nosmonkey

In Rust We Trust
Site Donor
Messages
1,092
Reaction score
993
Location
London, UK
Welcome to the forum! Great to see you managed to pick a few things up on here needed for the resto. Proof that despite most forums and pages migrating to Facebook now there's still no substitute than a forum filled with info and a search button.

You've done some great repair work there, always the case with these cars where a rust bubble sends you down a bottomless rabbit hole of rust, filler and poor repairs.

Are you repairing both sides and I love the colour BTW, tundra?
 

Adaptor

Active Member
Site Donor
Messages
49
Reaction score
91
Location
Aalesund, Norway
Welcome to the forum! Great to see you managed to pick a few things up on here needed for the resto. Proof that despite most forums and pages migrating to Facebook now there's still no substitute than a forum filled with info and a search button.

You've done some great repair work there, always the case with these cars where a rust bubble sends you down a bottomless rabbit hole of rust, filler and poor repairs.

Are you repairing both sides and I love the colour BTW, tundra?

Thanks! Well, the other side will have to wait till next year. It is probably as bad as this one. This season i want to drive it :D And yes, the color is Tundra. One of the nicest colors IMO.

The only thing showing on the front fender was this:
IMG_0523.JPG
 

eriknetherlands

Moderator
Site Donor
Messages
2,697
Reaction score
1,929
Location
Netherlands, Eindhoven area
I see a lot of work being achieved here, and it all looks well done.
Good idea to do one side per season.

Also you summarize the rust situation of e9's in general quite well. From the little spot showing on your fender, to needing a full new sill.
 

Krzysztof

Well-Known Member
Site Donor
Messages
1,571
Reaction score
754
Location
Poland
Great to see how bad story turning into good happy end.

I see W&S is "sponsoring" also that project. It is good that E9's have such support!
 

Adaptor

Active Member
Site Donor
Messages
49
Reaction score
91
Location
Aalesund, Norway
I see a lot of work being achieved here, and it all looks well done.
Good idea to do one side per season.

Also you summarize the rust situation of e9's in general quite well. From the little spot showing on your fender, to needing a full new sill.

One side pr season is a good way I think. I also tackle other small jobs to make the car drive a little better every year. That way I dont get tired of restoring. And for the grand finale in a few years, it will get at full respray, a b34 engine and a 5-speed. I already have the engine and tranny laying around.
 

Krzysztof

Well-Known Member
Site Donor
Messages
1,571
Reaction score
754
Location
Poland
Very nice plan!

I wish I would have such option to restore my E9 in parts.
 

Adaptor

Active Member
Site Donor
Messages
49
Reaction score
91
Location
Aalesund, Norway
A little progress update.
I finished welding, bondoed, sprayfiller and started sanding. I'm waiting for my new sparaygun which gets here probably monday or tuesday. Cant wait to be finished with this!

Welding finished: Got into a little panel-gap problem between the lower part of the fender and the door, it looks worse in the picture than it is. I think it's the door that has been fixed poorly int the past, they also have some rust in the bottom, so I bought two new door skins that will be mounted probably next year. I removed all the grey primer from WN, and used the yellow 2k primer on both front and back fender before filler was applied.
IMG_0506.JPG


IMG_0505.JPG


First layer of bondo (I use Wurth, not bondo)
IMG_0525.JPG


Spray filler applied, and sanding started in the front. If you look closely in the rear wheel well you can see the draining tube now exits there:
filler back.jpg


filler front.jpg
 

Krzysztof

Well-Known Member
Site Donor
Messages
1,571
Reaction score
754
Location
Poland
Thanks to this project (with others coming along) W&N can freely count they will have money on vacation also in 2022.
 

Adaptor

Active Member
Site Donor
Messages
49
Reaction score
91
Location
Aalesund, Norway
Time for a new update.
Things a moving along slow, but steady. The painting is done and the interior is recovered and on the way here. Cant wait to see it! Now some photos:

Sanding off spray primer finished:
IMG_0653.JPG


Base coat applied:
IMG_0656.JPG


Clearcoated and polished. Not perfect, but good enough for a couple of years before a professional full respray. The color blended in nicely. Very hard to see where the old one stops and the new one starts, better pictures will be uploaded when I finally can take the car outside. It actually got so shiny I might have to polish the rest of the car now :D
IMG_0692.JPG

IMG_0694.JPG
 

Adaptor

Active Member
Site Donor
Messages
49
Reaction score
91
Location
Aalesund, Norway
It's been a while since my last post. Been busy with redecorating our kitchen, kids and work. But have managed to get some work done in between :)
As mentioned I sent the interior to get reupholstered, and my guy did an amazing job with it! He re-did the front and rear seats, front and rear arm rests, rear senter arm rest, all four door covers and the senter console with a new gear boot. The dash etc will be done probably next year. I re-did the leather and made new wood on the upper door panels. I also made new kickpanels left and right as the old ones were shot.

How the seats looked like before. The front seats was very good. Almost not been used and was new in 2010. The rear ones was stiff and sun bleached.
IMG_0010.JPG
IMG_0011.JPG


The door cards was homemade in Sweden in the 90's. Also look at the condition of the wood, and this was the better side:
IMG_0017.JPG


The old kick-panels (?) was kinda poor looking :rolleyes:
IMG_0030.JPG


The "new" front seats:
IMG_0737.JPG
IMG_0736.JPG


The "new" rear seats:
IMG_0735.JPG


The new kick-panel installed:

IMG_0796.JPG


Also changed the carpets! Didn't like the green one, and it was dirty and greasy beyond repair:
IMG_0012.JPG
IMG_0782.JPG


One of the rear upper doorpanels sandblasted, painted and reupholstered, felt was glued on after the pictures was taken. All four got the same treatment:
IMG_0472.JPG

IMG_0578.JPG
IMG_0582.JPG


The windows was very slow, so I took out the window mechanisms and treated them the with new grease, a good clean and new stopping rubbers.
IMG_0761.JPG


Sadly, they were still slow, so i bought new switches, but still slow. I the rewired all four with relays, they got better, but still not there. I found that the voltage droppet way too much when i operated them, so I checked the battery terminal. It's a miracle anything even worked on this car. This is the main connection to the battery. Sorry @deQuincey for the dirty hands:

IMG_0841.JPG


As mentioned, the wood was crap. So I bought a cheap Oak shelf. My dad and me cut it into pieces and made new wood for the doors. I am planing on buying new wood, probably from Bela, later on. We stained it to try to match the color to the rest. Here he is in deep focus:
IMG_0788.JPG
IMG_0787.JPG
IMG_0814.JPG


Today I mounted the passenger door. I'm very pleased with how it turned out! Almost looks like a new door. It kind of look like the panels has waves and bulges, but in reality it is not, its only the lighting reflecting.
IMG_0844.JPG


So this is how far along i am at the moment. Will update when i have something new to report. Cheers!
 

Attachments

  • IMG_0782.JPG
    IMG_0782.JPG
    366.3 KB · Views: 116

Krzysztof

Well-Known Member
Site Donor
Messages
1,571
Reaction score
754
Location
Poland
I wish, your nicely done oak panels will not bend.

As we know, wood is a "living" material, so that is also a reason why wooden furniture is made of glued parts in different alignment of the layers.

That's why veneer is used even in the most expensive cars (on steel/aluminum base) as it is easier to keep intact thin layer than the thick wood against cracking and bending.

Cheers
 

Adaptor

Active Member
Site Donor
Messages
49
Reaction score
91
Location
Aalesund, Norway
I wish, your nicely done oak panels will not bend.

As we know, wood is a "living" material, so that is also a reason why wooden furniture is made of glued parts in different alignment of the layers.

That's why veneer is used even in the most expensive cars (on steel/aluminum base) as it is easier to keep intact thin layer than the thick wood against cracking and bending.

Cheers

Yes, you are absolutely right! The wood might bend and twist. It took only a few hours to make and cost less than 30usd, so i'll take my chances. It is only supposed to last maybe 2-3 years before a complete restoration of the car and I will order new wood probably from Bela then :) But thanks for the heads-up!
 
Top