gazzol
Well-Known Member
This is my account of the restoration of my pride and joy, a BMW 3.0 CS Coupe. I purchased the car on February 16 1999 having decided to look around and find a nice one, the thing is these cars were rare when they were current (in the 70's) which means they aren't exactly thick on the ground these days so "looking for a good one" involves a lot of waiting and not a lot of looking. Any way this one turned up for sale (it was the first one I'd seen) and I ended up buying it. It seemed all there, it had a folder of bills for parts bought and work done etc and it had a photographic record of a restoration carried out in 1987 so I bought it. Over the first year of ownership I transfered the running gear from a E12 M535i basket case into my coupe so it now had the 3.5 ltr engine 5 speed dogleg box and lsd and thats how it stayed for the next few years, slowly deteriorating cause the previous owner had had it tarted up to sell it and it was full of filler. As the car got worse I used it less and less untill finally last year I was able to find a unit to work in at a reasonable price.
Here is my car finally in the workshop,
2nd July 2006.

In this picture the car looks quite good however looks can be deceptive as anyone who has owned one of these cars or any other classic car will tell you. Here are some of the things that were apparent.
Body filler in roof panel.

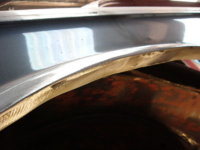
The tops of the doors were quite bad too.
Right door

Left door

Over the next week the car was stripped of it's glass, doors and interior trim.

Here is a piccy of how bad the roof was on from the inside. Note the hole to the left of centre

When you start a restoration there are always things to do that you weren’t expecting, in my case I was quite alarmed by the amount of rust underneath the front and rear screen rubbers. Fortunately they were still quite solid with only a small amount or repair work needed.


The above areas were ground down with coarse sanding discs in a angle grinder and then treated with phosphoric acid, for those who don't know phosphoric acid reacts with rust turning it black, in doing so it alters the chemical makeup of the rust so that it can't rust any more.
Here is a pillar that has been treated.

My ultimate goal when starting this project was to create a "no frills" lightweight car so I was over the moon when I managed to source a roof in good order without a sunroof, this alonesaved me about 40 Lbs. And I had the added bonus of not having to worry about it rotting away again!
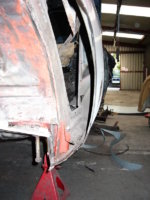
Fist major task was to remove the old roof.

As you can see only the outer skin has been removed this way there is no danger of the car coming apart in an accident like so many "cut n shuts".
The frame was then de rusted.

And treated to a very effective anti-rust paint called Bonda. Note the masking tape to keep the paint off the edges.

Blocks of wood were then placed on the frame

To hold the roof skin up

Whilst I applied the special adhesive (hence the bare metal edges). Yes thats correct the roof is GLUED on. This is actually how most modern body shops operate and its an insurance approved method of working.

Then the blocks were removed and the skin lowered into place then it was clamped for 24 hours (4 is sufficient) and the pillar gaps welded up.
LOTS of clamps were needed. (I've got more than you Malc :shock: :lol: )


The pillar after welding

And after it was dressed

Roof done!

Next installment the doors get repaired.
Here is my car finally in the workshop,
2nd July 2006.
In this picture the car looks quite good however looks can be deceptive as anyone who has owned one of these cars or any other classic car will tell you. Here are some of the things that were apparent.
Body filler in roof panel.
The tops of the doors were quite bad too.
Right door
Left door
Over the next week the car was stripped of it's glass, doors and interior trim.
Here is a piccy of how bad the roof was on from the inside. Note the hole to the left of centre
When you start a restoration there are always things to do that you weren’t expecting, in my case I was quite alarmed by the amount of rust underneath the front and rear screen rubbers. Fortunately they were still quite solid with only a small amount or repair work needed.
The above areas were ground down with coarse sanding discs in a angle grinder and then treated with phosphoric acid, for those who don't know phosphoric acid reacts with rust turning it black, in doing so it alters the chemical makeup of the rust so that it can't rust any more.
Here is a pillar that has been treated.
My ultimate goal when starting this project was to create a "no frills" lightweight car so I was over the moon when I managed to source a roof in good order without a sunroof, this alonesaved me about 40 Lbs. And I had the added bonus of not having to worry about it rotting away again!
Fist major task was to remove the old roof.
As you can see only the outer skin has been removed this way there is no danger of the car coming apart in an accident like so many "cut n shuts".
The frame was then de rusted.
And treated to a very effective anti-rust paint called Bonda. Note the masking tape to keep the paint off the edges.
Blocks of wood were then placed on the frame
To hold the roof skin up
Whilst I applied the special adhesive (hence the bare metal edges). Yes thats correct the roof is GLUED on. This is actually how most modern body shops operate and its an insurance approved method of working.
Then the blocks were removed and the skin lowered into place then it was clamped for 24 hours (4 is sufficient) and the pillar gaps welded up.
LOTS of clamps were needed. (I've got more than you Malc :shock: :lol: )
The pillar after welding
And after it was dressed
Roof done!
Next installment the doors get repaired.


