My CS Restoration

gazzol

Well-Known Member
Messages
466
Reaction score
113
Location
Preston, England
This is my account of the restoration of my pride and joy, a BMW 3.0 CS Coupe. I purchased the car on February 16 1999 having decided to look around and find a nice one, the thing is these cars were rare when they were current (in the 70's) which means they aren't exactly thick on the ground these days so "looking for a good one" involves a lot of waiting and not a lot of looking. Any way this one turned up for sale (it was the first one I'd seen) and I ended up buying it. It seemed all there, it had a folder of bills for parts bought and work done etc and it had a photographic record of a restoration carried out in 1987 so I bought it. Over the first year of ownership I transfered the running gear from a E12 M535i basket case into my coupe so it now had the 3.5 ltr engine 5 speed dogleg box and lsd and thats how it stayed for the next few years, slowly deteriorating cause the previous owner had had it tarted up to sell it and it was full of filler. As the car got worse I used it less and less untill finally last year I was able to find a unit to work in at a reasonable price.

Here is my car finally in the workshop,

2nd July 2006.

1591ee1dfd3946d3d70fe2f7bef8652e.jpg


In this picture the car looks quite good however looks can be deceptive as anyone who has owned one of these cars or any other classic car will tell you. Here are some of the things that were apparent.

Body filler in roof panel.

7d01a3ad3b85588d692f64bc7c094e41.jpg


The tops of the doors were quite bad too.

Right door

f935c011285ad00f3d2aa29bb471065b.jpg


Left door

9a6aac31b29375d60c7e1e3b94817663.jpg


Over the next week the car was stripped of it's glass, doors and interior trim.

15ed17cb20dbbed26bcab8e99a5717ad.jpg


Here is a piccy of how bad the roof was on from the inside. Note the hole to the left of centre

bbd01bd632c15e87ccb08adf49dfd3f2.jpg


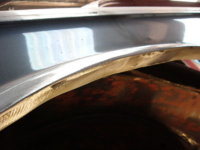
When you start a restoration there are always things to do that you weren’t expecting, in my case I was quite alarmed by the amount of rust underneath the front and rear screen rubbers. Fortunately they were still quite solid with only a small amount or repair work needed.

23f997e6800c0b30359ab3d1ddfa5c84.jpg


34f49321e37e9f1210aee0429e7f1968.jpg


d270f375653c9cca1003646ada499c4f.jpg


25a4fa728a59b4929fddc00b4f530b22.jpg


The above areas were ground down with coarse sanding discs in a angle grinder and then treated with phosphoric acid, for those who don't know phosphoric acid reacts with rust turning it black, in doing so it alters the chemical makeup of the rust so that it can't rust any more.

Here is a pillar that has been treated.

181fd04ff219cd32aa48646d03f6a1fd.jpg


My ultimate goal when starting this project was to create a "no frills" lightweight car so I was over the moon when I managed to source a roof in good order without a sunroof, this alonesaved me about 40 Lbs. And I had the added bonus of not having to worry about it rotting away again!

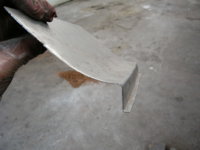
Fist major task was to remove the old roof.

3cd33cff8156bddfa6394e7092af9c50.jpg


As you can see only the outer skin has been removed this way there is no danger of the car coming apart in an accident like so many "cut n shuts".

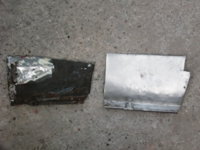
The frame was then de rusted.

d08712698f165e2ed18c435cc471de66.jpg


And treated to a very effective anti-rust paint called Bonda. Note the masking tape to keep the paint off the edges.

3241aebe23300d62657c3a5cdc8771bf.jpg


Blocks of wood were then placed on the frame

2fa80c3071cb7b16739d811d9e725f81.jpg


To hold the roof skin up

b88388399ee65224fbe252354f83dd88.jpg


Whilst I applied the special adhesive (hence the bare metal edges). Yes thats correct the roof is GLUED on. This is actually how most modern body shops operate and its an insurance approved method of working.

3f0fb763ac02dee4e4474b6560750be5.jpg


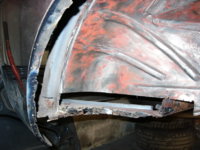
Then the blocks were removed and the skin lowered into place then it was clamped for 24 hours (4 is sufficient) and the pillar gaps welded up.

LOTS of clamps were needed. (I've got more than you Malc :shock: :lol: )

f37b0b26d52ac8a84d2a5847811899ac.jpg


9462fff103dbf8e699c9487d299ca669.jpg


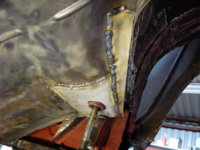
The pillar after welding

3e8673520778b1eeed9194fb7f884a06.jpg


And after it was dressed

09d173c56567ba4031427fdd4145e3a2.jpg


Roof done!

1aa17c36bdccde905c5cea898440f291.jpg


Next installment the doors get repaired.
 

TILLA

Well-Known Member
Site Donor
Messages
221
Reaction score
0
Location
Portland, Oregon
Thanks for sharing, I really look forward to these sagas, hey Malc - isn't it time for another Wednesday shed update?
 

Malc

Well-Known Member
Messages
1,179
Reaction score
10
Location
The Garvock, Scotland
Not only more clamps than me but a bigger shed!
I like the glue route, I think I might glue the front wings on, only welding or brazing where they meet the front nose cone.

Little progress recently... Im building an autocross car :oops: for a little light relief!! !
Malc
 

gazzol

Well-Known Member
Messages
466
Reaction score
113
Location
Preston, England
As shown earlier the doors were quite badly corroded alng the top edge so I bought two new aluminium skins from a guy who makes repair panels for Jaymic.
Before I started doing the roof I took the old door skins off so that the frames could be sent away to be acid dipped. The skins are removed by grinding along the edge where the outer skin is folded round the frame.

f10ae1febe275744477e42f7bcd99184.jpg


Once the frames came back they were completly free from rust but were obviously quite badly corroded in places.
The bottm edge in this photo is actually the top edge of the door note how "jaggedy" it is.

79e7b3e1910a71578a63cdac4277a7b9.jpg


A new piece needed to be let in so the rotten bit was cut off.

3de895ad15376880fbf11a3f7d0e7cb9.jpg


Here is the new piece ready to be welded in.

fba1a5a70094ce028dbe25d55ce266d3.jpg


Repairs had to be carried out in various other places (on both doors) as well, like here

d2041a0ef836cad6b0320265377338cf.jpg


And here

4fbebd998c21cf30b3641179f6fb0084.jpg


Once both door frames were solid they were hung up and painted with Bonda

6e5dd8c4b54cd5226986a43b4a46338e.jpg


eee161fe962c552e9154d584abf3aaa8.jpg


The frames were then painted gloss black (because thats what I had) before being liberaly coated with waxoyl.

eca00f706d4ea7642f399e27294b247e.jpg


4f849f20ed2e308df6067e200b02bbe9.jpg


cf9b7cfd77eb72497a087aa6273977ec.jpg


The doorskins were also painted on the inside before fitting. The reason for this is that if aluminium touches steel you will get electolytic corrosion where (like in a battery) electrons will pass from one to the other until there is nothing left!! So the skins were painted with acid etch primer (normal paint won't stick to ally) and then gloss black which had plasticiser in it to make it flexible so that (hopefully) when I folded the skins over the paint wouldn't crack.

91d46ee3d556f0256d61d51e68526aa1.jpg


Next installment, a few minor jobs before starting the floor.
 

Malc

Well-Known Member
Messages
1,179
Reaction score
10
Location
The Garvock, Scotland
Tidy 8)
Impressive shed! Impressive work!

Black is ok! I have a large can of Chassis Black from Spencers paints in Aberdeen, basically it's sold to the truck/farm trade and is wonderful stuff...sprayable but like polyurethane seems really resistant to the elements.

I am in two minds about reskinning the doors, I have 4 so I could make 2 good ones. Interestingly each set has rusted in different places!
What are the ally skins like from the Jaymic guy? Can you still add the belt trim?
Good Stuff Gazzol!
Cheers
Malc
 

gazzol

Well-Known Member
Messages
466
Reaction score
113
Location
Preston, England
Malc said:
Tidy 8)
Impressive shed! Impressive work!

Black is ok! I have a large can of Chassis Black from Spencers paints in Aberdeen, basically it's sold to the truck/farm trade and is wonderful stuff...sprayable but like polyurethane seems really resistant to the elements.

I am in two minds about reskinning the doors, I have 4 so I could make 2 good ones. Interestingly each set has rusted in different places!
What are the ally skins like from the Jaymic guy? Can you still add the belt trim?
Good Stuff Gazzol!
Cheers
Malc

To be honest Malc the door skins from Ted wern't the best, I've never fitted skins before so it was quite a nighmare. The worst aspect was that they were too deep at one end. However as always once you know what to expect its a darn sight easier.
An interesting point to note (I didn't feel so bad about the poor fit of my doors after this) I recently attended the BMW festival at Gaydon and a nice old bloke walked up to me and started to complement my "CSL" duty bound as I am to be honest I had to correct the chap and confess that my car isn't a L just a CS. "Oh" came the response "but its got the aluminium door skins". "Yes you're quite right" I replied "but how do you know?" "Because they don't fit!" :shock: :lol: . And there was I thinking I'd done a bad job when in fact they weren't all that good from the factory.
 

Malc

Well-Known Member
Messages
1,179
Reaction score
10
Location
The Garvock, Scotland
...they don't fit.....

:lol: Brilliant. I think we tend to forget that 30 odd years ago they wasn't such things as robotised assembly lines.
A few years ago I restored a MGA and had a devil of a time getting anything to line up properly especially the front wings and doors. By chance my Dad knew a really nice gentleman, now passed away, who used to work in Abington on the assembly line in the 50's.
To cut a long story short I actually met him and told him of my problems, he just laughed..... to loosely quote him
"the bodies came to be added to the chassis and all the parts hung (doors ,wings etc) there always was a hell of a din as each body was battered with hammers to make it fit. I'm surprised you managed to get a 2nd hand wing to fit your car as they were all different!"
Malc
 

gazzol

Well-Known Member
Messages
466
Reaction score
113
Location
Preston, England

gazzol

Well-Known Member
Messages
466
Reaction score
113
Location
Preston, England
The next job was the relatively simple one of welding up the holes that had been cut into the rear parcel shelf for speakers as I said earlier the car was to be a no frills lightweight, as such no stereo will be fitted (the engine sounds much better anyway)

cc56bda93c9c2fe3f60efd33c9fa97ae.jpg


First a larger and neater hole was cut

4e808cf71b120fb70d94e8c71468bdec.jpg


And then a plate was welded in

09b47da8556bb51c571c763b8c536277.jpg


The next job (simply because the mig welder was at the back of the car) was to weld up the the holes in the gutter arround the boot.
Sorry I don't have any before shots but if you look carefully in the shot above where I've made the speaker hole larger you can see some holes in the gutter.

Here's what they looked like after being welded up.

347298400f2238277080b930903266cb.jpg


314a96639f7a566587a316d978a4da05.jpg


The next job (no particular reason I just felt like doing it) was to take the old paint off the roof and paint it with Bonda.

b2803dc6224b168140f7f546dba84dcd.jpg


c3dbbdd9a4739d41f2a2e9bc91c1611e.jpg


a38b2a0b97a154e362847b92b9895f67.jpg


The next job was one of those should I or shouldn't I things. The floors on the car weren't rotten but they had been plated up in the past in the end what swung it was that I knew if I didn't do them I'd regret it every time I had to do any work underneath (Pristine on top, scabby old donkey underneath!) So I ordered four floor pan repair panels and set about it, it turns out that I'm glad that I did but for a different reason.

Here the left rear floor pan has been cut out.

02cb7a1f9d95cdb6da850845204b2d56.jpg


And here is the new one welded in.

2392f7216ae7b568135f487e80fe0754.jpg


What these two photos don't show is all the work that went into making this panel fit as they were quite poor, also the inner sill to which the floor is attached was rotten (Hence why I was glad I decided to do the floors. Can you imagine getting the car mint only to have it fail the m.o.t. the next time arround cos it's rotten !!!)at the bottom edge which was extra work. I didn't get any pics of the rear inner sill but you can see what it was like in the sequence of shots for the front floor pan.

Front floor before work started. Note the plates on the floor, look carefully there is one large one and then another smaller one over the top of that.

10753850d8e162a40d0662e7b6afffa1.jpg


And after it had been cut out.

528f5d12c6dc9bb2c4d9b29311ec12b8.jpg


Earlier on I mentioned about finding things you weren't expecting, the inner sills were one of those things. You can't see the rot cause the flash didn't work.

8594bfe4aec0086387876804ddc2b705.jpg


But you can see that I had to cut the inner sill away.

32fe4430fb1bc8cdb520d0f8e14d2fab.jpg


As a point of interest take a look at the picture below, this is a good example of how not to carry out a repair, when you weld over the top of rusty metal you create a nice space between two peices of steel one of which is corroded, what do you think is going to happen????
It's not big and it's not clever. Cut out the rusty part and start again!!!!

aa6a6e1bb63a76dac4923ee4a7264d09.jpg


Here's a better view with all the rot cut out.

7ed96b90e6d3c54a76a43e3279be68a4.jpg


Now the job of rebuiling it can start, here is the first bit.

7b39f94bc063d0bb4ca699008decf1cd.jpg


And here's where it went.

2054c45d01ecce28937c220f8d17814a.jpg


Here is the inner sill repair piece, the holes are so that it can be "plug welded" ( it's a bit like spot welding) in place

1666d4b61f9c5c1fd2661b5bdfee8b92.jpg


And here it is welded in

fa476d93b7874aed7a7151626476617e.jpg


Now the floor repair piece can be welded in.

d76e12f1d81ebd0b3bff0921287a4826.jpg


And finally the last bit whch the repair piece didn't cover.

2998d0f79e5c4172fc27a1e294031435.jpg


The floor pans on the drivers side were also replaced but to save you all from boredom I've not included the pics, suffice to say that the same ammount of work was needed.

Next installment repairing the bottom of the drivers front wing (another one of those unforseen items) and repairing the rear subfame mounts (another one of those unforseen items)

Have you spotted the recurring theme yet?
_________________
 

Malc

Well-Known Member
Messages
1,179
Reaction score
10
Location
The Garvock, Scotland
Gazzol,
I think you and I should form the "why am I doing this" Or "the light is at the end of the tunnel or through the floor" sub section of this forum!
Good stuff
Keeping my enthusiasm up...
Cheers
MAlc
 

gazzol

Well-Known Member
Messages
466
Reaction score
113
Location
Preston, England
DJSimca said:
Fantastic work :!: :!:
How much would you charge to restore a car for me :D

This is a very difficult question to answer because there is always more work to do that you think there will be. When I restored my car I spent somewhere in the region of 2000 hours, which included all the modifications which I made (you'll have to wait and see). If the modifications took 500 hours that still leaves 1500 hours which in real terms is a lot of money. If you are really serious P.M. me and we'll talk some more about it.
 

gazzol

Well-Known Member
Messages
466
Reaction score
113
Location
Preston, England
Okey Dokey time for the next bit.
As stated previously the drivers front wing had corrosion at the bottom, the reason I didn't know about this was that this area is normally covered with a decorative panel which is screwed on, the first time I took the car for an m.o.t. it too quite a lot of persuasion to convince the tester that it was meant to be like this and it wasn't just a cock up job.
Any way here is the piece I had to cut out.

27a78ec00843d54de498a35f833da19d.jpg


Here's the other side.

[img]http://i90.photobucket.com/albums/k250/gazzol/74Insideviewofsame.jpg

And here is the repair piece being fabricated.

8f472a23d2d50711d6fe18f3fd132f20.jpg


ad3564b2bf7a6f5c38d7d4b63fa063ce.jpg


Old and new side by side, new needs trimming to size but the drain point has been pressed in.

bb3ce771b0622aceb2bb445d92fd7bc7.jpg


And here the new piece has been welded in, I didn't bother too much about the quality of the welding or fit as it is never going to be seen.

7ed2ea1c546c5f1dac9818129d06f748.jpg


Next up was the rear subframe mounting points and rear inner sills.

Here is what they looked like after removing the subframe and the mulitple layers of underseal, it is a common misconception that covering slightly rusty metal with this most sinful of products will stop corrosion, if fact what happens is the metal carries on corroding but you are oblivious to it. Don't fool yourself, grind it up tread it with phosphoric acid and a good anti-rust paint.

b24216b2048b1717be164d5ada220279.jpg


2f5de15c1ebf6337e6c848d754821235.jpg


Here some of the work has been done to the drivers side. Note that I elected to cut out the rear inner sill area rather that trying to patch it up. This way the metal inside the sill could be cleaned up and painted before the repair piece war put in. Yes I know some of the paint will get burned off by the welding process but I,ve pre-empted that problem becuase the new piece will have extra holes so that paint cac be sprayed into the cavities (using a wax sprayer) after the paint had dried wax was sprayed in.

970e04eb817bc8877b36b4be222a6538.jpg


Here work has started on the passenger side, the white stuff in what was left after treating with phosphoric acid.

96135800dd192ab5b6dfea818d01ad39.jpg


A few (quite a few) hours later.

22ade9e15e5a70c3f0567cb425a37a13.jpg


The E9 suffered quite badly from body flex and were prone to corroding arround the subframe mountings so I decided to add extra steel to this area in order to stiffen things up a bit. Here is the piece I made note it has holes to plug weld though so the piece isn't just attached round its own edge.

e07287bd292ce3b9aa6259b101bb029d.jpg


Here it is welded in but before being dressed up.

11965af51a58ff342b2b2b88c33c7a4f.jpg


Next on the list was to carry out repairs to the rear wheel tubs. During the cars previous restoration new rear quarter panels were fitted, sadly the wheel tubs must not have been treated properly and they corroded, even more sadly (for me) was that this corrosion spread to the lip of the arch on the rear quarters. So as well as having to fit the wheel tub repair peice that I'd ordered I also had to fabricate a new lip for the rear arches.
You can see in some of the previous photos that I'd already cut out part of the wheel tubs.

Here is a view of the drivers side . The picture is taken from the middle of the car looking outwards and up, note how rough the lip of the arch looks.

39dfe5f5ebcd6356fdfaa50e0b6be514.jpg


Another view.

f4e4ba35489c7fbe7c6c04fdae9dedff.jpg


Looking towards the boot, more unexpected rot had to be cut out.

7197f3986984b6459d93332ff6e749cd.jpg


The next two photos show the lip of the arch cut off.

bcc29bcaaf5f5e3cd9ce81c32b88b2ff.jpg


06f23e94623657b1453d3a05e063eaa0.jpg


These shots show the new lip tacked into position and being welded up.

0441b64ffe866772596474142c516ff7.jpg


3812c7c85d735da281109b651d4ca447.jpg


And here is what it looked like afte being dressed up.

12b3dc898e82856d9a946b2c97f8dda6.jpg


Same with the other side.

e4e00c27302e964150e51a16719344e1.jpg


After the arch lips were finished the rest of the wheel tubs were welded up and then the repair sections fitted. Sorry I don't have any more photos of the wheel tubs being finished but you do get to see the finished article later on.

The Differential Mounting

When BMW launched the first M Power Car (E12 M535i) they fitted them with an LSD as standard. This increase in traction meant that more twist was applied through the shell of the car as the diff tried to pull itself out,this bid for escape led to cracking of the body shell and BMW had to recall all the cars and strengthen them. My diff had also tried to escape and so remedial repair work and extra strength was called for.

First of all I had decided to replace the boot floor so that was cut out and then a strengthening piece was welded in above the diff mounting point. This piece will serve a dual purpose but more of that later.

de629f1ffdcb67753a726b6fe41e370e.jpg


Underneath a plate was cut to fit over the diff mounting then holes were cut into it before it was welded in place. Finaly triangular pieces were welded to the new mounting and the floor, these would serve to spread the loads imposed by the twisting action of the diff further across the the floor where they can also be delt with by... more of that later (as above).

24a57e5baaca65dc1b81dca5f392fc50.jpg


289989a36fd9dccb80a6cad0b0942ef5.jpg


Next instalment: Hand making a new boot floor!
 

Attachments

  • 27a78ec00843d54de498a35f833da19d.jpg
    27a78ec00843d54de498a35f833da19d.jpg
    76.6 KB · Views: 207
  • 8f472a23d2d50711d6fe18f3fd132f20.jpg
    8f472a23d2d50711d6fe18f3fd132f20.jpg
    55.6 KB · Views: 231
  • ad3564b2bf7a6f5c38d7d4b63fa063ce.jpg
    ad3564b2bf7a6f5c38d7d4b63fa063ce.jpg
    39.3 KB · Views: 218
  • bb3ce771b0622aceb2bb445d92fd7bc7.jpg
    bb3ce771b0622aceb2bb445d92fd7bc7.jpg
    62.8 KB · Views: 219
  • 7ed2ea1c546c5f1dac9818129d06f748.jpg
    7ed2ea1c546c5f1dac9818129d06f748.jpg
    42.3 KB · Views: 210
  • b24216b2048b1717be164d5ada220279.jpg
    b24216b2048b1717be164d5ada220279.jpg
    66.7 KB · Views: 190
  • 2f5de15c1ebf6337e6c848d754821235.jpg
    2f5de15c1ebf6337e6c848d754821235.jpg
    97.3 KB · Views: 209
  • 970e04eb817bc8877b36b4be222a6538.jpg
    970e04eb817bc8877b36b4be222a6538.jpg
    73.4 KB · Views: 200
  • 96135800dd192ab5b6dfea818d01ad39.jpg
    96135800dd192ab5b6dfea818d01ad39.jpg
    141 KB · Views: 188
  • 22ade9e15e5a70c3f0567cb425a37a13.jpg
    22ade9e15e5a70c3f0567cb425a37a13.jpg
    120.8 KB · Views: 216
  • e07287bd292ce3b9aa6259b101bb029d.jpg
    e07287bd292ce3b9aa6259b101bb029d.jpg
    145.7 KB · Views: 218
  • 11965af51a58ff342b2b2b88c33c7a4f.jpg
    11965af51a58ff342b2b2b88c33c7a4f.jpg
    97.1 KB · Views: 201
  • 39dfe5f5ebcd6356fdfaa50e0b6be514.jpg
    39dfe5f5ebcd6356fdfaa50e0b6be514.jpg
    84.9 KB · Views: 206
  • f4e4ba35489c7fbe7c6c04fdae9dedff.jpg
    f4e4ba35489c7fbe7c6c04fdae9dedff.jpg
    115.7 KB · Views: 209
  • 7197f3986984b6459d93332ff6e749cd.jpg
    7197f3986984b6459d93332ff6e749cd.jpg
    102.5 KB · Views: 198
  • bcc29bcaaf5f5e3cd9ce81c32b88b2ff.jpg
    bcc29bcaaf5f5e3cd9ce81c32b88b2ff.jpg
    97 KB · Views: 200
  • 06f23e94623657b1453d3a05e063eaa0.jpg
    06f23e94623657b1453d3a05e063eaa0.jpg
    92.1 KB · Views: 202
  • 0441b64ffe866772596474142c516ff7.jpg
    0441b64ffe866772596474142c516ff7.jpg
    72.2 KB · Views: 198
  • 3812c7c85d735da281109b651d4ca447.jpg
    3812c7c85d735da281109b651d4ca447.jpg
    124 KB · Views: 207
  • 12b3dc898e82856d9a946b2c97f8dda6.jpg
    12b3dc898e82856d9a946b2c97f8dda6.jpg
    53 KB · Views: 212
  • e4e00c27302e964150e51a16719344e1.jpg
    e4e00c27302e964150e51a16719344e1.jpg
    85.9 KB · Views: 194
  • de629f1ffdcb67753a726b6fe41e370e.jpg
    de629f1ffdcb67753a726b6fe41e370e.jpg
    125.2 KB · Views: 209

radosc

Active Member
Messages
61
Reaction score
0
Location
Warsaw/Poland
Hi gazzol! Impressive work!

What kind of tools are you using for panel fabrication?
When it comes to plug welding aren't you afraid that moisture would accumulate between plates leading to slow corrosion? Are you using weld thru primer on the other side? I'm a bit afraid to use what seems to be an excellent method.
 

DJSimca

Well-Known Member
Messages
333
Reaction score
0
Location
Denmark
Gazzol,
I can only repeat what I said earlier... Fantastic work.. :D

Looking at the amount of rust on this car allow me this question: Was this car really worth salvaging? :shock:

Don't get me wrong. I know that the car is worth saving now that you have put in a lot of work, but was the body really worth saving when you started? :wink:
 

gazzol

Well-Known Member
Messages
466
Reaction score
113
Location
Preston, England
radosc said:
Hi gazzol! Impressive work!

What kind of tools are you using for panel fabrication?
When it comes to plug welding aren't you afraid that moisture would accumulate between plates leading to slow corrosion? Are you using weld thru primer on the other side? I'm a bit afraid to use what seems to be an excellent method.

I use hammers, dollies, tin snips (the type that allow you to cut curves), blocks of wood and years of experience to fabricate repair pieces.

Your quite right about corrosion between panels, and no I didn't use weld through primer although there is nothing to stop you from doing so. The thing to remember is that primer is hygrscopic (spelling?) ie it absorbs water and if water stays in contact long enough it will start to corrode the steel underneath. The secret is to stop moisture getting in by using a good quality seam sealer after priming and then another coat of primer on top of that before finishing with a top coat. After the shell was finished all the cavities were liberally injected with wax.

DJSimca said:
Gazzol,
I can only repeat what I said earlier... Fantastic work..

Looking at the amount of rust on this car allow me this question: Was this car really worth salvaging?

Don't get me wrong. I know that the car is worth saving now that you have put in a lot of work, but was the body really worth saving when you started?

First of all the car wasn't actually that bad, belive me I've seen a lot worse than mine put back in service but it's a fair point that you make and looking at it from the point of view of someone who can't do the work themselves then the answer is a resounding NO. It simply would not be financially viable to pay someone to do the ammount of work that I have done on this car.

However I must stress that at the begining of this project I decided to do the car in such a manner that I wouldn't have to do any welding or tackle any rust issues on the paint work for at least 10 years. So with that in mind I went overboard cutting out areas of metal that most people would have left alone. It would have been OK to leave several areas of the car as they were and tackle them as and when needed. Its just that as cost wasn't an issue for me it made more sense to get every thing (and every potential thing) done in one sitting.

Thanks for your comments.

Gazzol
 
Top