OTOTOTO

Stan

Well-Known Member
Site Donor $$
Messages
6,997
Reaction score
1,526
Location
Newmarket, New Hampshire
I have been weighing the pro and cons of triple side draft for years. They look so sexy!
Those who have them and have them dialed in report reliable performance.
Hmmm, someday maybe but the engine on my car is very nice now.
 

OTOTOTO

Active Member
Site Donor
Messages
56
Reaction score
85
Location
Manhattan Beach, Ca
@Stan, I probably should wait a bit as well. Might get the hookup on replacement Webers.

I took it for its first longer drive, about 20 miles round trip, and the smell of fuel at idle and when parked is very noticeable. It’s so much fun to drive but this poor thing needs new plumbing.

Got a few more photos to document. Hope to have a nice before/after with these someday. Seems to be leaking oil on to the head from above somewhere. Most of the gaskets look leaky. This car is said to have a new head at 57,000 miles, under the oil cap looks very clean, but will pop the valve cover open toon to verify.

DE9262F3-6EAF-4E94-AA9B-EC8A874CF3E8.jpeg


0B329F7D-E625-426A-950A-464E24CA61E8.jpeg


Other things
- coolant tank cracked and not attached, I have a brass one but need to check it’ll hold pressure, also polish
- a few meters of fuel line ordered. It seems all that’s available is the clothy braided stuff, is that fine around the engine?
- portion of the metal fuel line under the driver side looks cut and replaced with a soft line, replaced with new soft line bit need to fix properly
- when cold, it has trouble priming fuel, when warm it starts right up. I put in a check valve that helps a but but somethings needed.
- from cold, it idles high about 4500, kicks down to about 2500, doesn’t drop to normal till a few minutes later. Weather about 65F outside. Otherwise, runs fine, no backfiring, smooth acceleration albeit likely underpowered and running rich
- broken brake reservoir and cap replaced, will need a proper flush when I get to brakes
- battery ground replaced
- Coolant lines seem newer
- Brake booster lines are the worst


99C88058-E8A9-4F87-8425-4243383F13DE.jpeg
16EBF255-C0D8-4277-AA75-8CFE57DDACF1.jpeg


Dug through paperwork a bit and found a lot of work done around 1997 along with rust repair on the passenger side and rear strut reinforcement.
Also have what looks like a copy of the original Importer/Dealer sticker, Looks like it started its American life in Houston before heading to Connecticut.

182758DA-5ED6-4B81-9C5B-6767144B3EF7.jpeg


Last but not least, I went to two shops who didn’t have any luck (or didn’t want to mess) with my wheel locks. I broke out the Dremel and cut in enough notches to hammer on a 24mm socket. Note me honing in smaller notches each time. Careful not to hit the BBS’s, I was able to get all 4 removed! Happiest day tossing these Pep-Boy monstrosities in the trash.

B45D2467-3C8C-4CBF-97F0-0E52578576C0.jpeg
CFA87059-C8FA-4E4C-9FBC-442FBE12F3DB.jpeg
 
Last edited:

HB Chris

Well-Known Member
Site Donor $$
Messages
19,418
Reaction score
8,757
Location
Huntington Beach, CA
Without the firewall rubber seals and drain snorkels you will always have gas smell from engine bay. Fuel hose was originally cloth covered and I have used these but it is best if you used the proper 8x13 rubber fuel hose as our ethanol infused gas can cause the rubber to degrade and the cloth hides these minuscule cracks. Air leaking into the old fuel hoses causes the fuel pump to suck air and not gas. Cold idle should be around 2000-2500 rpm for a very short time only then down to 950 rpm when warm.
 

OTOTOTO

Active Member
Site Donor
Messages
56
Reaction score
85
Location
Manhattan Beach, Ca
Before driving another mile, it’s time to take care of these old tires. While at coffee at cars, we started looking at the age codes on the Goodyear Eagle VR60s and they seem to be at least 20 years old and look the part. I can’t find the manufacture dates on vr60’s to see if they might be older, but regardless, a well earned retirement.

BCB464AF-C5D9-44B6-9F67-ECF3CE1B1196.jpeg
60E0A1A9-66C6-49AF-8601-352A5AD9C4A8.jpeg
830DF36F-B60E-4A0A-8754-693A0FF7B246.jpeg


This was its first time at C&C so great to meet Jefflit.
Thanks for the Webers! Going to get to those after brakes...which are also ancient.

F7D0FD3A-48BF-48B4-B7DC-DB63BC0322AE.jpeg
F0F1A94C-4CB3-4D8E-8608-B4C99E0F46E2.jpeg


Freshly installed is CoupeKings staggered Alpina reps with Michelin Pilot Exaltos. They have a nice classic looking cross-section. Other Michelin Pilots I’ve had were worth the cost.

Wheel pretty picture time:

6E82FC67-78AD-48B8-A6A8-ED72F214B02A.jpeg


0AB4C615-9A52-4D17-BA0D-EB64679EC6AE.jpeg


433CA8D7-CB6C-4E42-BEDE-0CEBC6D751BE.jpeg


This has been a much needed change, time for a test drive and donuts. Yes, good.

4DF10AFE-8AE8-47B7-9EB3-6151C74BCD67.jpeg
 
Last edited:

OTOTOTO

Active Member
Site Donor
Messages
56
Reaction score
85
Location
Manhattan Beach, Ca
My next plan was to replace the tired old brakes, but slight detour back to the engine bay once I got an “L light” after turning the car off. Thanks to some help on this thread (https://e9coupe.com/forum/threads/the-l-light.3789/), I have a new alternator, but also went ahead with more cleaning and parts.

Quick check under the valve cover generally looks to confirm the top end was done.

5189D9BD-53F2-4E40-B1C8-9B264AFE23B4.jpeg


I have an unused mechanical fuel pump that matches up. Not sure the difference between the old flat top design and this but seems to work about the same. After install, it still takes a while to prime at cold start, but I’ll probably try to seriously resolve that when the replacement Webers go in.

5CFEDC15-A1FC-4D18-9A6B-99E5FFBA70A8.jpeg
6839D353-1D55-4C23-83F2-77C095F17DFC.jpeg


On the alternator side, I replaced the stock oil filter with one from an e28. Partly for size, but they seem a bit easier to replace. Huge preference would have been to a B35 oil filter that aims up and out, but it was pretty clear it would hit the carburetor. I found the below one on eBay, easy enough to clean. Removing the old one, I found a lot of oil had been leaking out onto the engine, there was no physical gasket, but some hardened paste.
The new oil filter housing needs longer bolts than old, but otherwise looks like a direct fit.
The replacement now has a gasket but I am still seeing a small pool of oil still coming off the plate. No signs of cracks or anything but way less than before.

711CB1EE-D60F-4604-A3D3-92528A09C536.jpeg
12BD80F8-05BF-48F3-B1C4-561653E85BC2.jpeg


I sent some parts out for refinishing, powedercoat for the cable cover and hand sanded the icons, a look I like on the e28 I have.

87E9AF76-614C-49EC-81F8-5CC13692FB23.jpeg
BB6CB500-1FD7-4957-A090-70D618852CD7.jpeg


I like the above oil cap but they only seem to come fully polished, a bit of steel wool is enough to better match the valve cover. Exhaust covers and headers got a round of media blast, covers + ceramic paint.

70E686B2-26CE-470A-B46A-CCEB5AE25755.jpeg
AD8F304E-C76C-4631-A6A8-ED69373F70B9.jpeg


More cleaning, and reassembling, The blackened A/C lines are actually a nice shade of red! I’m still going around the engine bay with a coat of silver rust bullet.
Generally will start repainting anything that isn’t red, silver, black or gold. I got a red top Optima to pair with the new alternator, new blue Bosch coil, rotor, and alternator replacement cap, spark wires, and a/c bottle clamps. Topped off with some Liqui Moly. The oil seemed dirty enough to have to do another oil change soon.

026C54B1-F5C0-4DA6-9002-25306D8C2D7D.jpeg
DD787BCA-3A56-4392-8EEE-97537041CC0B.jpeg


Obligatory before after image after 4 months of ownership.

1D50C3CD-A380-4045-BF1B-2A12340C4426.jpeg


6F9A1AA9-10F9-40BB-8F95-7385564560EC.jpeg


few loose ends.....

Post assembly I lost track of where these go. Car seems to run fine without.

E5BEFF4D-0CA8-42A4-9E07-CCA34DCEA288.jpeg


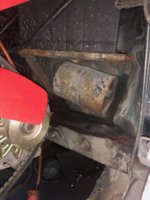
Under the battery tray, there is a large filter. A clear line runs up to the firewall, then over to the passenger size and into the firewall. The other end drains out to the ground. I pulled it out to fit the alternator, but still cant find it in any documents.

6703E3C9-3B3F-40E5-83EA-B5CA64E64243.jpeg
 
Last edited:

HB Chris

Well-Known Member
Site Donor $$
Messages
19,418
Reaction score
8,757
Location
Huntington Beach, CA
The relay with the loose ground wire is for the A/C fan in front of your condenser. The grey cylinder under your battery tray is a charcoal canister for gas fumes coming from the trunk where there is a grey plastic reservoir. The line travels from pass side of car to the firewall area (skinny blue plastic hose) where it transitions to black rubber hose that connects to the grey can, the exit from the can connects under air cleaner so it draws fumes from rear of car to the carb so it can be burned. Having it hooked up can reduce gas smell from trunk area.
 

bavbob

Well-Known Member
Site Donor
Messages
3,354
Reaction score
1,569
Location
Boston, Ma
WRT gas line etc, I put in one of these non return check valves, have not tried it out yet though.

1613573182077.png
 

OTOTOTO

Active Member
Site Donor
Messages
56
Reaction score
85
Location
Manhattan Beach, Ca
Finally got the replacement Weber’s installed at California Carburetors in Hawthorne. Just in time, the tired old ones were visibly leaking fuel after the last drive. Thanks again @jefflit!

The fuel pickup issues are now gone and idles well, doesn’t reek of fuel after drive! I hade the manual choke converted over to electric, but otherwise no different. Than previous setup.

F660659A-C00A-48B0-9B8D-03CDAAAAA9ED.jpeg


While at it, I’ve also decided to ditch the Cibie lights for some clean Hella’s. The beam pattern is much cleaner with these. Aukee has a decent LED replacement bulb that’s compatible with H1 housings.

48D06A17-22F4-430D-A76E-22AFAF67A608.jpeg
8FFBB000-EAB0-4D7B-8781-6905065C0A6D.jpeg


Last, I started digging into the wiring situation under the driver side. There is a switch under the light panel which I don’t recognize, which has been tapped into. Not sure what it is, but hoping I can remove it once I chase the source.

55CAFBA7-5713-4D24-9DD6-5ACA66EE3AD5.jpeg
71EECA09-C0AB-4483-A78F-1D059B44C6AD.jpeg


Time for a drive.
DB86B7CD-3C70-47F5-8CBB-C082606D1A58.jpeg
 
Last edited:

aearch

Well-Known Member
Site Donor $
Messages
4,106
Reaction score
588
Location
pleasant hill , ca
THAT CANISTER IS THE CHARCOAL FUEL FILTER THAT IS USED TO PICK UP
GAS FUMES AND RETURN TO THE GAS TANK
CANCEL THE ORDER FOR THE CANISTER
ITS USED FOR SMOG PICKUP TRASH IT AS ONLY 1975 CARS NEED SMOG
 

HB Chris

Well-Known Member
Site Donor $$
Messages
19,418
Reaction score
8,757
Location
Huntington Beach, CA
Alan, It is on all US coupes and helps the environment and reduces gas odors from the trunk, it does not affect performance. And 75 does not require smog testing in CA but 76 does.
 

OTOTOTO

Active Member
Site Donor
Messages
56
Reaction score
85
Location
Manhattan Beach, Ca
Your car is looking good! I probably know the answer already, but how did you manage to get the tar off and so cleanly down to metal in the cowl and air box area - a mixture of scraper blade and wire wheel or chemical strippers as I have this job on mine to do soon ?

I used a heat gun. Not much heat was needed for it to soften up, with a scraper it came off in big easy chunks.

All excess dirt and grime came off with a wire wheel on a cordless drill.
 

jpg10

Well-Known Member
Site Donor $
Messages
144
Reaction score
50
Location
Halifax, UK
I used a heat gun. Not much heat was needed for it to soften up, with a scraper it came off in big easy chunks.

All excess dirt and grime came off with a wire wheel on a cordless drill.

Thanks for that, will break out the heat gun and then the wire wheel then!
 

OTOTOTO

Active Member
Site Donor
Messages
56
Reaction score
85
Location
Manhattan Beach, Ca
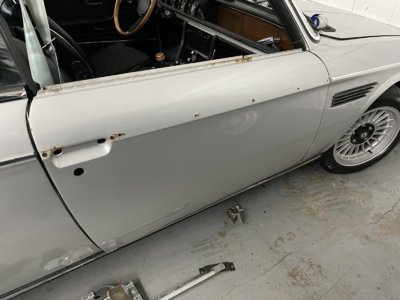
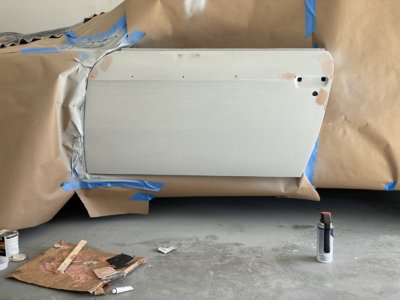
Door Refresh Part 1

I started just wanting to do a window regulator swap and ended up with a rabbit hole of things to do in the door panels and a few discoveries. Research is key again.
I have a couple e28 motors and assumed I would be doing a switch out from the sardine can motors to a faster one. I don’t see too many write ups for the newer style black motor housings but that’s what I found. However, new motors don’t seem to be the issue as much as all the gunk I found.

Before any of that, I found some ugly bits of rust under the metal brightwork, mainly where the vertical rail separates the two window panels. As planned, I want to reduce of eliminate whatever rust I can find while saving for a full restore in a few years.

83BB21DA-2BF9-4FEA-8B67-181E8CA45587.jpeg
I was able to get the bulk of it off with a wire wheel and sandpaper, enough to need a full recoat. I’ll have to live with the slight mismatch on color for now but so far it’s not as bad as expected. I found less rust on the passenger side but generally the same procedure.

722947AF-3283-4234-A57F-412CA5591D3D.jpeg

Onto the inside, I found ALOT of dried grease, the consistency of overcooked caramel.
I quickly tested the motor and it seems to be fine on speed and power

6FCB865F-E3F0-4EBB-BC1B-E73644FB5C69.jpeg


I used mostly goo off and some oven cleaner with steel wool and a brush to get the grease off. For all the smaller bits, I used a gallon of Gunk parts cleaner soaked for a few hours. Along with the window rail parts, I cleaned up the lock and handle bits which were also showing signs of binding. Last, I used a Dremel polishing when to get the exposed parts a nice shine.

42BA7422-0E85-4393-B129-9C8FF6E6AC29.jpeg


65E7A089-DC56-4806-AE56-07F0AECC6C38.jpeg
4AC386F4-F665-45AC-A7D1-467D9C4EE538.jpeg


I ordered replacement gaskets for the lock, insulation, seals, and committed to black door panels from Wallothnesh for the reinstall. I’ll save that for part 2!
 

Oldbmwcoupes

Well-Known Member
Messages
347
Reaction score
332
Location
Memphis, TN
I’ve enjoyed your thread, and love seeing a rolling restoration. Keep up the great work. Are you converting to a black interior?
 
Top