OTOTOTO

OTOTOTO

Active Member
Site Donor
Messages
56
Reaction score
85
Location
Manhattan Beach, Ca
I’ve enjoyed your thread, and love seeing a rolling restoration. Keep up the great work. Are you converting to a black interior?
Thanks! I’m going to do something two-toned. On my 5 series, I went very 80’s high contrast with Kvadrat woven fabric, Recaro Experts, red LED’s, and a bit of wood. On this one I really want to do a modern 60’s look. I’ve been circling a few leather colors for the seats that are more on the orange side, but I want to avoid a pumpkin interior. For now the black door cards will help me decide if the seats to rear panel is enough to get the look I want. I’d like to avoid going brown on the doors because you’ll lose the wood wraparound visually.

37EB99CF-A360-4F8C-A63D-E5439BA1CDAA.jpeg
2F27AF83-49DB-4ED5-BF9F-579678A6F431.jpeg


CC986218-6CDE-44E1-8DF4-054C3F7CAB3D.jpeg
 
Last edited:

OTOTOTO

Active Member
Site Donor
Messages
56
Reaction score
85
Location
Manhattan Beach, Ca
Door refresh part 2.

I got to most of what I wanted to do but not everything.
Upgrades achieved:

- driver side e28 window motor replacement
- Noico sound proofing
- new door cars + switch to black
- cleaned and refreshed cigarette tray
- new chrome caps and black plastic
- leather wrapped armrest front and back
- cleaned an regreased door locks, handle assy, window gear, and rails.

Missed
- passenger side motor replaced- just cleaned but works fine
- circular cap for fwd window adjuster, want to mill billet cap
- leather map pocket in black
- door adjustment, still can’t seem to get this perfect after a few tries, but much improved in feel at least.
- plastic moisture barrier

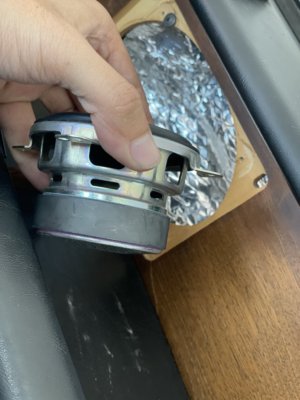
The driver side door motors were cracked and wrapped in duct tape. Definitely has been “worked on”
Luckily the e28 motors are almost a direct fit. The only problem I ran into with figment was the original bolts were too long. They’re smaller so easier to maneuver into It’s new home. While in there, it was a good time to lay down a layer of Noico sound proofing to the door panel. It now has a satisfying solid feel when you knock.

1293EB40-841F-49A9-B8B3-6BB48772296A.jpeg
C195F603-5812-421C-806A-7A163230AA4D.jpeg


If you’re doing this job, don’t forget to replace the little plastic collar for the handle leads, otherwise you’ll have a terrible rattle when closing the door. I didn’t pay attention to the assembly order coming out so had some trouble slipping assemblies past each other, but it all went in ok. The metal trim clips were almost all corroded away, luckily not too much damage to the door.

E5DC0693-FA9D-446F-AD59-2762CEF62C09.jpeg
828FEAA9-0853-4297-A3A6-52000A6F4C6F.jpeg


I didn’t think the glass would clean up as nice as it did. Removal and install was one of the easier things to do.

556B0C8F-4DA5-4294-93FA-E6706027ADA2.jpeg
AD849ACC-6C43-4D04-8219-CD2CCAEC4C49.jpeg


Next up. I got some leather wrap kits for the front and rear armrests. Gluing trick from an interior buddy, spray both sides with 3m upholstery glue and let them sit a bit before applying, that way the leather doesn’t slip when wrapping. I usually start with the stitch line and slowly glue out to the ends.

8039EC2C-48A8-445D-ADA0-F65BB7BD3F01.jpeg
70932DE6-BE1A-426D-AB00-1F12369F4ECE.jpeg
EC98D111-2DF7-4060-A27B-E074293403F1.jpeg


WallothNesh door panels were pretty nice. They don’t come with chrome trim or the leather pocket, so you’ll have to swap them with your old door parts. The originals being blue, I tried some black dye to color match, but unfortunately it left the material looking shiny. I’ll likely send it out for a reupholster, but will have to wait. The ash tray wasn’t cut out to the correct size, I didn’t feel like cutting away so left the ashtray on top for now.


F8EEF52A-85FD-4A56-A222-E7CCB94E310F.jpeg
95D416A3-1533-4137-85D5-74EB9C74F842.jpeg


In the home stretch. I have a few new chrome caps and gaskets. The circular chrome caps, I could not find, but I’m thinking of machining some nice ones instead. I took some of the trimmed leather from the armrests to replace the ashtray covers. The grain isn’t my favorite and the chrome is a bit beat up, so I’ll probably redo these someday.

6A80E606-9955-4CF6-B86A-DCBAAAE64153.jpeg
613BF8B2-216B-45A9-94BF-33811EF29C44.jpeg
E0797D2B-6A47-408E-B17D-CAD2F40D2F30.jpeg


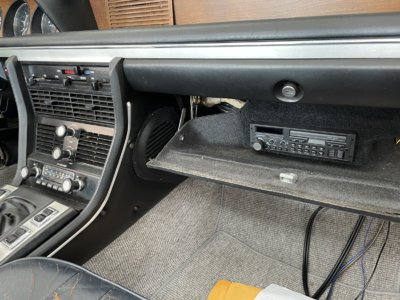
Feels nice to get it out on the road again. This 3 week detour was worth the effort. No more slow window, binding key lock, door rattles, or rusty spots. I’ll have to live with the mismatched doors, but its still an improvement.


25D8FA1C-29D5-41BF-9CC5-57A95EEC265D.jpeg


AE27D90F-7126-4BE6-95AE-EB95C526D9C3.jpeg
 
Last edited:

OTOTOTO

Active Member
Site Donor
Messages
56
Reaction score
85
Location
Manhattan Beach, Ca
Radio Upgrade Part 1

In parallel with all the door work, I wanted to start mocking up the radio situation. In general, I don’t like to cut holes and make big changes to get good audio, so I’ve purchased enough to get things started so I can drive around and form some opinions. Some of the parts list was audio odd and ends I already had. Here’s the list:

-JBL fuse 8” sub speaker enclosures
- Blaupunkt Bremen Sqr46
- 4” main ripped out of a Nest indoor speaker
- Rockford Fosgate R600X5
- red top Optima battery
- 2 gauge AWG power cable and ground
- Stetion 100 amp breaker style fuse
- Nomad Kevlar braided usb cable
- 4x RCA audio cables
- 14 gauge audio cable

The last owner installed a radio in the glove compartment, which seemed like a good thing to build on. I love having the Blaupunkt Bremen as a single din radio but it’s a bit too 80’s for his car, and I don’t want to cut out the OEM radio just yet.

25AFA908-66E7-4392-88C6-8B067CFA3819.jpeg

The red top is partial battery upgrade and partial color correction. I’m probably one more refresh away from some thing that looks clean but this will do for now. I put in a quick disconnect too, perfect for pulling power away while I re-wire this and the LED upgrade to come. Ultimately, I’d like to put in a hidden terminal somewhere so all the cables are hidden away.

1FC129BF-82E9-4C6C-B9C9-78F7CCA7D1F1.jpeg

The rest of the stuff... I’ve packed either under the rear seats or under the driver seat. There is lots of room for the amp, spare cable, and one of the sub speakers, the other going under the carpet. In my 5 series, I tucked a 10” sub into the spare tire compartment, which is a possibility here since I don’t like the asymmetric layout.

D72B0684-334E-4431-B2EC-3649E839FF25.jpeg

Blaupunkt Bremen comes with all the modern amenities, Bluetooth and USB out. For now I’m running the USB cable through the speaker opening in he dash, but no drilled holes until I decide to commit.

C3A2124A-D7FE-41AB-91DD-863834B517B3.jpeg
4119A8CF-B686-4699-A203-20F0462E07EA.jpeg
E2DF3089-348E-43F4-A1EE-CB6057673CC4.jpeg

I’ve done a couple drives with this set up. It sounds good enough, but the remote is infrared and doesn’t work through the glove box. I’d like to rig up a volume knob somewhere in the driver’s side, but no plans yet on how to keep it clean. Generally though, I keep he volume low and audio plays automatically when I plug in the phone. Most important, no one can really tell anything was done besides the USB cable!

3095A361-CE2C-486A-99AE-CB1310C5BB57.jpeg
 

Attachments

  • 036D4A39-4333-4448-A382-CDC0D62B2974.jpeg
    036D4A39-4333-4448-A382-CDC0D62B2974.jpeg
    238.7 KB · Views: 103
  • A811AF7C-5C1B-4A04-98A7-D2CA132DA127.jpeg
    A811AF7C-5C1B-4A04-98A7-D2CA132DA127.jpeg
    322.4 KB · Views: 105
  • 17E98B49-167A-4C67-81C4-AC8271E65513.jpeg
    17E98B49-167A-4C67-81C4-AC8271E65513.jpeg
    486.7 KB · Views: 105
Last edited:

JFENG

Well-Known Member
Site Donor
Messages
3,177
Reaction score
1,393
Location
Bahston (Boston)
Don’t forget to ‘baffle’ that dash speaker. If you do not acoustically isolate the front and back of a speaker’s cone cone, the speaker output will cancel itself at lower frequencies and performance will be substantially degraded.
 

OTOTOTO

Active Member
Site Donor
Messages
56
Reaction score
85
Location
Manhattan Beach, Ca
Decided to finally take care of the brakes and suspension. I went with the Wilwood big break kit from Ireland Engineering and coil over kit from Ground Control. This gave me a good number of auxiliary parts to replace and lots of areas to clean on the car!

This is not my first time doing suspension work but my first time doing brake line work, hubs, and calipers.

E5A552B8-8473-4A36-A648-E2BE5FCE1571.jpeg


671C03EA-5714-4017-BACE-A4D6C7170816.jpeg


Shopping list

Brakes:
- Wilwood big brake kit front (included hubs, stainless line, threaded studs)
- Wilwood big brake kit rear (included stainless line)
- Wilwood rear bias valve
- Ireland engineering booster refurb
- e23 master cylinder BMW 34 31 1 150 229
- brake lines via Walloth
- parking brakes pads
- parking brake hardware (springs, adjustment screw ,pad pins)
- brake hose bulkhead clips
- firewall insulation

Suspension/steering
- Ground Control full coil over suspension with camber plate
- Walloth front control arm section
- Walloth steering center bar and rod ends
- Walloth zinc coated hardware kits
- Powdercoated lower knuckle and front control arm bar
- Ireland engineering swaybar endlinks
- front bushings
- cotter pins
- rust proof coating ( matte black)
- power steering hose
 
Last edited:

OTOTOTO

Active Member
Site Donor
Messages
56
Reaction score
85
Location
Manhattan Beach, Ca
Brakes and Suspension P2

Lots of dirty work ahead.

Engine bay.

I removed the master cylinder, power steering reservoir, battery, coolant tank, and brake booster. There’s about 1/8” of grease and dirt caked on everything, so I’m pulling as much as I can to clean and recoat. If the leak still exists, this will make it easier to find in the future. The booster went straight to Ireland Engineering for a refurb, it came back in about 2 weeks looking fresh!

BB45FA68-38E2-4145-99FE-BDE29268AFEA.jpeg


2DB667D4-7684-44EC-A5B4-F4D3E6454D6D.jpeg
 

OTOTOTO

Active Member
Site Donor
Messages
56
Reaction score
85
Location
Manhattan Beach, Ca
Out with the old. These rotors have been sitting still far too long. The pads are imprinted and rears super corroded. To clean up the engine bay I took out the harnessing and horns off the front end, sent a few parts out for cleaning. I think I have all parts accounted for so far with a couple issues.

- The front swaybar seems thicker than any of the new hardware I ordered, the ends don’t look like the diagram either. I’ll just reuse old hardware for now
- the new hub/bearing kit seems to loose on the old stub even when torqued down. Ireland E is going to look at my parts to see what’s off.

9BA9C864-5596-4626-852A-88CB1AF9C11F.jpeg


F6680A41-2EA5-4539-927D-4E4A49492F9B.jpeg


2BC50D93-EDD7-463F-B4ED-71FD3211AFAC.jpeg


A97D7956-05C4-4DBC-A6AC-177222B3AC96.jpeg
 

OTOTOTO

Active Member
Site Donor
Messages
56
Reaction score
85
Location
Manhattan Beach, Ca
Still a few mysteries on this install.

Front wheel hubs (not fixed)
I built one strut on a table top and noticed a lot of loose play both lateral and in/out about 1mm each way. I tried going past the 7ft/lb recommend and it seems I cannot tighten it enough for the hubs to seat against the spindle. I took it to a local shop and they reported back the same, thinking the bearings were incorrect. Next stop was talking these over to Ireland Engineering for a look since the hubs came with their Wilwood big brake kit. Hoping its an easy fix since time to make SoCal Vintage is winding down.

55C34057-7413-40FC-9487-20EA879C8706.jpeg

Sways (fixed)
The front sways on my car are just under 30mm and seem to have a different end than the 17 & 23mm swaybar listed in the parts diagrams. This left me with not enough free threads to get the endlinks on. I ground off about 1/4” from the long spacer to take up the extra thickness and it all went together.

5F27DBC6-24FA-45FF-8728-938446A6707C.jpeg

All else seem to be going on ok. I send various bits out for powder coating and received some replacement parts from WN.
Rear struts and springs went in easily as well as the rear calipers. Rears needed a couple brake shims to center correctly and just a little trim on the brake shield with some tin snips for clearance.

82E5C7CC-BCA7-41CE-BF95-983DF308B743.jpeg

CE611115-CC14-4498-8EEF-A6A0B44D2407.jpeg

EEE12840-7D2C-47AC-970E-F5180F40DF1F.jpeg
 

HB Chris

Well-Known Member
Site Donor $$
Messages
19,418
Reaction score
8,757
Location
Huntington Beach, CA
The end link rubber is a common issue, much easier to buy a longer M8 bolt although I too have trimmed one rubber. Loose front hub is an issue that seems to haunt IE with some of their parts, I hope the fix is easy.
 

OTOTOTO

Active Member
Site Donor
Messages
56
Reaction score
85
Location
Manhattan Beach, Ca
The end link rubber is a common issue, much easier to buy a longer M8 bolt although I too have trimmed one rubber. Loose front hub is an issue that seems to haunt IE with some of their parts, I hope the fix is easy.

Mystery solved! I took it into Ireland Engineering about an hour north and Andrew pointed out the race is replaceable. Because everything was alodine I thought the hub was solid. Once removed you can see the difference in thicknesses. I pressed in some new ones and the fit is correct.

CCF2D06E-8DBF-49DC-83F8-4C84F65420F2.jpeg

1A1DBFDE-1A3A-44AC-A8F7-168EF4CFB681.jpeg

26A93BD9-6987-4617-BE6A-3D81BDF8D629.jpeg
 

OTOTOTO

Active Member
Site Donor
Messages
56
Reaction score
85
Location
Manhattan Beach, Ca
Wheels are back on the ground but still a ways to go! This marks one year of owning an E9 and I’m a bit sad it isn’t running yet, but working on the brakes, rather take the time to do it right and safe. Unfortunately this also means I may miss SoCal vintage next month since I’m only doing weekend wrenching.

34C137D4-AB47-4223-91F1-2FCBEBFAD613.jpeg


Things complete:

- front bearings packed
- front struts installed
- cross car brake line fitted
- brake booster, power steering tubes, firewall insulation upper fitted
- swaybar endlinks fitted


D3C56F30-DEE2-49C3-A281-E0EB4174F0B8.jpeg

364B0AC3-3775-48BD-BCE3-D72E5626A865.jpeg

6C462DA3-CD83-4D10-AF53-A57FE77C798A.jpeg

C1D9B154-F77D-4B0B-AE8E-4B0CAEB943A8.jpeg

The last major hurtle is running the brake lines. I chose to use Wallothnesh precut steel lines to replace a majority of the tubes, keeping only the longest one and a few rear lines. The parts supplied with the Wilwood brake kit came with 4 90 degree fittings, 4 steel braided brake lines, 2 hard lines for the rear, and two splitters (assuming you use these only if your coupling the original dual lines). The 90 degree fittings don’t seem to fit well into the calipers, they’re really tight and I don’t want to risk cross threading. The sticker was also labeled 1/8-27 NPT at the caliper but I think the fitting is an m10-1.0. At the front, the braided line ends with a male port so I think I’ll need a double flare fitting. Labeled red in my little sketch. May update once it’s more clear.

D7F75A2B-3672-4A2F-B7EB-6F563716CDFB.jpeg


Things I still need to do.

- finish brake lines
- brake fluid fill and bleed
- steering wheel alignment
- height adjustment
- front camber adjust
- power steering reservoir install and fill
- suspension tighten, cotter pins and wires
- battery and electrical
 
Top