it looks like yours are black@Stan gave me one a few years ago & has very close tolerances. It took a few minutes to get it to sit correctly.
View attachment 119255View attachment 119256View attachment 119257View attachment 119258
You are using an out of date browser. It may not display this or other websites correctly.
You should upgrade or use an alternative browser.
You should upgrade or use an alternative browser.
Trunk Roundel Gasket
- Thread starter Ohmess
- Start date
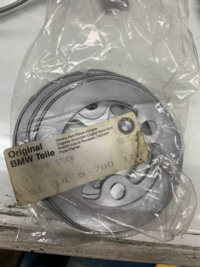
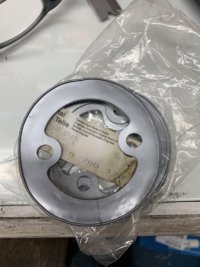
The set I bought came in a bag with an old BMW part number sticker on the bag. The part looks identical to the original one that I have other than size since the original one has shrunk. I can only assume that the new one will shrink too.
Attachments
The set I bought came in a bag with an old BMW part number sticker on the bag. The part looks identical to the original one that I have other than size since the original one has shrunk. I can only assume that the new one will shrink too.
This is consistent with my thought that the original part was designed to be more pliable, and that the material hardened over time. Markos and I were intending to shape the original part in more of an oval shape, as the gasket would be when installed. The lip that is supposed to fold up onto the base would still need to be flexible in order to hold tightly along the base, and because the outside portion of that lip is exposed, the material would need to remain colorfast even with high amounts of UV exposure.
Anybody have connections to a college with a "center for advanced manufacturing?" Maybe we could find some college kids to help us.
edit,
Last edited:
My model is “darn close”. Just needs some tweaks. I can email it to you @mark99. You can print it in ASA (UV resistant ABS). It is thin enough to easily bend. Original color is silver, as seen above. ABS grey is close.
A car isn’t necessary to complete the effort. One does need a stand-alone roundel pedestal.
Photo Credit @Stevehose

A car isn’t necessary to complete the effort. One does need a stand-alone roundel pedestal.
Photo Credit @Stevehose
edit2
Last edited:
I think I have my badge here, I will have to look, sure email it to me, IGES or STEP
I am not promising I can do this right away
Markos, have you printed some trials?
You can get a satisfactory interference fit with ABS?
I have an STL file. I have printed trials and it is close. I increase the thickness and was still able to get a good fit. I think it should be thinner though. This is a good project for someone with a 3D printer as it takes a bit of trial and error.
If you want to measure the shape of the oval, you take a piece of card stock and mount it to the pedestal. Trace the pedestal. Lay the card stock flat and measure the height and width. The roundel base is to no surprise when flattened.
It makes no sense to me that the original part was round and not oval. There is no benefit that I can think of by stretching it into place. It would also be very difficult to install.
One must ask what the original purpose of the “gasket” was. I don’t think it was to keep water out, but I could be mistaken. The belt trim and badges don’t have a rubber gasket. Why is water management a problem for the rear roundel? The front roundel would be more prone to collecting water, at least while parked. Also, there
is no gasket between the roundel
and the pedestal.
is no gasket between the roundel
and the pedestal.
Could it have meant to act as a cushion knowing some people would use the roundel when closing the trunk?
Doug, You hit the nail on the head. I never push on it as it could eventually break the mounting pins.
I am guessing its purpose is simply a gap close out, the badge is not going to fit the shape of the trunk exactly, gap / closeouts, seals, look around in an aircraft interior
and, should be the 3D shape
Last edited:
I also can use one if more are available. Thx


