VDO Kienzle clock repair

Posted on the parts forum about trying to buy a working kienzle clock. my dash clock and both spares i have when hooked up to 12V do not work. Pretty much got the idea that people sent them out to specialty clock shops paying hundreds of dollars for the work. So i decided what the hell i have the main clock in my dash and two spares in my parts inventory lets open one up and take a crack at doing the repair myself and documenting it for the forum.

1) having the clock on the work bench you’ll see the plastic white back cover has two nuts and one plastic tamper proof piece. To gain access to the clock movement and gearing this will need to come off.

A2EA0B10-0847-4CFB-8720-51C0DC0F361B.jpeg


2) the tamper proof covers the third 5mm nut that needs to come off. I cut the to small plastic ear tabs on the side of the tamper proof cover with a utility knife then just pride off with a small flat head Screw driver

C5DE2A39-AA14-4126-AEEA-54442EF22F81.jpeg


AF07F32E-FF66-4527-9426-4B4ADE2AD16D.jpeg


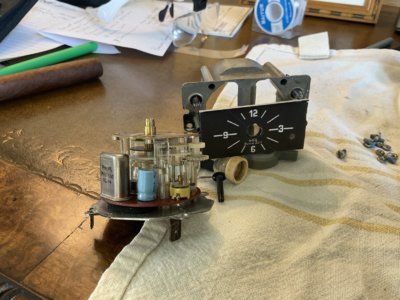
3) after sliding off the back cover you can see all the glory of german engineering. upon close examination of the gears, movements and winding mechanism i found a disintegrated soldered joint between the electrical coil and winding mechanism ( I believe it was ground side)

B4A93663-95A9-4AAE-AE5D-58AD337787A3.jpeg


A88AE2BF-3ADB-4925-8813-B3F7F935A779.jpeg


NOTE-on all three of my clocks this soldered joint had failed!!!
NOTE-this picture of the winding mechanism shows the contacts touching when this happens with uninterrupted power the left contact turns clock wise away from the right side stationary contact. This resets the mechanism and keeps the clock turning Until it happens all over again and again and again.

4) I repaired the joint with some 18-20 gauge wire and threaded it between the two eyelets twisted to tighten then resoldered.

0EEF921D-036E-409C-BA6A-94468F3D878F.jpeg


5B214843-B2B5-47CE-8E29-AAD1B8D37625.jpeg


CA8879FB-F52E-448F-88D2-9DF75CE3850A.jpeg


5) I went through the gears lightly blew any grim away and oiled all pivot points. Hooked up the clock to 12v and we were back in business and being on time for it as well. winding mechanism winds, movements move and the sound of the classic tick tick tick are great.

i did this same repair one all three of my VDO clocks and it fixed them all. Saved me a couple hundred bucks and wasn’t that tough to do. Hope this helps others out there.
 
Last edited:

Sean Haas

Well-Known Member
Site Donor $
Messages
155
Reaction score
46
Location
Chicago
this is one of my summer projects - to remove the clock is all that necessary or can you loosen the plastic nuts, rotate the clock and drop it out the back without removing the wood trim piece?
 

Frederick

Well-Known Member
Site Donor $$
Messages
358
Reaction score
276
Location
Park City,UT
No Dick, The quarts is completely different. The face is paper and says Quaz Zeit on it.
 

Attachments

  • image.jpg
    image.jpg
    366.4 KB · Views: 89

vanbavaria

Well-Known Member
Site Donor
Messages
247
Reaction score
133
Location
Vancouver B.C. Canada
this is one of my summer projects - to remove the clock is all that necessary or can you loosen the plastic nuts, rotate the clock and drop it out the back without removing the wood trim piece?
Could be possible I believe though that the way you need to manipulate the clock through the dash its easy to damage the beauty panel.
 

Sean Haas

Well-Known Member
Site Donor $
Messages
155
Reaction score
46
Location
Chicago
OK so first of all the removal instructions, very helpful. Second, the driver's side plastic retainer nut for the clock is just not coming off. I turned it for no joke 45 minutes, now I have a legit blister on my finger. Everything else came off no problem. Before I get more drastic, anyone else run into this? Any tips? Might just be stripped in some way, although it doesn't seem to slide on the shaft either, so best of both worlds. As you probably know very hard to get any grip on it to both turn and pull at the same time, unless I was a 3-handed elf. Which if anyone has one of those, I'll rent it.
 

vanbavaria

Well-Known Member
Site Donor
Messages
247
Reaction score
133
Location
Vancouver B.C. Canada
OK so first of all the removal instructions, very helpful. Second, the driver's side plastic retainer nut for the clock is just not coming off. I turned it for no joke 45 minutes, now I have a legit blister on my finger. Everything else came off no problem. Before I get more drastic, anyone else run into this? Any tips? Might just be stripped in some way, although it doesn't seem to slide on the shaft either, so best of both worlds. As you probably know very hard to get any grip on it to both turn and pull at the same time, unless I was a 3-handed elf. Which if anyone has one of those, I'll rent it.
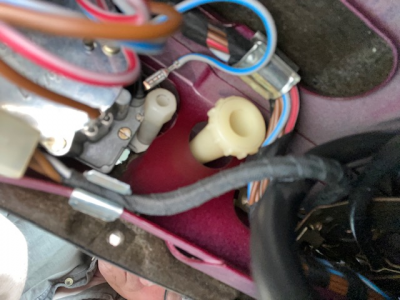
I found the drivers side clock retainer knob is a tight fit between clock threaded stud that it screws onto and the metal frame under the dash that the clock stud runs through. Taking off wasn’t to much of a hassle for me but putting the knob back on was a pain. Easy to cross thread and almost get it wedged if I didn’t take my time. I used my phone to take pictures of the area I couldn’t see to try and get a better idea what it looked liked to deal with it.
 

Sean Haas

Well-Known Member
Site Donor $
Messages
155
Reaction score
46
Location
Chicago
Yeah, snapped a pic if it's helpful to anybody. I'll give it another go tonite.
1654518032797.png
 

Attachments

  • 1654518005131.png
    1654518005131.png
    459.2 KB · Views: 80

Sean Haas

Well-Known Member
Site Donor $
Messages
155
Reaction score
46
Location
Chicago
OK - I finally got it. For whatever reason that side was on super tight and did not want to break loose. I alternated between a small 10mm wrench and a needle nose pliers to break it loose, which was not particularly easy, then once it was backed out a bit I used a 10mm socket on the end which gave my fingers space to turn the socket since I could not grab the end of the retainer knob. Then I ran out of patience so I still have to push it back through the dash. Does it go back through without removing the black bezel and faceplate? There is space on the right side barely but does not appear to be on the left, although I'll give it another go tomorrow.
 
Last edited:

mulberryworks

Mr. Fixity
Site Donor
Messages
1,243
Reaction score
612
Location
Jacksonville FL
Back to the electrical connection that seems to be the first point of failure for these mechanical clocks.

Being made of softer, low-temperature solder, they are designed to be the first things to fail. While it seems likely that the passage of time will cause the oil in the various pivots to thicken and generate more friction, it seems unlikely that will cause enough additional drain on the circuit that the temperature of the joint will rise to the melting point. I'd suggest that much like the solder used on the Bosch relays in many mid 80's Volvos, the soft solder in the clock's connection has succumbed to the influence of time, seasonal temperature fluctuations along with daily vibrations from the winding solenoid and road use have caused the joint to fail.

Thus, resoldering with regular rosin core solder is not a bad repair. But the best clock service would be to clean out all the old oil before the application of new oil. Dust and dirt left in the pivots will grind out the fittings and cause excess wear. Ideally, much like a proper watch service, the clock would be disassembled completely and cleaned with solvents and/or a bath in an ultrasonic cleaner. I realize this is unlikely for most of us. Spraying with a contact cleaner/degreaser would probably be sufficient, however.

Then a tiny amount of good quality clock or watch oil should be applied to the all pivots. I prefer synthetic oils. General use oils should not be used. An oiler can be made from a solid piece of thin wire that's had one end flattened with a hammer. It will hold a small drop of oil so you can apply it where needed. A dirty clock will run slow and simply adjusting the speed to compensate for the additional drag isn't the best solution as that will accelerate wear.

I've repaired several clocks this way with good results.
 

HB Chris

Well-Known Member
Site Donor $$
Messages
19,418
Reaction score
8,757
Location
Huntington Beach, CA
If I remember correctly the early e3 like our 2800 has the adjusting knob underneath and the later clocks have it on the face.
 
Top