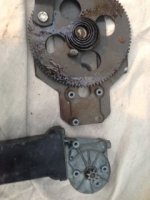
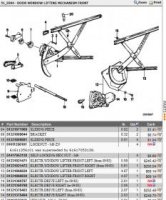
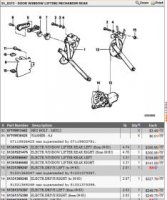
OK got the motor out. Was not able to get it out attached to the regulator but was able to remove it from the regulator and then it was easy. Motor and Regulator are just attached by the three long 10 mm bolts but the ends of the of the three points of connections are tightly tightly fitted (almost pressed). Small portion of the motor is still on the regulator. Will need to clean them out a bit. Now just need to find a motor. Thanks for all the help.
You are using an out of date browser. It may not display this or other websites correctly.
You should upgrade or use an alternative browser.
You should upgrade or use an alternative browser.
Window Motor
- Thread starter HB Chris
- Start date
stphers
Well-Known Member
Window motors
In the old days, I use to send the motors out to get them rewound with more windings to get them to go faster. That depended on how he armature was. I havent had this done in years because 1) labor now is too much and 2) cant find a decent electrical motor shop that knows how to do this any more. Perhaps in your area , you can.
Thanks, Rick
New ones are white, the tubes aren't really needed if you have a good clip but they are available.
I tried to order new clips and the tubes and the part number has been replaced with one number.
You get the green clips that work without the tubes.
I will have to disassemble further and see what the actual problem is, but the motor is still moving. I removed the cover and there are no broken teeth on the large plastic gear however there are bits of plastic shavings in the grease, The drive seems wobbles and slips on the drive, worm gear of the motor.
Motors from the rear doors of an e28 are direct replacements as well.
Honolulu
Well-Known Member
And be sure to note, DAMHIK, when you mount the transmission to the door, that the three holes on the trans that receive the mounting bolts have shoulders on them that allow them to lock into the regulator frame. YOU HAVE TO REMEMBER TO FIT THE SHOULDERS INTO THE HOLES.
If you don't fit the shoulders into the regulator frame properly, the motor/trans will wobble and the trans gear will eat up the large gear on the regulator arm. Then when it gets near the top the large gear will no longer engage, the regulator will go clunk-clunk-clunk as the gears don't mesh, and eventually fail to go all the way up.
Motor covers can be taken off and old crud grease removed/cleaned/relubricated with white grease or similar. Also use a little 220 grit wet-dry sandpaper and a minor amount of elbow grease on the copper of the armature.
I have replaced both motors and don't recall any shouldered bolts. Also, Penske shows a standard M6 bolt in the parts diagram.
I was afraid you would ask that question! My photo is for passenger side and I though it came from a passenger side e28 but can't promise. Buy two used ones, you will need another eventually.
Here's a writeup that I did a few years ago on my conversion to E-28 window motors that might be helpful
https://sites.google.com/site/kdelimon/windowmotorconversion1
https://sites.google.com/site/kdelimon/windowmotorconversion1
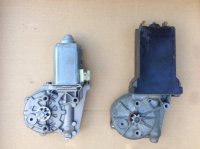
Part arrived. Look different than the original. Much smaller. Picture on the left is the new. Connections to the motor is now on the side rather than the bottom. I installed in the reverse order and it went fairly smoothly other than because the the connectors to the motor are the side they needed to be bent in order for them to fit toward the front of the door. Other than this its a direct replacement. And they are fast. I'd say twice as fast as the original and run smooth.
Attachments
I replaced both window motors on my '74 CS today with motors from the rear doors of an e28. Job went fairly well, using a lot of the info that is on this web site and this thread. I had replaced the rear window motors with e28's earlier in the week. This car has the later motors, and the e28's are almost 'plug and play' once you get the regulator and OE motor out of the car.
A few very small things to add to the description and pictures above, based on my experience today.
1. The mechanism seemed impossible to get out of the door (these doors have reinforcing braces for side impact). After about 5 minutes of tugging, twisting, pulling, I studied the system a little more, and decided to LOOSEN the nut on the bolt that holds the bottom of the front track for the windows to the door frame (just below the rear of the door brake - 13mm nut). I backed it off about 3 turns, and this gave enough movement of that track to allow the motor and major mechanism of the regulator to slide past it, then be maneuvered out the hole (the rear arm was kept in the door, high and to the rear). Once the motor etc. was out, then the arm came out easily.
2. The bolts holding the Original motors to the regulator are much longer than those used on the e28 (the e28 bolts are too short for the door motors, but perfect for the rear window swap). They are the same 6mm 1.0 thread, but 25 mm long. One of these could be used on the e-28 motors (in the hole that is drilled completely through). But, the two bolts above and below the motor 'gear' needed to be replaced by 6mm 1.0 thread flange head bolts that are 20 mm long. IF you firmly install the 25 mm bolts, the motor won't turn, as they strike the helix gear shaft attached to the armature. So - get 4 of those 20 mm bolts ($0.55 each at my Ace Hardware) before you start to do both doors!
3. Installation was reverse of removal, of course, with the regulator to the back and up, then the new motor/gears etc. moves into position. I got one bolt started but not tightened in the correct hole, then used the switch to move the window (actually, the regulator moves/rotates - pivoting on the installed bolt) up or down slightly to get the other two holes lined up and bolts installed.
4. IF you loosen the 13 mm bolt at the front of the guide, don't forget to tighten it after the motor is installed and operating!
I cleaned all the old grease off both tracks, put a generous coating of SuperLube on the tracks while the regulator was out of the door (much easier then).
Final result - both windows traverse up or down in 5-6 seconds on battery. Might be slightly faster with the engine running and alternator putting out 14+ volts. When I took delivery of the car in May, it was 18-21 seconds. Had to start rolling the window down a half mile before a toll booth!!!
MANY MANY THANKS to HBChris and others who have posted procedures on this job for cars with the later motors.
Last edited:
As I recall, only one bolt needed to be shorter but you're probably correct. Great description!
Gary, for the 74, did you have to do anything to the wiring?
From Feb/Mar 73 thru 74 motors and wires are the same, uses the e28 rear door motor. These cars have the circuit breakers under the dash.
when i installed the e28 motors i had to do the same thing
as the motor wont clear the front support
i had to assemble the motor to the frame after sliding it forward of the frame.
i used a block of wood to hold everything in place to bolt it up.
as the motor wont clear the front support
i had to assemble the motor to the frame after sliding it forward of the frame.
i used a block of wood to hold everything in place to bolt it up.
02coastie,
Yes, but all I had to change was the connections at the motors. If I recall correctly, the wires from the chassis already had shielded female spade connectors so I just installed male spade connectors on the motor wires. Be sure you get the + to +, otherwise the switches will produce the reverse action of the window!
Beyond that it was just plug and play for my car. Four motors from e 28 rear doors - two from R & two from L, remove old motors, clean old grease out of regulators, re-lube, use same bolts to install new motors. Approx six seconds up or down vs ~20 seconds with old motors.
IF I were doing it again, I'd clean up the old grease in the transmissions connected to the e 28 motors. I think that would probably reduce the time by maybe 1-2 seconds!!
Last edited:
Hi Gary, do you know a good source for e28 window motors. Cheers Victor
I got mine from eBay - search 'bmw e28 rear window motor' or put regulator in place of motor. Most advertise that way. I know I paid more than I would have at a pick and pull wrecking yard, but I didn't want to spend a lot of time searching, as there aren't that many yards near here.
Also, remember that the right rear window e28 motor is for the right rear or the left door windows on the e9 and vice versa.
Good luck.
Also, remember that the right rear window e28 motor is for the right rear or the left door windows on the e9 and vice versa.
Good luck.
Last edited:


