The Walloth front and rear seals went in easily and the corners are not lifting or curling. Who knows, they may the same supplier anyways.
You are using an out of date browser. It may not display this or other websites correctly.
You should upgrade or use an alternative browser.
You should upgrade or use an alternative browser.
Windscreen removal
- Thread starter Barry.b
- Start date
Stefan Ries is really nice to deal with. Quality is reasonable, but prices are way better for a lot of items (compared to the competitors, just my experiences for a couple of orders over the years).
His shop system is a real weak point. It's often the case, that the system tells red/not avail, but if you give him a ring to ask for delivery forecast he's coming back with: It's available still allthough his shop has a different "opinion".
So worth a try with an email or call...
If you check out my thread, covering the restoration process of my coupe, you'll find some pictures from various works, including the roof skin exchange:
 e9coupe.com
The donor for the skin was a non sunroof car, so no rust at all around the sunroof opening, which is imho the best case to do such a repair.
His shop system is a real weak point. It's often the case, that the system tells red/not avail, but if you give him a ring to ask for delivery forecast he's coming back with: It's available still allthough his shop has a different "opinion".
So worth a try with an email or call...
If you check out my thread, covering the restoration process of my coupe, you'll find some pictures from various works, including the roof skin exchange:
skin exchanges started
Hello guys, in my introduction some weeks ago I mentioned to start a restofred when it's becoming "serious". So in the meantime I already prepared more or less everything to exchange the whole outer skin. Have front and rear fenders, complete front mask, door skins, endpiece for the trunk...
The donor for the skin was a non sunroof car, so no rust at all around the sunroof opening, which is imho the best case to do such a repair.
Hi ArnieStefan Ries is really nice to deal with. Quality is reasonable, but prices are way better for a lot of items (compared to the competitors, just my experiences for a couple of orders over the years).
His shop system is a real weak point. It's often the case, that the system tells red/not avail, but if you give him a ring to ask for delivery forecast he's coming back with: It's available still allthough his shop has a different "opinion".
So worth a try with an email or call...
If you check out my thread, covering the restoration process of my coupe, you'll find some pictures from various works, including the roof skin exchange:
skin exchanges started
Hello guys, in my introduction some weeks ago I mentioned to start a restofred when it's becoming "serious". So in the meantime I already prepared more or less everything to exchange the whole outer skin. Have front and rear fenders, complete front mask, door skins, endpiece for the trunk...
The donor for the skin was a non sunroof car, so no rust at all around the sunroof opening, which is imho the best case to do such a repair.
Thanks for the photos.
When you were re attaching it to your car , did you weld it on along the sides ( on the edge near to the blue line out by the rain channel ) or did you bond it ?
Also I believe you would spot weld or plug weld it onto the windscreen flanges both front and back. ( near the yellow line )
Is that correct ??
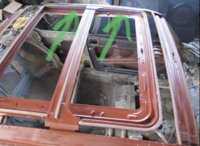
In karmann it looks like it was spot welded all around. Is that what I can see near the green arrows in my second Photo out near to the drip rail or rain channel ( spot welds drilled out )
Just wondering as I need to get my good roof skin removed without too much damage .
Thanks again !!!
Attachments
Last edited:
Hi Barry,
as you can see in my pictures, there's allready rustprotection paint (2 layers of a real good product called "Brantho Korrux") on the sunroof frame, as well as on the skins under side, after I cleaned it completely. The skin got an additional layer of sound dedending material, same as you normally use on the under carriage).
The factory did rust protection only to the areas, where they could reach any surface after the roofskin was attached to the car allready. So really ZERO rustprotection on the top surfaces of the frame and ZERO rustprotection on the underside of the skin. In between they applied some foam as bearing, that was collecting humidity as hell. So this construction ended up in a perfect playground for our old brown friend ....
This is why I recommended to remove the old and rotten skin completely, instead of just applying plasters to the open wounds.
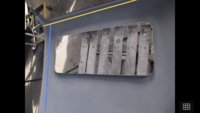
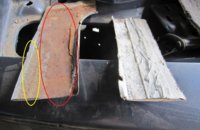
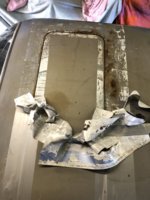
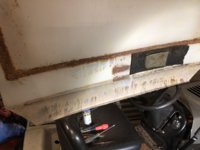
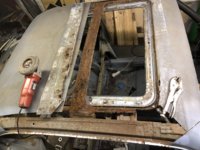
In the picture with the sheetmetal fragments you see a genuine piece of the cut out roof skin on the left. I marked the area, where you see some rest of the foam stick to the bare metal of the skin and the real bare metal area without any rustproctection, allready conquered form the rust.
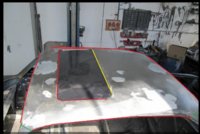
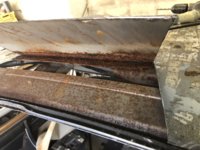
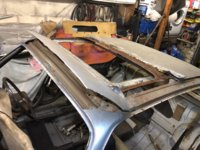
The other picture shows the positions of spot welds (red lines), crimpted rear side of the sun roof opening (yellow) and the completely welded connections to the A - and C - pillar (green).
Distance between the welding spots approx 5cm
Hope this helps ...
Greets
Ingo
as you can see in my pictures, there's allready rustprotection paint (2 layers of a real good product called "Brantho Korrux") on the sunroof frame, as well as on the skins under side, after I cleaned it completely. The skin got an additional layer of sound dedending material, same as you normally use on the under carriage).
The factory did rust protection only to the areas, where they could reach any surface after the roofskin was attached to the car allready. So really ZERO rustprotection on the top surfaces of the frame and ZERO rustprotection on the underside of the skin. In between they applied some foam as bearing, that was collecting humidity as hell. So this construction ended up in a perfect playground for our old brown friend ....
This is why I recommended to remove the old and rotten skin completely, instead of just applying plasters to the open wounds.
In the picture with the sheetmetal fragments you see a genuine piece of the cut out roof skin on the left. I marked the area, where you see some rest of the foam stick to the bare metal of the skin and the real bare metal area without any rustproctection, allready conquered form the rust.
The other picture shows the positions of spot welds (red lines), crimpted rear side of the sun roof opening (yellow) and the completely welded connections to the A - and C - pillar (green).
Distance between the welding spots approx 5cm
Hope this helps ...
Greets
Ingo
Attachments
Hi again Arnie , I think the karmann guys that spot welded mine must have been getting paid per spot weldHi Barry,
as you can see in my pictures, there's allready rustprotection paint (2 layers of a real good product called "Brantho Korrux") on the sunroof frame, as well as on the skins under side, after I cleaned it completely. The skin got an additional layer of sound dedending material, same as you normally use on the under carriage).
The factory did rust protection only to the areas, where they could reach any surface after the roofskin was attached to the car allready. So really ZERO rustprotection on the top surfaces of the frame and ZERO rustprotection on the underside of the skin. In between they applied some foam as bearing, that was collecting humidity as hell. So this construction ended up in a perfect playground for our old brown friend ....
This is why I recommended to remove the old and rotten skin completely, instead of just applying plasters to the open wounds.
In the picture with the sheetmetal fragments you see a genuine piece of the cut out roof skin on the left. I marked the area, where you see some rest of the foam stick to the bare metal of the skin and the real bare metal area without any rustproctection, allready conquered form the rust.
The other picture shows the positions of spot welds (red lines), crimpted rear side of the sun roof opening (yellow) and the completely welded connections to the A - and C - pillar (green).
Distance between the welding spots approx 5cm
Hope this helps ...
Greets
Ingo
")
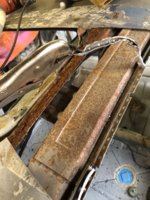
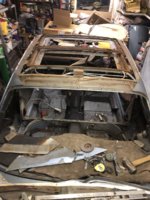
Anyway I am just starting at the roof today.( I still have more to cut )
And as expected I found lots and lots of rust.
But I am happy doing it the Wright way .
It is just a bit scary !!!
She is a relatively rare and special car to be attacking with the grinder after all !!!
Attachments
-
 98BE22C1-9BDD-4200-A7EE-91674F1CBCF8.jpeg301.1 KB · Views: 257
 -
 2EA111B0-8C9A-4B68-AC69-100DF1110DA7.jpeg282.7 KB · Views: 252
 -
 C095C4E9-4E54-47FB-B6AA-E5249BF039A3.jpeg311.9 KB · Views: 261
 -
 57518A2C-6A66-4EF6-9579-310B5DD2DBAF.jpeg304.5 KB · Views: 260
 -
 B4C61494-D062-43A1-BEDF-2F13D3C9B0D6.jpeg384.6 KB · Views: 242
 -
 655B3058-1336-4FF3-8C61-8E949FCCBE6C.jpeg347.1 KB · Views: 242
 -
 DC05D386-15C2-4A1E-B635-ADF02BBE7698.jpeg333.2 KB · Views: 245
 -
 DBDB9BB4-D07F-49B5-8D54-351A817C7C35.jpeg385.9 KB · Views: 243
 -
 47D1B00B-81BA-4369-B90F-59F3309A9213.jpeg334.3 KB · Views: 247
In one of the sales brochures BMW talks about rust protection and shows a photo of the body being dippedHi Barry,
as you can see in my pictures, there's allready rustprotection paint (2 layers of a real good product called "Brantho Korrux") on the sunroof frame, as well as on the skins under side, after I cleaned it completely. The skin got an additional layer of sound dedending material, same as you normally use on the under carriage).
The factory did rust protection only to the areas, where they could reach any surface after the roofskin was attached to the car allready. So really ZERO rustprotection on the top surfaces of the frame and ZERO rustprotection on the underside of the skin. In between they applied some foam as bearing, that was collecting humidity as hell. So this construction ended up in a perfect playground for our old brown friend ....
This is why I recommended to remove the old and rotten skin completely, instead of just applying plasters to the open wounds.
In the picture with the sheetmetal fragments you see a genuine piece of the cut out roof skin on the left. I marked the area, where you see some rest of the foam stick to the bare metal of the skin and the real bare metal area without any rustproctection, allready conquered form the rust.
The other picture shows the positions of spot welds (red lines), crimpted rear side of the sun roof opening (yellow) and the completely welded connections to the A - and C - pillar (green).
Distance between the welding spots approx 5cm
Hope this helps ...
Greets
Ingo
Was it being dipped into a bath of seawater by any chance ???In one of the sales brochures BMW talks about rust protection and shows a photo of the body being dipped
")
that's funny, I would say Photoshop but they didn't have it back thenWas it being dipped into a bath of seawater by any chance ???
Being fair there is or was something running along the underneath of the roof skin , it is creamy in colour but looks like it was a very light / thin paint or something.that's funny, I would say Photoshop but they didn't have it back then
The moisture retaining sponges seems to have “taken care” of most of it though .
Attachments
Wow... This is something I'm expecting also in my... What a pain with all of the rust underneath!
Lucky You, finding a donor car/roof section. It has to be a masterpiece to make it from piece of steel in case there is no replacement part.
Have you been using spot weld removal drill or standard one? I would only use special, good quality one (probably 6mm dia) to avoid drilling through the base frame.
Hi I have a standard drill which I reground to make the tip less pointed and more flat, and yes you are correct you need to be careful of the base frame below it.Wow... This is something I'm expecting also in my... What a pain with all of the rust underneath!
Lucky You, finding a donor car/roof section. It has to be a masterpiece to make it from piece of steel in case there is no replacement part.
Have you been using spot weld removal drill or standard one? I would only use special, good quality one (probably 6mm dia) to avoid drilling through the base frame.
I did unintentionally drill through it in a couple of places , so I will have to weld them up before going forward with the job.
This is a big job alright , so much rust !!!
Hi again ArnieHi Barry,
as you can see in my pictures, there's allready rustprotection paint (2 layers of a real good product called "Brantho Korrux") on the sunroof frame, as well as on the skins under side, after I cleaned it completely. The skin got an additional layer of sound dedending material, same as you normally use on the under carriage).
The factory did rust protection only to the areas, where they could reach any surface after the roofskin was attached to the car allready. So really ZERO rustprotection on the top surfaces of the frame and ZERO rustprotection on the underside of the skin. In between they applied some foam as bearing, that was collecting humidity as hell. So this construction ended up in a perfect playground for our old brown friend ....
This is why I recommended to remove the old and rotten skin completely, instead of just applying plasters to the open wounds.
In the picture with the sheetmetal fragments you see a genuine piece of the cut out roof skin on the left. I marked the area, where you see some rest of the foam stick to the bare metal of the skin and the real bare metal area without any rustproctection, allready conquered form the rust.
The other picture shows the positions of spot welds (red lines), crimpted rear side of the sun roof opening (yellow) and the completely welded connections to the A - and C - pillar (green).
Distance between the welding spots approx 5cm
Hope this helps ...
Greets
Ingo
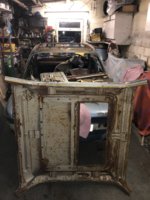
Did you ever consider replacing the roof completely . Ie cut the 4 pillars and weld on the new roof completely .
I am just wondering as it looks like I will need to replace my sunroof support frame also as mine is rusted so badly. The one on my donor roof is not rusted out.
So would it be a bad idea to replace the whole lot in as 1 large piece ?
I must say I would prefer not to cut the pillars
But I have never replaced a roof before.
Attachments
Barry,
since the main issue with the sunroof is the area in between the frame and the skin, that you can't reach, if you don't devide these two parts, I'd only consider to replace the whole roof if the car had a rool over i.e..
But in this case you can't protect the roof against rusting away once again in a reasonable way.
I would recommend to repair the frame in your car, sacrify the frame of the donor roof and prepare that skin with as much as possible demage while you seperate the skin from the rest.
Preparing it to go into your car, should be easy as the installation is as well.
To exchange the complete roof is WAY more risky and complicated, cause you need to be rather precise in cutting both.
And the main you weaken the allready weak integrity of the chassis and might not reach every layer by welding it on. So you'd need to reinforce the pillars as well I think.
So not my prefered way to go for that job ....
Greets
Ingo
Last edited:
OkayBarry,
since the main issue with the sunroof is the area in between the frame and the skin, that you can't reach, if you don't devide these two parts, I'd only consider to replace the whole roof if the car had a rool over i.e..
But in this case you can't protect the roof against rusting away once again in a reasonable way.
I would recommend to repair the frame in your car, sacrify the frame of the donor roof and prepare that skin with as much as possible demage while you seperate the skin from the rest.
Preparing it to go into your car, should be easy as the installation is as well.
To exchange the complete roof is WAY more risky and complicated, cause you need to be rather precise in cutting both.
And the main you weaken the allready weak integrity of the chassis and might not reach every layer by welding it on. So you'd need to reinforce the pillars as well I think.
So not my prefered way to go for that job ....
Greets
Ingo
Apologies for all the questions.
Yes I think I need to slow down, take a step back and take my time to remove my good sunroof support first from the donor.
Which will mean I will then get access to the surface rust on the donor skin .
Then I need to weld the good sunroof frame into my car .
Then I need to do the re skin.
I will not cut my pillars. It is too risky !!!
Thanks again !!!
Hi James , yes it all helps !Couple photos of my roof swap, non sunroof but maybe it helps. Good luck!
View attachment 118577View attachment 118578View attachment 118572View attachment 118573View attachment 118574View attachment 118575View attachment 118576
Did you re do any spot welds along the sides and in both windscreen frame openings or have you used the adhesive in those areas?
Hi James , yes it all helps !
Did you re do any spot welds along the sides and in both windscreen frame openings or have you used the adhesive in those areas?
I believe it’s all bonded with adhesive.
These should be added to the Media section if you haven't already.Not sure if getting just the panel out will be enough to comfortably access the sunroof section & your potential rust areas.
Once you have the panel out, the worst part is over.
Unclipping a few baleens is actually quite easy and will provide much better access. You only need to re glue the edges, but I think you need to glue anyway when you remove the formed panel.
Consider that if you require to weld, you need to have the headliner out of the way anyway, as sparks fly everywhere.
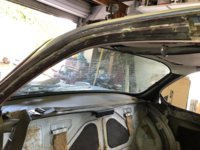
Here's some pics that may help you from my car (which has no sunroof as you'll see.) Important hidden things are the 2*2 small rivets hidden under the roof trim. I also think that it requires the rubbers & alu trim to be pulled i think).
roof+A-pillar; just left of the middle are 2 rivits normally that are hidden. I think it is the same for sunroof cars. In my car it located the textile headliner and also the front headliner panel.
View attachment 118251
View attachment 118252
after removal of panel, sunvisor mounts and rearview mirror (no sunroof car):
View attachment 118253
pull glued textile
View attachment 118254
To unhook baleens, push them up in the middle; pull them out of the plastic guides. this actually is very easy, and creates much more access to the roof.
View attachment 118255View attachment 118256
I thought they are available for all to see ?These should be added to the Media section if you haven't already.
[/QUOTE
I am not sure how to do that ???
They are. The Media section is just for photos but they have to be uploaded separately. It's nice to have helpful images stored there.I thought they are available for all to see ?