woodworking question

bavbob

Well-Known Member
Site Donor
Messages
3,372
Reaction score
1,585
Location
Boston, Ma
Laquer is nice if you can achieve that mirror finish but if you have never done it before, now is not the time. Also it does not hold up as well to water etc.

Charlie, kind of an old New England approach gone Hawaiian. We use bees wax, linseed oil and turpentine in equal parts. I too put it over poly in the places that need a tough surface to give it a nice patina while knowing it can handle abuse and can just reapply the bees wax stuff when needed.

Poor Stan, he has a huge decision tree to contend with.
 

dave v. in nc

Well-Known Member
Site Donor $
Messages
3,034
Reaction score
1,210
Location
North Carolina, USA
please dont..

I believe the suggestion was an either/or, so in a word, no...The bee's wax, coconut oil, linseed, olive oil, ear wax, bowling alley wax, etc are all what I would call treatments...the word "finish" does imply that, when you complete the process, you are done, or finished. All of the others are in a category that will need refreshing, even if on your wood desk in your study. Most antiques that are very dark/black, are because of the boiled linseed oil/wax, or just beeswax, that has taken on dirt, coal or other soot/smoke...for a car, especially a wooden tiller, the finish should be something that will polymerize (set-up, harden, cure, etc), like tung oil, lacquer, polyurethane, polyester, etc....and be able to withstand oils, moisture, and acids of your hands, and the temp variants that a car goes through..There is a reason that most wheels have a polyurethane top coat, or finish. Even catalyzed lacquer, which is very hard and durable indoors, is brittle and will crack..ask Doug Cain..sorry so wordy. Just kidding about the ear wax...
 

Stevehose

Well-Known Member
Site Donor $$
Messages
13,004
Reaction score
5,679
Location
Sarasota, FL
I would think not, it will prevent the laquer from penetrating the pores of the wood and will likely peel off.

Speaking from a noob experience when I refinished a wheel, patience is key. You will have runs, drips, and probably a lot of frustration. Light coat once a day and let dry 24 hours before another. Can wet sand out the imperfections between each coat and hopefully the learning curve is complete before getting a nice flawless final coat.

Try to spray and dry indoors, you wont believe the crap that floats around in the air and lands on the damned thing.

I used marine varnish applied with a foam brush on mine and it came out nice, but it took 2 weeks to do. Not sure about laquer but I thinned the first few coats for better coverage and penetration into the wood, gradually moving to full strength. I probably did 10 coats.

Can I use the 2K spray over the bees wax concoction?
 

Stan

Well-Known Member
Site Donor $$
Messages
7,007
Reaction score
1,526
Location
Newmarket, New Hampshire
Steve, a lot of the product I have looked at say to have adequate ventilation.
I am thinking that the basement may not be the best place
 

Stevehose

Well-Known Member
Site Donor $$
Messages
13,004
Reaction score
5,679
Location
Sarasota, FL
I painted my wheels in the basement. I set a work table underneath the window into which I put a box fan to draw air out. I put another box fan at the top of the stairs pushing air down, creating a draft to take the fumes out right away.

Steve, a lot of the product I have looked at say to have adequate ventilation.
I am thinking that the basement may not be the best place
 

bavbob

Well-Known Member
Site Donor
Messages
3,372
Reaction score
1,585
Location
Boston, Ma
I have a hanger hanging from the ceiling in my basement, all things get hung on there to paint. All doors open. Keep in mind we supposedly lose 1% of our smell each year of our life.........let you know if it's true when I hit 100.

I stand behind the 2K poly to get a great, smooth, durable finish with less effort. Nothing before it other than wood stain if desired and let that dry for 3 days (oil, 2 days water-based....). I never use any water-based product because it has inferior durability.
 

Stan

Well-Known Member
Site Donor $$
Messages
7,007
Reaction score
1,526
Location
Newmarket, New Hampshire
Ordered 2K.
My sense of smell is shot already.
I have one door and one window in the basement. Might do it in the garage.. 12' ceiling, epoxy floor, probably less dust than the basement.
 

Honolulu

Well-Known Member
Messages
1,918
Reaction score
226
Location
Honolulu Hawaii
Stan I think if you've applied an organic oil (olive, coconut, linseed...) these will not allow a solvent-based "varnish" to go on well b/c the solvent will solubilize the oil and it will not evenly disperse, resulting in fisheyes or worse.

Paint strippers with methylene chloride may go right through some gloves and really put you in a world of hurt. Methylene chloride is also carcinogenic.
Avoid it if possible.

Some coatings have surfacing agents which rise to the top and aid cure. These may have to be removed for subsequent coats to adhere properly.

A true "varnish" cures by oxidation. Early paint (think Henry Ford "any color you want as long as it's black") was linseed oil based IIRC. The chemical process is one way only.

A "lacquer" is solvent based and subsequent coats partially solubilize the surface and "mix" with them, promoting a good bond without much prep beyond light fine sanding.

Urethanes cure by irreversible chemical reaction but require prep for adherence of subsequent coats. They can be REALLY REALLY toxic so be sure to have adequate PPE.

Epoxies are tough but some will yellow with sun exposure. They can be had in various two-part formulations. Mix ratios can vary from 5:1 to 1:1. Hardeners can be "slow", "medium" or "fast". This material is 100% reactive so there is usually no solvent as sold. Caution: it likes to be mixed in exactly correct proportions. I use discarded syringes for small batches I use for various projects around the place. Heating epoxy (such as in a microwave) will thin it out and can be useful. Epoxy is a structural adhesive, which means it's useful as a crack filler, which a "glue" will not be. Epoxies can be tinted or pigmented by the user with commonly available colors used for polyester (surfboard) resins, but verify with the seller that the color base chemistry is compatible. As noted above, you thin and clean up with denatured alcohol (DNA) which is relatively cheap and easy to find. Be sure that if you thin with DNA, there is enough time for it to evaporate before the cure occurs. Some epoxies like to be heat cured at up to 140 degrees F to fully harden. Using fast hardener in full sun or filling thick areas (not likely to happen in your application) can release enough heat to boil the material before curing. The result is ugly. All this I've learned the hard way, that's me.

Some people are terribly allergically sensitive to some epoxy products, but only discover this the hard way. You can't know in advance; and some develop the reaction after successfully using the product for a long time.

The application described in the Ferrarichat link is good, but I would reiterate to blow ALL the dust out of the wood before application. Expect a first coat to be just a filler/surfacer, rough and require sanding unless your prep has been really good. This likely applies to any other finish as well.

The yacht types are where the money is, and where the finish companies will have spent their R&D money. If you have a yacht store in the area, or can speak to people who maintain the wood on someone's high-dollar boat, ask them what they use that promotes shine, resist yellowing and aging in sunlight. It used to be that properly prepping and applying varnish was a high and exacting art but I think modern finishes are more tolerant and have obviated some of the refinishing tedium.

As we all know. the 6P rule for finishes goes something like: Proper Preparation Prevents Piss-Poor Performance. A clean surface and clean environment are essential elements of successful refinishing.
 
Last edited:

eriknetherlands

Moderator
Site Donor
Messages
2,772
Reaction score
2,006
Location
Netherlands, Eindhoven area
My trick to get the old paint from a wooden steering wheel

Hi, just to add what worked best for me to get the old, cracked paint layer (appearently cellulose) from my steering wheel.

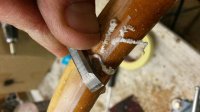
The best method I found to work well was use a chisel. The pointy end worked well to get the chips off that were already half detached, and the areas around it. It seems that humidity or so loosened the bond already there.
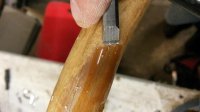
On the areas where the paint was still ok, it was tough, not brittle, so trying to chip it doesn't work. I used the side of a chisel for this; it has a clean, 90 degree steel edge. When scraping over the paint, it causes chips of the paint to fly of where it still brittle. In tougher paint it scrappes white curls from the paint . Best thing; the wood to stays ok if your carefull. (mind you it's just 1 millimeter thick in most places!)

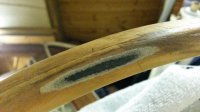
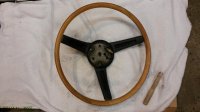
I purchased for 30 dollar this used steering wheel, which showed a lot of cracks in the paint, filled with dirt and grease, and chips of paint already lost along its 40 year trip. The black spokes however were pretty OK, with only one small crack in the rear. I thought i'd give the wood a try, peel of the old paint and reapply. Worst thing that could happen is that I would damage the wood... I did.

I tried many things, amoung others paint remover. Indeed no go. sanding it of by hand gave me directly one huge 'sand through'. The wood layer is just 1 millimeter thick, and seems to be on a canvas carrier. So i'll likely follow the tip from this thread to use the wood dust to cover it up.

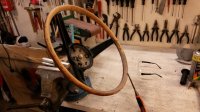
In the meantime i bought a second wheel, that's now also scraped and chipped clean. This one however has many cracks in the black spokes....
So ideally i'd like to combine the wood from one with the spokes from the other:(
 

Attachments

  • 20141119_221940.jpg
    20141119_221940.jpg
    94.9 KB · Views: 157
  • 20150608_235927.jpg
    20150608_235927.jpg
    93 KB · Views: 150
  • 20150608_235902.jpg
    20150608_235902.jpg
    92.8 KB · Views: 148
  • 20141111_205036.jpg
    20141111_205036.jpg
    97.9 KB · Views: 146
  • 20141119_221737.jpg
    20141119_221737.jpg
    94.1 KB · Views: 153
  • 20141101_225910-01.jpg
    20141101_225910-01.jpg
    95.3 KB · Views: 153

Stan

Well-Known Member
Site Donor $$
Messages
7,007
Reaction score
1,526
Location
Newmarket, New Hampshire
At this point I am very happy with the wood. I will use 300 and 500 grit for one final smoothing the spray with the 2K clear epoxy.

After it cures I will wrap the wood and start working on the black spokes. I think Andrew's recommendation for the Minwax high performance filler (like a Bondo) will do a nice job followed by semi gloss black paint. The horn buttons are fought but I have a better set. Just need to remove and replace.

All I need now is to find the little trim pieces I took off last year before I relocated.
 

Stan

Well-Known Member
Site Donor $$
Messages
7,007
Reaction score
1,526
Location
Newmarket, New Hampshire
Fine Cracks

I have the Minwax High Performance Wood filler and JB Weld.
Since the Minwax needs to be done "with adequate ventilation" and the JB Weld was already open, I tried it on the back of the steering wheel.

Where the cracks were wide, the JB Weld seems to do a good job. Where the cracks are hairline, it is really hard to tell. I think I want to get al the repair work done before and painting or "varnishing"

Is there anything else I could use that is more liquid in consistency?


The wood part is ready for clear. The sanding with 300 and then 600 grit left it smooth as glass.
 

Honolulu

Well-Known Member
Messages
1,918
Reaction score
226
Location
Honolulu Hawaii
Epoxy and polyurethane resins can be tinted or pigmented with the same ester-based tints and pigments available from your local fiberglass store, if you have one.
 

Stan

Well-Known Member
Site Donor $$
Messages
7,007
Reaction score
1,526
Location
Newmarket, New Hampshire
Epoxy and polyurethane resins can be tinted or pigmented with the same ester-based tints and pigments available from your local fiberglass store, if you have one.

I am OK with any color since this is for the spokes. I need something liquid enough to fill in fine cracks in the spokes. Then I will paint after I get them smooth.
 

mark99

Well-Known Member
Site Donor
Messages
1,505
Reaction score
260
Location
Kirkland WA
I just skim read the thread so I might have missed this
For thin cracks, where you are going to paint, I think is super glue
You can fix filler into it
The advantage is capillary action will draw it into the crack
People use it on wood repair also, mix in sanding dust from the same wood
Will not stain the same, so better for clear finish
I have done some rifle stocks (small chips) and they look great
For larger painted fill areas, Goop SuperMend at any Lowes etc. works great
build it proud of the surface, let firm up and shave off with sharp exacto befor it gets hard
 

Stan

Well-Known Member
Site Donor $$
Messages
7,007
Reaction score
1,526
Location
Newmarket, New Hampshire
Mark,
The plastic spokes of the steering wheel have hairline cracks.
I will try crazy glue and hope for capillary action then sand and paint!
Thanks!
 

Ivari

New Member
Messages
1
Reaction score
5
Location
Estonia
I hope the following will help someone that have the same issues. My steering wheel had also several small cracks at the spokes. Firstly sanded everything down with P180, then filled every single crack with super glue. Next day again used P180 to remove all excessive glue and make everything smooth, then P240 and finally sprayed 3 coats of high filling primer:

20171101_232004.jpg


Next sanded it with P400 and P600, cleaned everything and examined if there were any cracks left, fortunately not (so superglue and primer will fill hairline cracks successfully, for bigger ones use filler or 2k PUR plastic glue). Next step was painting:

20171105_161408.jpg


Finally wet sanded everything with P2000 and polished with 3M green and yellow paste. Also added 2 coats of clear coat for the wooden part (as there were no cracks and only scratches in original clear coat it was not necessary to sand everything down to bare wood, just slightly went over with P600/800 for the new clear coat to stick). I am more than happy with the results, better than new:

IMG_1523.JPG

IMG_1524.JPG

IMG_1525.JPG

IMG_1529.JPG

IMG_1528.JPG


And finally now it was worthy to go next to my other steering wheels :)
BMW_Wooden_steering_wheel_holzlenkrad_Nardi_Petri_collection.JPG
 
Last edited:

Markos

Well-Known Member
Site Donor
Messages
13,369
Reaction score
7,503
Location
Seattle, WA
Lovely! It is amazing what one can do with paint and sandpaper. That looks better than new!

Your wall is impressive. I had a line on one of those 2000ti wheels but someone else offered him $800
for it. :(
 
Last edited:
Top