For those contemplating such a project, I recently completed my York to rotary a/c compressor upgrade. Keeping with R-12. In prior posts on this subject there weren't a lot of specifics so I am trying to offer some here for the novices like me. Project included:
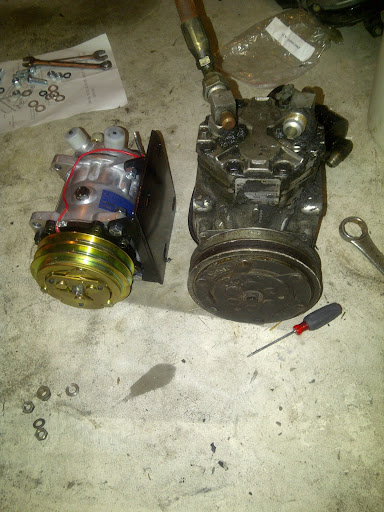
-switch from old York boat anchor to "Sanden style" 709 compressor and York mounting bracket from Johnjoysyl eBay seller ($190 for both and must be at least a 15lb weight savings):
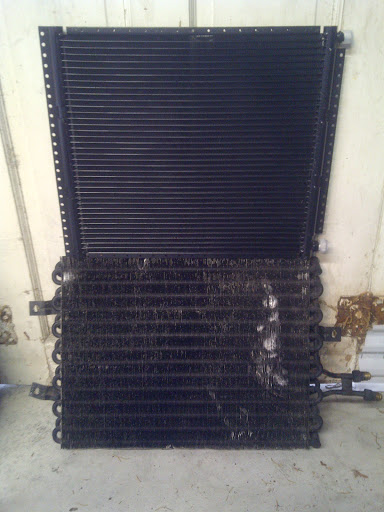
-replace old crusty condenser with modern 16x18" parallel flow version from nostalgicairparts.com ($90):
-new dryer from RMEuropean ($30) and
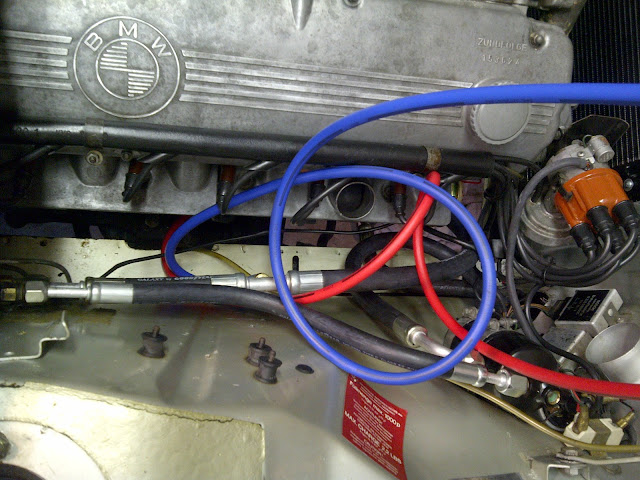
-new a/c hoses from local hydraulic hose shop ($75) - wish they were like the cool oem red ones but such is life (the red and blue shown here are the gauge hoses):
-recored the radiator to triple core by local radiator shop ($350)
-new water pump from RMEuropean ($45)
-new fan clutch found NOS online bargain ($35)
-hose fittings and copper flare washers from NAPA ($40)
It's not a difficult process, but it took 2 full weekends to complete.
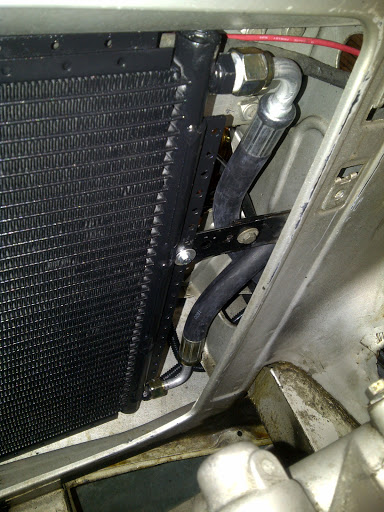
Fabrication included making some bracket extensions for the condenser to fit the existing one seen in this pic:
and having a machine shop extend the compressor mounting bracket bolt slots so the pulley would line up correctly:
The evaporator and dryer have flare fittings, the new compressor and condenser have o-ring fittings so you have to get some hoses made that mix/match the fittings. So for my setup they were:
[FONT=Calibri, Verdana, Helvetica, Arial]
1. Compressor to condenser: 40” total length, 45 deg #8-8T O-ring compressor out to 90 deg #8-8T O-ring condenser in. #8 hose.
2. Condenser to dryer: 39” total length, 90 deg #6-8T O-ring condenser out to 90 deg #8-8T flare dryer in. #8 hose.
3. Dryer to evaporator: 19.5” total length, straight #8-8T flare dryer out to straight #6-8T flare evaporator in. #8 hose.
4. Evaporator to compressor: 33” total length, straight #10-10T flare (with separate #10 R-12 port spliced in) to 90 deg #10-10T O-ring. #10 hose.
Total length = hose plus fittings. I installed an R-12 port into the low side evap-to-compressor line for convenience and 3rd degree burn elimination. I thought my dryer came with a high side port but it didn't so at some point I will replace with one that does.
Basically the order of work was:
-had freon evac'd by a/c shop
-remove radiator and brought to shop for recore
-remove front grilles and headlight assemblies (I removed the bulbs and cleaned the glass insides with rubbing alcohol - huge difference)
-disconnect hoses and remove old condenser
-disconnect and remove York (a major PITA with hidden bolts and 40 years of gunk)
-disconnect and remove dryer and vibration damper
-clean as much as possible with newfound access to areas (I also sprayed Penetrol into the nose, bumper, and headlight areas for rust protection)
-install condenser after making some bracket extensions from metal strip from Lowes
-lengthen slots on compressor bracket as much as possible (machine shop) and install compressor to stock York bracket on block.
-mount dryer but keep caps on until ready for hose fitting
-measure and re-measure (I used rope) the lengths you want for hoses
-source fittings and bring to hose shop and have them make up the hoses (they can probably order the fittings you need if NAPA doesn't have them)
-install hoses and tighten carefully
-bought cheap suction pump from Harbor Freight ($100) and some nice R-12/R-134a compatible gauges from online supplier ($50) - draw vacuum to -30 for an hour or so and then tighten gauges and turn off pump and see if it holds vacuum-mine didn't at first so I tightened everything a little more - this is why you don't install the radiator yet in case you have to get to condenser again - vacuum now stable
-installed water pump, fan clutch and new radiator
-I put in about 1/2 lb more freon than spec to account for bigger condenser capacity - no sight glass bubbles.
NOTES ON COMPRESSOR CHOICE:
[/FONT]The 508 and 709 is the designation of pistons and displacement, the 508 has 5 pistons and 8 cc or something, the 709 has 7 pistons and 9 cc. Both have the same body size and would fit. The other designations pertain to the type of clutch and fittings and where they are located on the compressor, some come straight out the back, others go up, I chose the latter for clearance reasons. Depending on which refrigerant you are going to use, you'll want it to come with the right oil in it, fittings that come up not staight back, and the correct service ports for your refrigerant (they are different for r12 vs r134), and a double pulley clutch not serpentine belt. The 508 probably takes less hp to run than the 709 but that's just a guess.
[FONT=Calibri, Verdana, Helvetica, Arial]
The upgrade is like night and day - the compressor is smooth, no vibrations, and silent, only reduces the idle rpm slightly when on, and the new system cranks out frigid air into the cabin - I can drive in 95 degree heat/humidity and be fine inside the cabin, and the system will actually cycle because it gets plenty cold. With the more efficient radiator, there's no going past halfway on the gauge with the a/c on in the broiling heat here.
[/FONT]
")