1970 2800CS restoration - in preliminary stage

So not a ton of progress here as work and the new garage has kept me hopping on other fronts.

I was going to send the brake booster out to be rebuilt but then I thought better of it and decided to buy one from Hal and have both the small one and the original so that whatever I decide to do in the future I'd have options.

Installation of the booster was pretty straight forward. I also installed a new master cylinder that I had pickup up at the same time.

I don't quite have it dialed in as my braking is very close to the floor at this point. I took the measurements off the old actuating rod but I think someone had messed with the adjustment big time. Now I just have to figure out if I need to shorten or lengthen the rod.

As most of you know when installing the smaller diameter but much longer booster you have to massage the lines to go a bit farther into the engine bay. Not a hard job by all means.
 

Attachments

  • 20240307_123438[1].jpg
    20240307_123438[1].jpg
    284.7 KB · Views: 68
  • 20240307_143133[1].jpg
    20240307_143133[1].jpg
    366 KB · Views: 67
I also started rebuilding the Zenith 35 / 40's I picked up on Ebay.

I will not be putting these on most likely until after the car is in "official restoration" but I thought I would see what I've got.

They came complete with intake manifolds and appear to possibly be off an automatic car?

I especially like the "gasket" someone made at some point in time :oops:

All in all they are good cores. The one choke mechanism is pretty toasty... the other is okay. I will have to source the water connection cover for the rear carb somewhere.
 

Attachments

  • 20240305_134555[1].jpg
    20240305_134555[1].jpg
    478 KB · Views: 81
  • 20240305_141705[1].jpg
    20240305_141705[1].jpg
    296.8 KB · Views: 66
I meant to do a compression test on this engine long ago and just never got around to it. Well we do have an issue... number 3 is very lazy. Doesn't matter as we are going to do a rebuild on the engine, trans and rear end as part of the restoration anyway.

Pardon my chicken scratch. I was having an issue with the gauge seating on 3 and 4 so I went back multiple times and redid those cylinders. Didn't matter... number 3 still sucked each time.

Also, I have noticed I am burning oil at a pretty good clip. Haven't run it much and I am down maybe a half quart.
 

Attachments

  • 20240312_142312[1].jpg
    20240312_142312[1].jpg
    181.1 KB · Views: 61
With the brakes "safe" and it running as well as can be expected right now it is time to get it down to the BMV for it's inspection. Well we kind of have to this week as the temporary tag expires end of the week.

I've driven in there with a expired temp before... they don't like that.... at all
 
I also started rebuilding the Zenith 35 / 40's I picked up on Ebay.

I will not be putting these on most likely until after the car is in "official restoration" but I thought I would see what I've got.

They came complete with intake manifolds and appear to possibly be off an automatic car?

I especially like the "gasket" someone made at some point in time :oops:

All in all they are good cores. The one choke mechanism is pretty toasty... the other is okay. I will have to source the water connection cover for the rear carb somewhere.
Todd,

Aren't these Zenith's maybe for a
20231215_164412.jpg
3.0cs? Carb top where the choke linkage comes up looks different than on the 2800.
 
And yes... I know they are mismatched as well. Only paid $200 for these. Not like they are concourse or anything. They'll do with some replacement pieces parts.
 
One smushy Trans mount changed... needed some garage therapy today.
 

Attachments

  • 20240327_115759.jpg
    20240327_115759.jpg
    380.6 KB · Views: 51
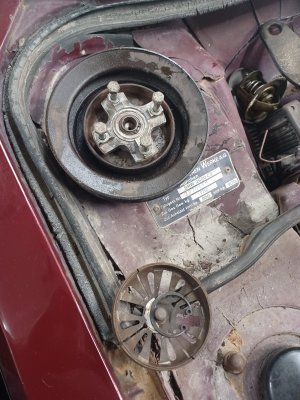
Well have the offending water pump out. Waiting on the replacement.

No wonder this thing was making a racket. The guts of the fan must have gone bad and someone screwed the fan directly to the water pump but left all the crap inside ... snap ring just laying there... things jingling around everywhere.

But my theory what actually killed the pump was that the alternator bushings were shot and it was sitting all cockeyed for who knows how long.
 

Attachments

  • 20240329_125649.jpg
    20240329_125649.jpg
    367.7 KB · Views: 52
  • 20240329_125616.jpg
    20240329_125616.jpg
    292.3 KB · Views: 52
That's a lot of stuff to remove just to get at a waterpump

Well ... changing the thermostat while I'm in there...
 

Attachments

  • 20240329_125630.jpg
    20240329_125630.jpg
    297.6 KB · Views: 57
Bolting the fan clutch to the water pump is a bandaid referenced in the manual for a failed clutch. The original clutch which that is in your pic is unreliable at best which is why the 9 blade upgrade is the way to go.
 
I kind of assumed so.

Yes… the 9 blade and all the gear is the way we will be going during the “real restoration “.
 
Well it was as if the car said today… thank you for your valiant efforts sir and I really appreciate the water pump… but we have a thrown rod bearing.

So I took the car down to get its out of state inspection on Thursday…That when I heard what I thought was a knock but then the water pump was crunchy on inspection…So I replaced that today….

And… it’s short journey must have been a bit too much. It is knocking to beat the band. Motor shut down…. Not to be started again. Waiting for its trip to the new garage in a few weeks.

Just hope the damage is not too severe. Only one way to find out…

And so ends the preliminary stage.
 
Back
Top