
it's a big small world (picture from our family West Coast Holiday 6 years ago)And now for something completely different:
Angels Landind,Zion National Park. Two weeks ago.
View attachment 170886View attachment 170889
You are using an out of date browser. It may not display this or other websites correctly.
You should upgrade or use an alternative browser.
You should upgrade or use an alternative browser.
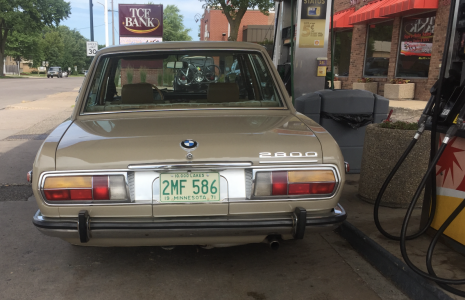
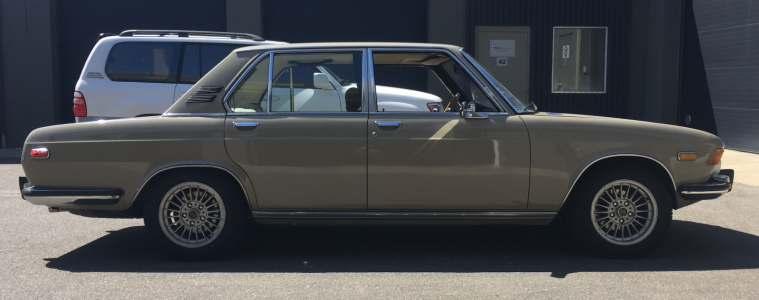
1971 2800 Sahara
- Thread starter Frederick
- Start date
OMG, Pain in the ass, does not even begin to describe it. I had four new door steals that came with the car, and none of them was worth the damn. The 3M adhesive works well and I wish I’d gone with the yellow instead of the black. It seems easier to clean up and it’s a little clearer. I must’ve taken the seal off on each door at least once possibly twice because as you say, the doors don’t close, especially the rear doors, and if they do close, don’t seal with the chassis. I gave up on the bottom part of the seals that I had. The part that seals into the frame works somewhat well again, except the rear doors don’t close because it sticks out too far. go figure. I ordered some aftermarket stuff Steele and used that for the bottom. It’s a different kind of rubber and gives a little better, still had trouble, and I’m still having trouble. The 3M 495 instant adhesive is your friend, cut and paste at will. Goo gone removes the excess, and even the areas with heavy adhesive. You just gotta let it sit and then scrape it off.Any words of wisdom on doing the door seals? Between not getting the adhesive to actually adhere to anything and not being able to close the doors because the new seals are too "thick", the job is a huge pain.
I also cut and pasted with some of the old seal and parts, where they were OK, and seemed like they fit better. I must have 200 hours in it.. It’s also important to make sure the doors fit and I’m not sure you had to take yours off, but I certainly did. Getting four doors and four frames to line up is no easy task. I don’t know why the new seals seem so much thicker in some places, but not in others. On the rear doors the part that goes behind the doorstop is way too thick and again the door wouldn’t close.
I’m not sure I can offer you words of wisdom, but I can certainly walk you through something that’s giving you a problem. I should be an expert at it by now, but I’m not.
I also went so far as to buy some flat pieces and use the 495 to extend or thicken where necessary. Checking to make sure the seals actually touch the frame and do in fact seal is important and you can use some kind of substance to verify it.
If you have specific questions or just need moral support, give me a call. I think in total I’ve spent the most time on the vehicle Between aligning the doors and frames and putting on the seals. I think I’d rather sand, the engine compartment again rather than nightmare. It just takes time and patience and I really can’t understand why it’s so difficult.
Wow, looks a lot less crowded than it has been of late. Didn’t need a permit at that time either. Great pic, just a fantastic hike. Unfortunate to be only four hours away.it's a big small world (picture from our family West Coast Holiday 6 years ago)
View attachment 172894
I plan on doing it again in the snow in February.
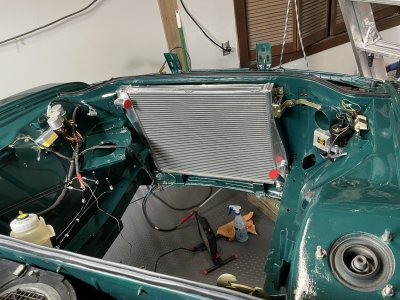
Done. Got the motor in no problem and took it for a test drive and made a video.
The project is slowed a bit, but it still keeps me busy with paint touchups, door seals and lately, chasing down the electrical gremlins, mostly caused by me.
I had the plugs on the back of the instrument panel reversed which, I don’t know how it happened but it was driving me nuts. I have become intimately familiar with the wiring diagram, and everything seems to work despite the fact that everything, i.e., alternator and starter, as well as the oil and water temp senders are not connected.
What I find a bit confusing is that the wiring diagrams do not always match the wires in my car. This may have occurred when the car was converted from an automatic to a force speed, which necessitated eliminated all the green and white wires for the carbs as well as changing the instrument panel. but in addition to that, it seems there’s some blending between the E9 and E3. specifically there’s a big fat yellow yellow wire on the dimmer switch that doesn’t even show up on the E3 diagram but without which the lights don’t work. This goes to a solder point on the E9 but isn’t even referenced on the E3. Also, on the E3 diagram, the oil sender and water temp sender use a brown and white wire whereas on the E9, the oil sender wire is brown and green as is the case with my car.
Basically, now waiting on the motor and interior both of which are out of my hands at this point. Motors due in mid February. which was originally October and then mid January. But this time I think it’s for real.
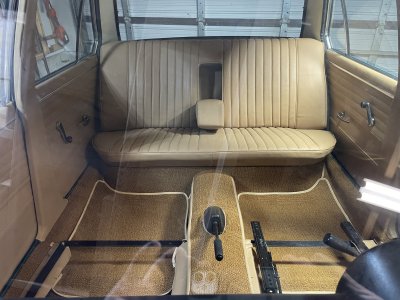
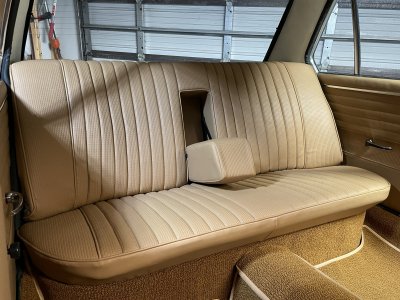
I got some of the upholstery in actually everything, but the front seats, needed more material. Armrest don’t match so put them on. Not sure how to match them.
Everything went great for the most part, panels were a little tricky. Backseat still needs some more foam.
Everything went great for the most part, panels were a little tricky. Backseat still needs some more foam.
Attachments

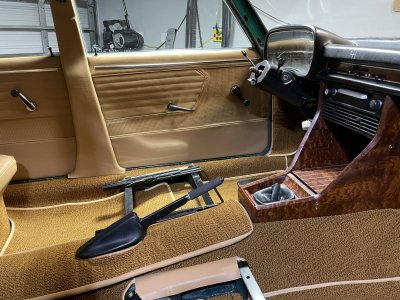
Finally decided on a steering wheel. This was a tough decision given the wood I already put in the console.
Horn is extremely loud!

Horn is extremely loud!
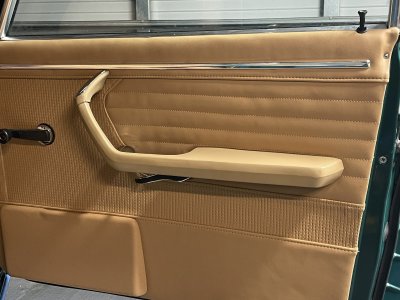
Finally got the front seats in and the two trim pieces on the windshield.. looks like I’m gonna have to paint the armrest as my upholsterer could not cover them.


Looks great, Frederick!
My stock 72 panels have about 4 colors going. Yours are much closer to what they should have been.

My stock 72 panels have about 4 colors going. Yours are much closer to what they should have been.
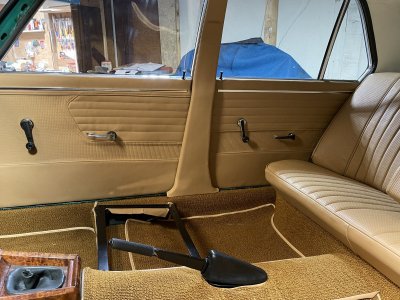
Thanks Steve, I think your door looks rather vintage!. fortunately I was able to save the plastic piece at the top of the armrest, which is very brittle.
That armrest looks the same as a pre 82 E24 and if so the chrome plastic caps are still available new I can see the door handles are the same
Yes, I was able to order two of the chrome pieces, but it’s the receptacle that bears the stress and they were somewhat cracked. Two part epoxy does wonders, it is still under a good bit of tension.That armrest looks the same as a pre 82 E24 and if so the chrome plastic caps are still available new I can see the door handles are the same
Stick on chrome, a marvel of the 21st-century.
I just hope it stays stuck because it looks OK. A little wavy maybe, might try again. You can see the paint peeling off in a couple of places as well. I’ll touch it up and see if it stays. The paint I used wasn’t the SEM material that’s supposed to stick to plastic/nylon but PPG. At $35 for a can, I can experiment.

I just hope it stays stuck because it looks OK. A little wavy maybe, might try again. You can see the paint peeling off in a couple of places as well. I’ll touch it up and see if it stays. The paint I used wasn’t the SEM material that’s supposed to stick to plastic/nylon but PPG. At $35 for a can, I can experiment.
Just stumbled on this thread and realized this is one that was in my possession for awhile... I'm the one that actually purchased it out of Colorado and then eventually sold it to the guy you purchased it from... I bought it for the color as I'm a big fan of "Nevada" but I have another E3 and had to make a choice.
Attachments
Last edited:
e30strube
Well-Known Member
Another possibility on the door panel... the upholstery shop I took mine to combined my factory Bavaria panel with a 3.0si panel. I then re-veneered the wood trim with an ebony wood (and did a matte clear coat). This also included a wrapped/stitched arm rest.

Now I’m having anxiety attacks over actually having to assemble this thing and make it operable. The learning curve begins again, and it has gotten steep and failing the test could be expensive. Seen as it’s all assembled. I don’t think I can screw it up too badly.
Going to start with the dual 38 downdrafts. Got rid of the water thingies underneath the intake manifold but now I have to do a workaround on the water flow from the heater.
I intend to load it from underneath, so I’m gonna have to make some kind of crate that will hold the motor and subframe with all the acuetrement attached, including the headers and transmission. The car is high and it’s on the dolly so I should be able to just role it over the motor on the subframe. Never done it before so only time will tell.
Oh, did I forget to mention that this is a Great forum. As always, I welcome all input, advice, suggestions, and ministrations on my sanity.
CHEERS
Congratulations, Frederick!
What a beautiful hunk of jewelry. I goes perfectly with the rest of the work you have done to this car.
What a beautiful hunk of jewelry. I goes perfectly with the rest of the work you have done to this car.
Thanks DickCongratulations, Frederick!
What a beautiful hunk of jewelry. I goes perfectly with the rest of the work you have done to this car.