3D Printed plastic gear for window regulator transmissio

Tony.dreamer

Raider of the lost parts
Site Donor $
Messages
770
Reaction score
193
Location
Edmond , Oklahoma
IMG_1396.JPG
3D printed gear I received from TravL350 was successfully installed. Although it will be a while before it is back on the car I am confident it will work fine because I tested it many times. For now here are few pictures I took and later when I do my next regulator I will be taking more detail photos. I was so anxious to see the end result that I didn't pay much attention to quatity or stages of( pictures ) I should take for this thread. I hope you find it useful, and accept this as my way of contributing back to this community!!!
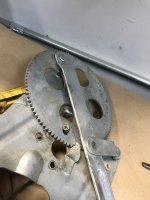
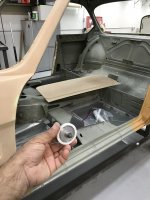
Photo above shows when window regulator is turned enough to align the Access hole for the third screw holding the transmission box to the regulator frame. This photo was taken after I took the Trasmission out.
 
Last edited:

Tony.dreamer

Raider of the lost parts
Site Donor $
Messages
770
Reaction score
193
Location
Edmond , Oklahoma
CAUTION!!!!!!!Before taking out the last Philips screw you should be aware that when you align the hole for access to the screw you have in fact put the mechanism under spring tension . To secure the mechanism so that it won't unwind on you and potentially hurt you I slide an allen wrench into the opposite end open screw hole locking it so it won't move once I remove the Philip screw and remove the gear as part of the transmission ..
You see the yellow piece portion of the Allen wrench pack I used on the left. You should also see the black tip of the Allen wrench sticking out.there is another photo later on in this thread that shows the Allen wrench pack better. You can alternatively use a small screw driver or something like that...
There may be other ways of securing the mechanism so it won't uncoil on you. But I found this method effective and easy !


IMG_1397.JPG
IMG_1398.JPG
 

Attachments

  • IMG_1399.JPG
    IMG_1399.JPG
    1.4 MB · Views: 292
Last edited:

Tony.dreamer

Raider of the lost parts
Site Donor $
Messages
770
Reaction score
193
Location
Edmond , Oklahoma
IMG_1395.JPG
IMG_1401.JPG
IMG_1402.JPG
IMG_1403.JPG

After removing the transmission you should remove the cover , the side with "Bosch" and part number on (no photos of it here) .
Mine was so easy it came apart as soon as I try to pry it open. There are 4 staked spots (punched in) of the casing that appears to be factory method of holding the cover onto the casing. Mine was rather loose....
Now you can see the plastic gear inside , I washed the grease out with solvent and cleaned it before start taking it apart.
You have two choices: 1) to remove the plastic gear with the shaft attached which is what I did this time or 2) remove the plastic gear off its shaft.
With either options you should try to support the transmission casing (or the gears) with different size socket to reduce the stress on the casing.
I decided to pull the plastic gear with its shaft. Lay the transmission flat on its back with gear on top. Get a hold of a punch and gently tap on the shaft of the gear increase intensity of the hitting until you notice the shaft is moving down. Use your judgement and not hit it too hard as you can brake the casing. You might want to apply some penetrating oil at the center and let it sit for a while...There is about 4 to 5 millimeters of space before the gear ends up in a same plane as the casing, and the shaft has no more room as it is hitting the table. So I used a pair of needle nose Plier and slide both tips of the plier under the gear, raising the shaft. And hitting the shaft center with the punch and gear came out . Notice you have a wave-washer under the gear and another one inside the casing too, right under the plastic gear. So one washer under the small metal gear and one under plastic gear. Now I have the plastic gear on its shaft freed from the casing . Secure ( set aside) the washers and casing for now ....
 
Last edited:

Tony.dreamer

Raider of the lost parts
Site Donor $
Messages
770
Reaction score
193
Location
Edmond , Oklahoma
IMG_1411.JPG
IMG_1412.JPG
IMG_1413.JPG
IMG_1414.JPG
IMG_1411.JPG

On the top photo notice how the gear teeth are worn off !!
Now I planed to remove the gear from the metal core . You will notice that the gear has incased the metal core on both side. You would also notice that the metal core is rather thin... comparing the new 3D gear I have with the the old one you kinda get the the idea what needs to be done. I figured I can not put too much pressure on the metal core or it will ruin it useless.... so I decided to sand it off and make the plastic part so thin that it will eventually peel off by hand.
Before starting the sanding process I washed the gear with solvent and starter Fluid again so that it won't gum up my sandpaper.
I put the gear at its shaft on to my drill, making sure that the surface if the shaft that touches the case bushing doe not get scratched, test spin it and it should feel balanced. Spinning it against a 40gris sand paper...
Have to make sure to pause and keep looking at the piece so that you won't grind any portion of the metal piece, or your fitment later could be loose....
After I was comfortable with how much I took off the outer surface I started sanding away the inside of the gear ....
The last picture shows as I started to peel off(push away) the remains of the plastic gear ...
 
Last edited:

Tony.dreamer

Raider of the lost parts
Site Donor $
Messages
770
Reaction score
193
Location
Edmond , Oklahoma
IMG_1415.JPG
IMG_1416.JPG
IMG_1418.JPG
and finally with little but careful effort the remains of the gear peeled off...
And wa lah here is the metal core.
Once again I used degreaser and brake cleaner to completely clean the metal core...
 
Last edited:

Tony.dreamer

Raider of the lost parts
Site Donor $
Messages
770
Reaction score
193
Location
Edmond , Oklahoma
IMG_1419.JPG
I Then removed the metal piece on its shaft from the drill and set it next to the new 3D printed gear, I noticed how precise of a fit I am going to get , and WOW , my hats off to TravL350 ..... I said to myself ,,,,,this is gonna work it seems .......
If it does I have to salute Travis when I meet him one day .. (by the way , later Sunday night I looked up Travis profile and I found out he is an Industrial designer .... isn't this forum great!! I am so lucky to have so many great people here on this forum, it makes it so much more fun......)
I was planning to use some type of glue or epoxy like JB weld to secure the 3D gear on to the metal core BUT NO I don't think you need it. It is such a perfect size that it will be there as long as the gear last, I think.
I used a large sucket, large enough to cover the inside edge of the new gear so it can evenly press on the metal piece into the gear..... gently and patiently tapping , and pressing it into place. You will be able to tell when you reach as far as it can go.... Don't over do it....
 
Last edited:

Tony.dreamer

Raider of the lost parts
Site Donor $
Messages
770
Reaction score
193
Location
Edmond , Oklahoma
and wa lah ,
I was so happy I took the new gear on its shaft and walked toward the car positioning it on its eventual place it will one day be..... bottom photo ofcourse...
 

Attachments

  • IMG_1420.JPG
    IMG_1420.JPG
    1 MB · Views: 313
  • IMG_1424.JPG
    IMG_1424.JPG
    1.4 MB · Views: 309
  • IMG_1425.JPG
    IMG_1425.JPG
    1.3 MB · Views: 336
  • IMG_1426.JPG
    IMG_1426.JPG
    1.4 MB · Views: 314
Last edited:

Tony.dreamer

Raider of the lost parts
Site Donor $
Messages
770
Reaction score
193
Location
Edmond , Oklahoma
now putting the gear back into the transmission is easy but don’t forget to put the wave-washer on inside of the casing and one on the outside , the washer needs to seat on the outside premiter of the casing shoulder ( inside and out)before you press in the metal gear drive... I then attached the transmissin on and tighten the two bolts and Philips screw back on and now you can slide out the Allen wrench holding the regulator from unwinding .....
I greased up the new gear and attached the newly cleaned (overhauled) motor and used a battery and tested the mechanism many many times and confident it should work without issues.. then attached the alluminum cover with some liquid gasket and carefully steaked them back on same four spots as the factory...

Best wishes!
Thank you again Travis!! (TraviL350)
 
Last edited:

Stevehose

Well-Known Member
Site Donor $$
Messages
12,933
Reaction score
5,598
Location
Sarasota, FL
this is great, i recommend some loctite on the 3 screws as these have a habit of loosening over time.
 

TravL350

Well-Known Member
Site Donor
Messages
163
Reaction score
78
Location
Winston-Salem, NC
Awesome job, Tony! Glad it seems the parts will work out for you. Just an alternative way of getting the plastic off the metal core, I used a sharp knife and cut through the old plastic in several places then it peeled off fairly easily.
Also - a reminder to others, be sure to clean and lubricate everything on the regulator itself or the new plastic gears will suffer the same fate as the original parts.

If anyone else needs them, I can have the plastic ones printed and sent to you directly from Xometry for around $15 each. Tony got 2 plastic ones shipped to him for $32 or something like that. The stainless / brass I think were going to be around $55 each. I still haven't had a chance to test the metal ones. The price goes down slightly for every additional part ordered. This is purely the cost, and I'm not interested in trying to make a profit on them. Glad to send some your way if needed, just PM me your address and how many you need.

-Travis
 

Tony.dreamer

Raider of the lost parts
Site Donor $
Messages
770
Reaction score
193
Location
Edmond , Oklahoma
Travis ,
I did just like you said . I soaked the regulators overnight in solvents once I pulled off the transmission and motor.
Then scrub them with scotch bright and used a curved tool to reach into the track. I then dismantled the guide cleaned and scrubbed every piece. I even run my fingers against the guide over the tracks and noticed the factory burrs and I took a file and carefully smooth those over , then used sandpaper and shine polished the tracks. I realized that I should not over do this as some grip was intended specially since there is spring temtion involved. I had already dismantled the motors and rebuild them. I consider the motors extremely durable. I believe my windows will be perhaps one of the fastest this side of Mississippi River , if not the fastest Moving windows in E9 world . I guess I have to wait and see after I install them on the car. I Hooked up motors , the battery and tested them making sure I have plenty of fresh Lubricants on and in the tracks . I spend about three hours on two back units.
All I have left is rebuilding the last motor (dismantle and sand the rust off and polish the bushings, brushed and polish the copper brush contacts )
I am very pleased with the end result as you notice from my enthusiasm, and about the gears you came up with Travis!
Thank you again Travis!

Cheers
Tony P.
 
Last edited:

jmackro

Well-Known Member
Messages
2,452
Reaction score
721
Location
San Juan Capistrano, Ca.
I believe my windows will be perhaps one of the fastest, if not the fastest Moving windows in E9 world .

I am impressed with the amount of work and quality of work that you are performing. And agree that among the people still using stock "sardine can" window motors, your's may be among the fastest.

However, you'll never win a window race against someone who has made the (simple) conversion to the later, e28 motor and gearbox. I wish I could find the link, but someone posted a video a few months/years/decades back here on e9coupe.com showing e28 and sardine can motors rotating; the e28 output gear just spins faster, even with no load. Add the mass & friction of the window mechanism to the equation, and the higher torque e28 motors produce far faster movement.

Again, I admire your efforts to improve the stock system. But this exercise is sort of like working to perfectly tune a 2800cc engine and then expecting it to win a drag races against a 3.5 L's.
 

Tony.dreamer

Raider of the lost parts
Site Donor $
Messages
770
Reaction score
193
Location
Edmond , Oklahoma
However, you'll never win a window race against someone who has made the (simple) conversion to the later, e28 motor and gearbox. I wish I could find the link, but someone posted a video a few months/years/decades back here on e9coupe.com showing e28 and sardine can motors rotating; the e28 output gear just spins faster, even with no load. Add the mass & friction of the window mechanism to the equation, and the higher torque e28 motors produce far faster movement.

Again, I admire your efforts to improve the stock system. But this exercise is sort of like working to perfectly tune a 2800cc engine and then expecting it to win a drag races against a 3.5 L's.[/QUOTE]

Thank you for your reply and comments.
I continue learning from this forum members. In fact that is one of the reasons that keeps me motivated!
The video is impressive same fast speed up or down and the movement is homogenous!!!!
I made some slight modifications to the tracks ( who knows I might regret it later ) but I am confident it will be very fast perhaps as fast as the conversion to e28 motor on the way up and on the way down it will be slower (but faster than most) due to the slower motor speed.

Cheers!
 
Last edited:

jmackro

Well-Known Member
Messages
2,452
Reaction score
721
Location
San Juan Capistrano, Ca.
In time I will definitely plan on expremienting w e28 windows motors as well.
Any suguestions and comments is greatly appreciated !!!!

For more info on converting to e28 motors, see:

https://sites.google.com/site/kdelimon/windowmotorconversion1

and

https://sites.google.com/site/kdelimon/windowmotorconversion2

One other (obvious) tip for fast window action: make sure your window tracks are well-aligned, and well lubricated. Disconnect the window from the regulator and move it up and down by hand, feeling for points where it binds. Eliminating binding and friction will go a long way toward producing faster motion.
 
Top