'73 3.0CS - M88 Jerez Schwarz build

nosmonkey

In Rust We Trust
Site Donor
Messages
1,103
Reaction score
1,002
Location
London, UK
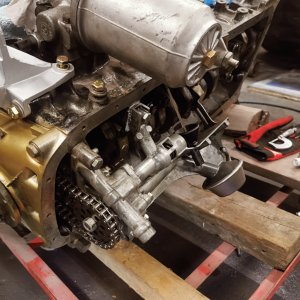
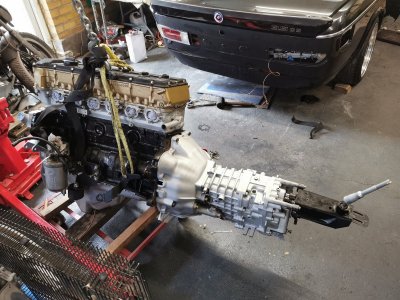
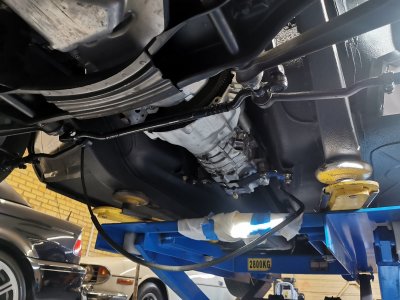
Oil pump shimmed and double triple checked everything was torqued down properly whilst in there.

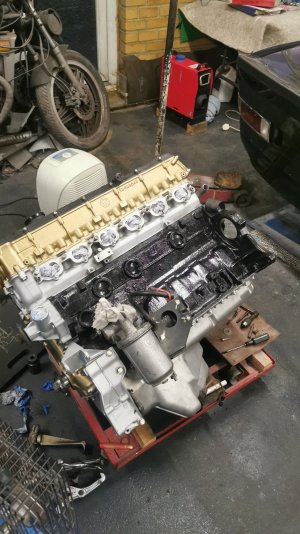
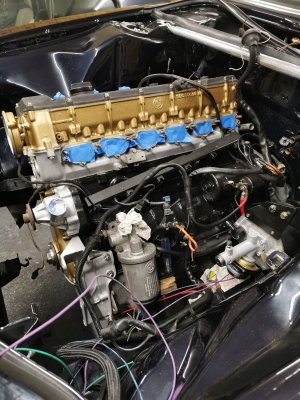
Also picked up an unobtanium m88 valve shim tool but 2 of my buckets are chipped so waiting for some new valve shims to finish the job and also now trying to source 2 buckets which are NLA.
 

Attachments

  • IMG_20240121_171845_097.jpg
    IMG_20240121_171845_097.jpg
    373.5 KB · Views: 224

nosmonkey

In Rust We Trust
Site Donor
Messages
1,103
Reaction score
1,002
Location
London, UK
Pulled the speedo drive and worm gear out the 4 speed and fitted it onto the 265 OD box. Just waiting for shaft seals to finish up.

Also picked up the electric brake booster to ditch the horrible rhd layout.
 

Attachments

  • IMG_20240122_174405.jpg
    IMG_20240122_174405.jpg
    313.7 KB · Views: 122
  • IMG-20240122-WA0018.jpeg
    IMG-20240122-WA0018.jpeg
    188.4 KB · Views: 123

nosmonkey

In Rust We Trust
Site Donor
Messages
1,103
Reaction score
1,002
Location
London, UK
Valve clearances are all spot on and managed to replace the 2 damaged buckets. A huge thank you to @roundel for the assistance. Just waiting on the hardened crank hub and clutch to arrive so those can get fitted, then the engine can get dropped into place!
 

Attachments

  • IMG_20240128_190341_613.jpg
    IMG_20240128_190341_613.jpg
    306.5 KB · Views: 100

nosmonkey

In Rust We Trust
Site Donor
Messages
1,103
Reaction score
1,002
Location
London, UK
Gearbox all re sealed and ready to go. The IE DSSR makes an incredible difference to the feel.
Just waiting on clutch and a few bolts and this should be getting dropped in a week or 2!
 

Attachments

  • IMG_20240204_164823.jpg
    IMG_20240204_164823.jpg
    389.9 KB · Views: 79
  • IMG-20240204-WA0039.jpeg
    IMG-20240204-WA0039.jpeg
    307.3 KB · Views: 99

nosmonkey

In Rust We Trust
Site Donor
Messages
1,103
Reaction score
1,002
Location
London, UK
Fitted up the front speakers. 3.5" rockford fosgate punch 132s. Used these before in another car and they are fantastic speakers for the price and size. Had to "massage" the a pillar hole about 3mm either side with a persuasion hammer as they have quite large magnets for the size. Also cut the a pillar covers and fitted speaker covers up. These will need to come back off to reroute the sunroof tubes and also fit the leather a pillar welts.

The pvc covering on the seat belts had also worn through and generally fallen apart. Some conduit and heatshrink on top and they look near identical to original. Note also UK specific britax sestbelts
 

Attachments

  • IMG_20240218_193421.jpg
    IMG_20240218_193421.jpg
    218.3 KB · Views: 80
  • IMG_20240218_193921.jpg
    IMG_20240218_193921.jpg
    258 KB · Views: 81
  • IMG_20240218_141911.jpg
    IMG_20240218_141911.jpg
    299.4 KB · Views: 74
  • IMG_20240218_141925.jpg
    IMG_20240218_141925.jpg
    248.8 KB · Views: 87

nosmonkey

In Rust We Trust
Site Donor
Messages
1,103
Reaction score
1,002
Location
London, UK
Hardened crank hub fitted. The old one had definitely broken a dowel pin at some point as there was signs it had spun, some scoring on the crank but nothing major, new dowel pin, hub, and revised nut/washer fitted. Also got the flywheel and clutch fitted and the engine mounts.

All that's left now is to move the engine to the front of the car and drop it in!
 

Attachments

  • IMG_20240224_151520.jpg
    IMG_20240224_151520.jpg
    442 KB · Views: 82

nosmonkey

In Rust We Trust
Site Donor
Messages
1,103
Reaction score
1,002
Location
London, UK
Went in the garage today to clean up the floor a bit to prep for engine install next week.

Got bored, ended up slotting the lump in!
 

Attachments

  • IMG_20240225_171424.jpg
    IMG_20240225_171424.jpg
    317.2 KB · Views: 74
  • IMG_20240225_170754.jpg
    IMG_20240225_170754.jpg
    273.5 KB · Views: 66

nosmonkey

In Rust We Trust
Site Donor
Messages
1,103
Reaction score
1,002
Location
London, UK
Gearbox in, also sorted out the fitment of the new brake servo, twin circuit but only one booster so saves a fair bit of weight and space. Mounts up on the standard brackets with a small adaptor plate. Also shifted the header tank over slightly for more clearance to the plenum.

Need to sandblast and paint the booster brackets then get them fitted back in, then time to start on the pipework!
 

Attachments

  • IMG_20240316_165241.jpg
    IMG_20240316_165241.jpg
    389.7 KB · Views: 49
  • IMG_20240302_145917.jpg
    IMG_20240302_145917.jpg
    269.4 KB · Views: 53

nosmonkey

In Rust We Trust
Site Donor
Messages
1,103
Reaction score
1,002
Location
London, UK
Brackets painted up and the servo sits quite nicely in there. Also moved the header tank over about 20mm and dropped the engine for the linkage to clear the hood. Made a start on the wiring, removing the unnecessary gubbins from the m88 harness which has left me with about 8 wires to connect up to the body harness, mostly for gauges. Just waiting on some connectors to arrive as well as brake pipe fittings, and can carry on!
 

Attachments

  • IMG_20240317_131054.jpg
    IMG_20240317_131054.jpg
    271.7 KB · Views: 44
  • IMG_20240317_131702.jpg
    IMG_20240317_131702.jpg
    352.2 KB · Views: 45
  • IMG_20240317_195800.jpg
    IMG_20240317_195800.jpg
    392.6 KB · Views: 62

nosmonkey

In Rust We Trust
Site Donor
Messages
1,103
Reaction score
1,002
Location
London, UK
I guess things have come full circle and now it's my turn to shout keep the damn flash light steady
 

Attachments

  • IMG-20240318-WA0004.jpg
    IMG-20240318-WA0004.jpg
    224.7 KB · Views: 55

nosmonkey

In Rust We Trust
Site Donor
Messages
1,103
Reaction score
1,002
Location
London, UK
A bit more done, engine harness now located and the ecu and relays under the dash just waiting for final mounting. Famous last words but seems pretty straightforward. A few wires run from the painless harness to the engine harness for the temp gauge, battery charge and pressure lights. This would have gone through the fuse box on the M5. Alternator exciter wire on the painless harness can be used to power the main relay as it sees battery voltage. OBC harness needs to be played with as the OBC that the e28 would have had also acts as an immobilising relay due to the code sequence feature. Feeding ignition power to the green wire bypasses this. Black wire coming out of pin 21 goes to the tacho.

Throttle bodies fitted and rod lengths set ready to synchronise tomorrow with the dial gauge. Heater pipes go straight on with no modification, header tank pipe fits but is a little stretched and I'm not too happy with that. Will pop over to BMW Friday and see if they have any radiator hoses in stock.
 

Attachments

  • IMG_20240319_173924.jpg
    IMG_20240319_173924.jpg
    365.6 KB · Views: 51

nosmonkey

In Rust We Trust
Site Donor
Messages
1,103
Reaction score
1,002
Location
London, UK
Not a huge amount done lately, mostly little odds and sods on wiring, brake pipe holders for the struts, and picked up some m5 water pipes which looks like an e28 m5 radiator should go straight in. Original throttle linkage goes on with some extension, and also got a bunch of bmw hose clips as at £1.50 each is a no brainer.
 

Attachments

  • IMG_20240407_185317.jpg
    IMG_20240407_185317.jpg
    275.4 KB · Views: 27
  • IMG_20240407_185325.jpg
    IMG_20240407_185325.jpg
    217.7 KB · Views: 29
  • IMG_20240407_194250.jpg
    IMG_20240407_194250.jpg
    248.7 KB · Views: 28
  • IMG_20240406_185944.jpg
    IMG_20240406_185944.jpg
    348.1 KB · Views: 41

nosmonkey

In Rust We Trust
Site Donor
Messages
1,103
Reaction score
1,002
Location
London, UK
Not a huge amount to report with progress being quite slow lately. Brake pipes nearly done, e28 m5 radiator fits in with slight trimming to one of the brackets and the e9 lower rad rubbers given an extra slot as the rad core is slightly thinner. Will need to fab a bracket on the O/S but overall a pretty simple affair.

Few more bits on order from BMW, various nuts, bolts, clips and pipes. Will be cracking on with the fuel system next, installing the efi pump conversion into the carb tank, running the lines up,then it's fit an oil cooler and we should be ready for a test fire!
 

Attachments

  • IMG_20240420_164550.jpg
    IMG_20240420_164550.jpg
    400.7 KB · Views: 20
Top